This tutorial assumes you have some familiarity with Ansible and are comfortable with writing and running playbooks. If not, please consider following our Ansible Tutorial first.
Here we’ll see how to install a Galaxy server using an Ansible playbook. The Galaxy Project has decided on Ansible for all of its deployment recipes. For our project, Ansible is even more fitting due to its name:
An ansible is a category of fictional device or technology capable of instantaneous or faster-than-light communication. It can send and receive messages to and from a corresponding device over any distance or obstacle whatsoever with no delay, even between star systems
We want to give you a comprehensive understanding of how the Galaxy installation occurs, but we want to avoid you having to write a “custom” Galaxy installation playbook which you would eventually throw away, in order to use the official playbooks. Given these goals, we will go through the playbook in depth first, and then move to a hands-on portion later. If you are not interested in the inner workings, you can skip to that section now.
The yearly Galaxy Admin Training follows a specific ordering of tutorials. Use this timeline to help keep track of where you are in Galaxy Admin Training.
These Ansible roles and training materials were last tested on Centos 7 and Ubuntu 18.04, but will probably work on other RHEL and Debian variants.
The roles that are used in these training are currently used by usegalaxy.*, and other, servers in maintaining their infrastructure. (US, EU, both are running CentOS 7)
If you have an issue running these trainings on your OS flavour, please report the issue in the training material and we can see if it is possible to solve.
The official role is extremely configurable, everything that you want to change is exposed as a variable, and then tasks will change behaviour based on that. The role documentation is the most up-to-date source of documentation for the variables. You should take a minute and read over the variables listed there.
The important variables for this tutorial are:
galaxy_root
galaxy_commit_id
galaxy_config
galaxy_server_dir (automatically set based on galaxy_root)
These are largely self explanatory: a directory for all of Galaxy’s code and configuration, which commit should be installed, and the Galaxy configuration. We will not explain Galaxy configuration variables in detail as they are covered sufficiently in the galaxy.yml sample file or the online documentation.
The official recommendation is that you should have a variables file such as group_vars/galaxyservers.yml for storing all of the Galaxy configuration.
The actions each set of tasks performs are described below.
Cloning Galaxy
The clone task is the one which is primarily interesting to us, it downloads Galaxy, using git, at a specific commit (or more generally, any git reference).
Ansible tries to update Galaxy, cloning it if it is missing, or otherwise attempting to update to the correct commit (or latest commit of the given branch).
Any change is reported.
The virtualenv is set up:
An empty virtualenv is created.
Pip is updated within the virtualenv.
Any .pyc files are removed, as this can occasionally result in Python loading the cached code, even if the corresponding .py file is no longer present at the checked-out commit. For safety, all of these are removed.
With that Galaxy is cloned to disk and is ready to be configured by the next task.
The directories for Galaxy configuration data and for the shed tools are created
Any config files are copied over
Any templates are copied over
The galaxy.yml is deployed
The setup for deploying extra Galaxy configuration templates and files is a little bit non-standard by Ansible best practices. Here you are expected to provide your own templates and static config files, and then describe them as a list of files and where they should be deployed to.
Using the UseGalaxy.eu configuration as an example, we have something like:
So the references in galaxy_config_templates to galaxy_config are done to ensure that the setting for e.g. “location of the datatypes config file” is the same between where we have configured Galaxy to looking for it, and where the file has been deployed, without requiring us to make variables changes in numerous places.
Using variables, either by defining them ahead of time, or simply accessing them via existing data structures that have been defined, e.g.:
# defining a variable that gets reused is great! galaxy_user:galaxy
galaxy_config: galaxy: # Re-using the galaxy_config_dir variable saves time and ensures everything # is in sync! datatypes_config_file:"{{galaxy_config_dir}}/datatypes_conf.xml"
# and now we can re-use "{{ galaxy_config.galaxy.datatypes_config_file }}" # in other places!
Practices like those shown above help to avoid problems caused when paths are defined differently in multiple places. The datatypes config file will be copied to the same path as Galaxy is configured to find it in, because that path is only defined in one place. Everything else is a reference to the original definition! If you ever need to update that definition, everything else will be updated accordingly.
Dependencies
Now that Galaxy is available on disk, Ansible is ready to start processing dependencies of Galaxy.
The virtualenv is updated with data from the galaxy_requirements_file, by default pointing to the requirements file in the codebase: {{ galaxy_server_dir }}/lib/galaxy/dependencies/pinned-requirements.txt.
This task creates a directory and initializes “mutable” (written/managed by Galaxy itself) configuration files. It also deploys any hand-managed mutable config files, but it is unlikely that you want to manage these directly, as Galaxy does a sufficient job. Any changes you make to Galaxy, for example installing some tools, would result in the tools being “forgotten about”, if you re-ran the playbook and overwrote the shed_tool_conf.xml mutable config file with a hand-managed one.
Managing the Database
The database management tasks are extremely convenient; any time you run the playbook to update Galaxy, this will automatically run the database schema migration as needed.
The role first obtains the current DB version and the maximum possible DB version based on the codebase.
If needed, the database is created.
Both versions are reported for the runner of the playbook.
If the versions are different, then Ansible runs the command to upgrade the database to the latest version.
As an administrator who often forgot to run the upgrade, and would only notice it once Galaxy crashed during startup, having this process completely automated is extremely nice.
Building the Client
Galaxy is a modern web application that includes both a server (written in Python) and a client (written in Javascript). After the server is installed and its database prepared, the next step is to build the client application. This means fetching its dependencies, bundling components, creating minified copies of static content, etc. This process ensures that the smallest possible amount of data is transferred to the user when accessing Galaxy over the web, which is important for the performance of the website.
This process can be lengthy and resource intensive. If you want to speed up your deployment, set galaxy_client_use_prebuilt: true and Ansible will download a prebuilt client using yarn.
The client lives in the Galaxy code under the client/ directory, and the build process deploys it to the static/ directory, which we will configure a webserver to serve in this tutorial.
Handlers
A number of the tasks that are executed will trigger a restart of Galaxy. The auto-magic implementation of this restart handler should work for most cases, but it is possible to define your own custom handlers if necessary. If this is the case for you, the role provides a way to do this by notifying handlers that “listen” to certain notifications. See the role handlers for details.
Defaults
As with other roles, numerous default values are provided, but these are useful mostly as reference, and not to go through individually.
Summary
Installation of Galaxy with the playbook follows generally the steps you would expect:
Galaxy is cloned (or updated)
A virtualenv is created if it doesn’t exist
Configuration files are installed
Any missing dependencies are installed
Any database updates are applied
The client application is built and deployed (to save time set galaxy_client_use_prebuilt: true)
It would not be difficult to write a role that does this yourself, but by using
the galaxyproject.galaxy role, you know that you’re getting all of the Galaxy
best practices and knowledge from previous admins codified for you.
Installing Galaxy
With the necessary background in place, you are ready to install Galaxy with Ansible. The playbooks will start simple, and grow over time. We will start with the minimal Galaxy playbook which only requires setting the galaxy_root and expand from there. First, however, we need a database for Galaxy to connect to, so we will do that now.
To proceed from here it is expected that:
Comment: Requirements for Running This Tutorial
You have Ansible installed on the machine where you will install Galaxy
Comment: Running Ansible on remote machine
It is possible to have Ansible installed on your laptop/local machine and run it against some remote hosts as well. We will not do that in this training.
Your ansible version is >=2.10, you can check this by running ansible --version
You have an inventory file with the VM or host specified where you will deploy Galaxy and Galaxy’s database. We will refer to these group of hosts as “galaxyservers” and “dbservers,” respectively.
Your VM has a public DNS name: this tutorial sets up SSL certificates from the start and as an integral part of the tutorial.
Your VM has python3 installed.
If you follow the official Ansible instructions to install Ansible on a blank machine, you will probably end up with py2 installed. You will need to install python3 in addition.
In your inventory file, you have written the full DNS hostname that has been provided, and notlocalhost, as we will be requesting SSL certificates.
You have the following ports exposed:
22 for SSH, this can be a different port or via VPN or similar.
80 for HTTP, this needs to be available to the world if you want to follow the LetsEncrypt portion of the tutorial.
443 for HTTPs, this needs to be available to the world if you want to follow the LetsEncrypt portion of the tutorial.
5671 for AMQP for Pulsar, needed if you plan to setup Pulsar for remote job running.
Comment: Ubuntu or Debian, CentOS or RHEL?
The training tutorial is only tested on Ubuntu, as that is the training platform most often used. The training should work on RHEL/CentOS, and the roles we use are definitely compatible with both. If any of the variable values differ between Ubuntu and CentOS, we try to note it in the tutorial. Any places we don’t note it are bugs.
There are known issues with CentOS7 and python3, which is used in this tutorial. If you use this setup, you should have python2 and python3 coexisting, and use python2 for Ansible (i.e. do not set interpreter_python in your ansible.cfg) and python3 for Galaxy. This setup requires numerous changes that you will need to discover, which are not covered in this tutorial.
On older versions, both python-psycopg2 and python3-psycopg2 may need to be installed.
CentOS8 (and RHEL in general) have significantly different package names for some modules, beware!
Requirements
We have codified all of the dependencies you will need into a YAML file that ansible-galaxy can install.
Hands On: Installing roles
Create a new directory galaxy in your home folder, and cd into that directory
Create a new file in your working directory called requirements.yml and include the following contents:
If you haven’t worked with diffs before, this can be something quite new or different.
If we have two files, let’s say a grocery list, in two files. We’ll call them ‘a’ and ‘b’.
Code In: Old
$ cat old
🍎
🍐
🍊
🍋
🍒
🥑
Code Out: New
$ cat new
🍎
🍐
🍊
🍋
🍍
🥑
We can see that they have some different entries. We’ve removed 🍒 because they’re awful, and replaced them with an 🍍
Diff lets us compare these files
$ diff old new
5c5
< 🍒
---
> 🍍
Here we see that 🍒 is only in a, and 🍍 is only in b. But otherwise the files are identical.
There are a couple different formats to diffs, one is the ‘unified diff’
$ diff -U2 old new
--- old	2022-02-16 14:06:19.697132568 +0100
+++ new	2022-02-16 14:06:36.340962616 +0100
@@ -3,4 +3,4 @@
 🍊
 🍋
-🍒
+🍍
 🥑
This is basically what you see in the training materials which gives you a lot of context about the changes:
--- old is the ‘old’ file in our view
+++ new is the ‘new’ file
@@ these lines tell us where the change occurs and how many lines are added or removed.
Lines starting with a - are removed from our ‘new’ file
Lines with a + have been added.
So when you go to apply these diffs to your files in the training:
Ignore the header
Remove lines starting with - from your file
Add lines starting with + to your file
The other lines (🍊/🍋 and 🥑) above just provide “context”, they help you know where a change belongs in a file, but should not be edited when you’re making the above change. Given the above diff, you would find a line with a 🍒, and replace it with a 🍍
Added & Removed Lines
Removals are very easy to spot, we just have removed lines
--- old	2022-02-16 14:06:19.697132568 +0100
+++ new	2022-02-16 14:10:14.370722802 +0100
@@ -4,3 +4,2 @@
 🍋
 🍒
-🥑
And additions likewise are very easy, just add a new line, between the other lines in your file.
--- old	2022-02-16 14:06:19.697132568 +0100
+++ new	2022-02-16 14:11:11.422135393 +0100
@@ -1,3 +1,4 @@
 🍎
+🍍
 🍐
 🍊
Completely new files
Completely new files look a bit different, there the “old” file is /dev/null, the empty file in a Linux machine.
We’ll cover it in more detail as we use each of the roles but briefly:
Role
Purpose
galaxyproject.galaxy
Installs and configures the Galaxy application
galaxyproject.nginx
Sets up a webserver
galaxyproject.postgresql
Installs our database, PostgreSQL
galaxyproject.postgresql_objects
Creates users and databases within PostgreSQL
galaxyproject.miniconda
Installs miniconda, which is used by Galaxy
usegalaxy_eu.certbot
Installs certbot and requests SSL certificates
Q: Is there a correspondence between galaxy role versions and galaxy versions?
A: They are correlated (because generally new Galaxy versions could introduce e.g. new configuration options that the galaxy role would then need to adopt), but the Galaxy role can install older versions of Galaxy.
This will install all of the required modules for this training into the roles/ folder. We choose to install to a folder to give you easy access to look through the different roles when you have questions on their behaviour.
Inspect the contents of the newly created roles/ directory in your working directory.
It’s good practice to put your playbooks and configuration files under version control (usually in a git repository), but there is no need to keep track of the content of the roles/ directory, as all of that data can be perfectly recreated from the requirements.yml file.
If you plan to put this git repository online (e.g. on GitHub), any file containing clear-text passwords should never ever be committed to the repository, even if the repository is private. For this reason, we should tell git, ahead of time, to ignore one such file, .vault-password.txt , which will use later on in this lesson.
To configure git to ignore certain files and directories, they need to be listed in a file called .gitignore , which should be instead tracked as part of your git repository. You can now create the .gitignore file with the following content:
When you run git status you’ll notice that the roles/ folder is not listed among the other “Untracked files”.
Now you can do git add . to add all of the files in the current directory to your repository, and not worry about committing these files and directories by mistake!
Hands On: Configuration files
Create a ansible.cfg file (next to your playbook) to configure settings like the inventory file (and save ourselves some typing!), or the Python interpreter to use:
--- /dev/null
+++ b/ansible.cfg
@@ -0,0 +1,11 @@+[defaults]
+interpreter_python = /usr/bin/python3
+inventory = hosts
+# Use the YAML callback plugin.
+stdout_callback = yaml
+# Use the stdout_callback when running ad-hoc commands.
+bin_ansible_callbacks = True
+
+# Show diffs of changes
+[diff]
+always = True
As mentioned in the “Ubuntu or Debian, CentOS or RHEL?” comment above, if you are using CentOS7 do not set interpreter_python in ansible.cfg .
There is an additional useful option that you might want to add to your ansible.cfg file if you are connecting over SSH:
[ssh_connection]pipelining=true
Pipelining will make Ansible run faster by significantly reducing the number of new SSH connections that must be opened.
Create the hosts inventory file if you have not done so yet, defining a [galaxyservers] group with the address of the host where you want to install Galaxy. If you are running Ansible on the same machine where Galaxy will be installed to, you should set the ansible_connection=local variable. Lastly, you should explicitly set the ansible_user variable to the username to use when connecting to the server. Ansible has changed its behaviour over time regarding whether or not ansible_user is defined, and it is most effective to define it explicitly even when it can sometimes be inferred.
You should also define a [dbservers] group for the hosts that will run Galaxy’s database. In many cases (and in the case of the Galaxy Admin Training), these will be the same host, but the tutorial is designed to support either scenario, and helps to strengthen understanding of the purpose of host groupings in Ansible for more advanced real-world deployments. Here however we suggest using [dbservers:children] and adding galaxyservers as the child of that.
In the hosts file above, we have defined the galaxyservers group to be a “child” of the dbservers group. This means that the host defined in [galaxyservers] is also a member of [dbservers]. If we instead wanted to define a separate host as the Galaxy database server, we would replace the [dbservers:children] section with something like:
[dbservers]galaxy-db.example.org
Create the group_vars directory and create the file group_vars/all.yml. These variables are applied to all hosts, regardless of group membership. The variables we set will be used to ensure Python 3 is always used on older systems where Python 2 might also still be installed. We will also set a few variables that must be known by both the Galaxy server and the database server: Galaxy’s system/database username, as well as the database name.
Code In: Bash
cat group_vars/all.yml
Code Out: Bash
--- /dev/null
+++ b/group_vars/all.yml
@@ -0,0 +1,7 @@+---
+# Python 3 support
+pip_virtualenv_command: /usr/bin/python3 -m venv # usegalaxy_eu.certbot, usegalaxy_eu.tiaas2, galaxyproject.galaxy
+
+# Common variables needed by all hosts
+galaxy_user_name: galaxy
+galaxy_db_name: galaxy
PostgreSQL
Galaxy is capable of talking to multiple databases through SQLAlchemy drivers. SQLite is the development database, but PostgreSQL (/ˈpoʊstɡrɛs ˌkjuː ˈɛl/, POHST-gres kyoo el) is recommended in production. MySQL is a possibility, but does not receive the same testing or bugfixes from the main development team as PostgreSQL, so we will only show installation with PostgreSQL.
PostgreSQL maintains its own user database apart from the system user database. By default, PostgreSQL uses the “peer” authentication method which allows access for system users with matching PostgreSQL usernames (other authentication mechanisms are available, see the PostgreSQL Client Authentication documentation.
For this tutorial, we will use the default “peer” authentication, so we need to create a PostgreSQL user matching the system user under which Galaxy will be running, i.e. galaxy. This is normally done with the PostgreSQL createuser command, and it must be run as the postgres user. In our case, we will use the galaxyproject.postgresql_objects role to handle this step.
Hands On: Installing PostgreSQL
Create and edit group_vars/dbservers.yml and add some variables to configure PostgreSQL:
Notice that we have used the variables we defined in group_vars/all.yml for the Galaxy user and database names in the previous section, implementing the principle of “define once, reference many times.”
To use postgres via another machine, or via the network, you can add lines like the following:
postgresql_pg_hba_conf:-host all all 127.0.0.1/32 md5
Here you should either add multiple lines per IP address that needs access to the Postgres server (with netmask /32), or a less specific IP range defined also via netmask.
Additionally you’ll need to change the postgresql_objects_users statement to include a password (maybe stored in a vault, discussed later!)
postgresql_objects_users:-name:galaxypassword:""
Create and open galaxy.yml which will be our playbook. Write the following:
Create a play that will run on the dbservers group, as the root user (you will need become/become_user)
Add a pre-task to install the necessary dependency at this stage: acl
Use the role galaxyproject.postgresql. This will handle the installation of PostgreSQL.
Use the role galaxyproject.postgresql_objects, run as the postgres user. This role allows for managing users and databases within PostgreSQL.
The bare role name is just simplified syntax for the roles, you could equally specifiy role: <name> every time but it’s only necessary if you want to set additional variables like become_user
{ Y, true, Yes, ON   }    : Boolean true
{ n, FALSE, No, off  }    : Boolean false
Run the playbook:
Code In: Bash
ansible-playbook galaxy.yml
Code Out: Bash
Note: we have stripped out the “diff” output for compactness, your output will be more verbose.
PLAY[dbservers]***************************************************************TASK[Gathering Facts]*********************************************************ok:[gat-0.eu.galaxy.training]TASK[Install Dependencies]****************************************************changed:[gat-0.eu.galaxy.training]TASK[galaxyproject.postgresql : include_tasks]********************************included:/home/ubuntu/galaxy/roles/galaxyproject.postgresql/tasks/debian.ymlforgat-0.eu.galaxy.trainingTASK[galaxyproject.postgresql : APT keyrings directory]***********************skipping:[gat-0.eu.galaxy.training]TASK[galaxyproject.postgresql : Install pgdg package signing key (Debian/pgdg)]***skipping:[gat-0.eu.galaxy.training]TASK[galaxyproject.postgresql : Install pgdg repository (Debian/pgdg)]********skipping:[gat-0.eu.galaxy.training]TASK[galaxyproject.postgresql : Install PostgreSQL (Debian)]******************changed:[gat-0.eu.galaxy.training]TASK[galaxyproject.postgresql : Get installed version]************************ok:[gat-0.eu.galaxy.training]TASK[galaxyproject.postgresql : Set version fact]*****************************ok:[gat-0.eu.galaxy.training]TASK[galaxyproject.postgresql : Install psycopg2]*****************************changed:[gat-0.eu.galaxy.training]TASK[galaxyproject.postgresql : Set version fact]*****************************skipping:[gat-0.eu.galaxy.training]TASK[galaxyproject.postgresql : Set OS-specific variables]********************ok:[gat-0.eu.galaxy.training]TASK[galaxyproject.postgresql : Set pgdata fact]******************************ok:[gat-0.eu.galaxy.training]TASK[galaxyproject.postgresql : Set conf dir fact]****************************ok:[gat-0.eu.galaxy.training]TASK[galaxyproject.postgresql : include_tasks]********************************skipping:[gat-0.eu.galaxy.training]TASK[galaxyproject.postgresql : Create conf.d]********************************ok:[gat-0.eu.galaxy.training]TASK[galaxyproject.postgresql : Check for conf.d include in postgresql.conf]***ok:[gat-0.eu.galaxy.training]TASK[galaxyproject.postgresql : Set conf.d include in postgresql.conf]********skipping:[gat-0.eu.galaxy.training]TASK[galaxyproject.postgresql : Include 25ansible_postgresql.conf in postgresql.conf]***[WARNING]:Moduleremote_tmp/root/.ansible/tmpdidnotexistandwascreatedwithamodeof0700,thismaycauseissueswhenrunningasanotheruser.Toavoidthis,createtheremote_tmpdirwiththecorrectpermissionsmanuallychanged:[gat-0.eu.galaxy.training]TASK[galaxyproject.postgresql : Set config options]***************************changed:[gat-0.eu.galaxy.training]TASK[galaxyproject.postgresql : Install pg_hba.conf]**************************changed:[gat-0.eu.galaxy.training]TASK[galaxyproject.postgresql : include_tasks]********************************included:/home/ubuntu/galaxy/roles/galaxyproject.postgresql/tasks/backup.ymlforgat-0.eu.galaxy.trainingTASK[galaxyproject.postgresql : Create backup directories]********************changed:[gat-0.eu.galaxy.training]=>(item=/var/lib/postgresql/backups)changed:[gat-0.eu.galaxy.training]=>(item=/var/lib/postgresql/backups/bin)TASK[galaxyproject.postgresql : Create backup output directory]***************changed:[gat-0.eu.galaxy.training]TASK[galaxyproject.postgresql : Install backup script templates]**************changed:[gat-0.eu.galaxy.training]=>(item=archive_wal.sh)TASK[galaxyproject.postgresql : Install backup script files]******************changed:[gat-0.eu.galaxy.training]=>(item=backup.py)TASK[galaxyproject.postgresql : Set WAL archive config options]***************changed:[gat-0.eu.galaxy.training]TASK[galaxyproject.postgresql : Schedule backups]*****************************changed:[gat-0.eu.galaxy.training]TASK[galaxyproject.postgresql : Remove PostgreSQL working WAL backup cron job]***ok:[gat-0.eu.galaxy.training]TASK[galaxyproject.postgresql : Ensure PostgreSQL is running]*****************ok:[gat-0.eu.galaxy.training]TASK[galaxyproject.postgresql_objects : Warn if deprecated user priv param is set]***skipping:[gat-0.eu.galaxy.training]=>(item=galaxy)skipping:[gat-0.eu.galaxy.training]TASK[galaxyproject.postgresql_objects : Revoke extra privileges]**************skipping:[gat-0.eu.galaxy.training]TASK[galaxyproject.postgresql_objects : Drop databases]***********************skipping:[gat-0.eu.galaxy.training]=>(item={'name': 'galaxy', 'owner': 'galaxy'})skipping:[gat-0.eu.galaxy.training]TASK[galaxyproject.postgresql_objects : Create and drop users]****************[WARNING]:Moduleremote_tmp/var/lib/postgresql/.ansible/tmpdidnotexistandwascreatedwithamodeof0700,thismaycauseissueswhenrunningasanotheruser.Toavoidthis,createtheremote_tmpdirwiththecorrectpermissionsmanuallychanged:[gat-0.eu.galaxy.training]=>(item=galaxy)TASK[galaxyproject.postgresql_objects : Create groups]************************skipping:[gat-0.eu.galaxy.training]TASK[galaxyproject.postgresql_objects : Add or remove users from groups]******skipping:[gat-0.eu.galaxy.training]TASK[galaxyproject.postgresql_objects : Drop groups]**************************skipping:[gat-0.eu.galaxy.training]TASK[galaxyproject.postgresql_objects : Create databases]*********************changed:[gat-0.eu.galaxy.training]=>(item=galaxy)TASK[galaxyproject.postgresql_objects : Grant extra privileges]***************skipping:[gat-0.eu.galaxy.training]RUNNINGHANDLER[galaxyproject.postgresql : Reload PostgreSQL]*****************changed:[gat-0.eu.galaxy.training]PLAYRECAP*********************************************************************gat-0.eu.galaxy.training:ok=27 changed=15 unreachable=0 failed=0 skipped=13 rescued=0 ignored=0
Comment: Error: `postgresql_version is version_compare('9.3', '>=')' failed`
You might see an error like this, if you’re running with --check mode. Unfortunately here --check mode meets real life: not all modules support it because some rely on running command line tools to obtain version numbers, something that cannot be mocked with check mode. You can solve this by running it without --check.
fatal: [gat-0.eu.galaxy.training]: FAILED! => {"msg": "The conditional check 'postgresql_version is version_compare('9.3', '>=')' failed. The error was: Input version value cannot be empty\n\nThe error appears to be in '/home/ubuntu/galaxy/roles/galaxyproject.postgresql/tasks/main.yml': line 42, column 3, but may\nbe elsewhere in the file depending on the exact syntax problem.\n\nThe offending line appears to be:\n\n# etc.). So check for a match first and then add if there's no match.\n- name: Check for conf.d include in postgresql.conf\n ^ here\n"}
Comment: When running Ansible
Always pay close attention to tasks reported as changed and ensure that the changes were expected!
In our ansible.cfg file we specified the inventory was stored in a file called hosts:
There can be multiple reasons this happens, so we’ll step through all of them. We’ll start by assuming you’re running the command
ansible-playbook galaxy.yml
The following things can cause issues:
Within your galaxy.yml, you’ve referred to a host group that doesn’t exist or is misspelled. Check the hosts: galaxyservers to ensure it matches the host group defined in the hosts file.
Vice-versa, the group in your hosts file should match the hosts selected in the playbook, galaxy.yml.
If neither of these are the issue, it’s possible Ansible doesn’t know to check the hosts file for the inventory. Make sure you’ve specified inventory = hosts in your ansible.cfg.
Inspect the changes that have been made on your Galaxy server. Places to look include:
/etc/postgresql
Databases and users in PostgreSQL.
Code In: Bash
List available databases. You can now login and access the database, but only as the postgres user. You will need to sudo -iu postgres first, and then you can run psql galaxy.
The database will currently be empty (check relations with \d and list of roles with \dg) as Galaxy has not yet connected to it. Once you install Galaxy in the next step, the database will be populated. (Quit database with \q)
psql(10.12(Ubuntu10.12-0ubuntu0.18.04.1))Type"help"forhelp.postgres=# \d
Did not find any relations.postgres=# \dg
List of rolesRolename|Attributes|Memberof-----------+------------------------------------------------------------+-----------galaxy||{}postgres|Superuser,Createrole,CreateDB,Replication,BypassRLS|{}postgres=# \q
Next we will dive right in to deploying a copy of Galaxy onto our server.
For a normal Galaxy instance there are a few configuration changes you make very early during deployment:
Changing the database connection
Configuring the admin user list
Additionally we’ll go ahead and set up the production-ready Gunicorn + Webless deployment, which separates Galaxy’s web and job handling into separate processes. This is done by configuring Galaxy’s process manager, Gravity.
Finally, best admin practices are to not run Galaxy as a user with sudo access, like your login user probably has. Additionally, it is best to install the Galaxy code and configs as a separate user, for security purposes. So we will instruct the galaxyproject.galaxy role to create a new user account specifically to run Galaxy under.
The configuration is quite simple thanks to the many sensible defaults that are provided in the Ansible roles.
Hands On: Minimal Galaxy Playbook
Open galaxy.yml with your text editor and do the following:
Create a new play that will run on the galaxyservers group, as the root user (you will need become/become_user)
Add a pre-task to install the necessary dependencies for the Galaxy server: acl, bzip2, git, make, tar, python3-venv, and python3-setuptools
Use the roles galaxyproject.galaxy and galaxyproject.miniconda (in this order), with galaxyproject.miniconda run as the galaxy user.
Create and edit group_vars/galaxyservers.yml and add some variables to configure Galaxy:
We need to set the following variables at the top level:
Variable
Value
Purpose
galaxy_create_user
true
Instruct the role to create a Galaxy user
galaxy_separate_privileges
true
Enable separation mode to install the Galaxy code as root but run the Galaxy server as galaxy
galaxy_manage_paths
true
Instruct the role to create the needed directories.
galaxy_layout
root-dir
This enables the galaxy_root Galaxy deployment layout: all of the code, configuration, tools, and mutable-data (like caches, location files, etc.) folders will live by default beneath galaxy_root. User data is stored under file_path, a variable we will set later.
The git reference to check out, which in this case is the branch for Galaxy Release 23.0
galaxy_force_checkout
true
If we make any modifications to the Galaxy codebase, they will be removed. This way we know we’re getting an unmodified Galaxy and no one has made any unexpected changes to the codebase.
galaxy_client_use_prebuilt
true
We are going to use a prebuilt client to save some time during this tutorial, if you want you can set it to false later and see how galaxy starts building the client itself.
miniconda_prefix
"{{ galaxy_tool_dependency_dir }}/_conda"
We will manually install conda as well. Normally Galaxy will attempt to auto-install this, but since we will set up a production-ready instance with multiple handlers, there is the chance that they can become deadlocked.
miniconda_version
25.3
Install a specific miniconda version, the latest one at the time of writing that was tested and working.
miniconda_distribution
miniforge
Install a specific distribution of conda, see https://github.com/galaxyproject/ansible-miniconda for alternatives. This determines the default value for the miniconda_executable (conda for miniforge)
miniconda_channels `
['conda-forge']
Use the free and community-maintained conda-forge channel.
In the time between this tutorial was last updated (), and when you are now reading it, one or more new releases of Galaxy may have occured.
If you wish to use a different version of Galaxy than the one listed, you can do so, but there is no guarantee this tutorial will work without modifications.
--- /dev/null
+++ b/group_vars/galaxyservers.yml
@@ -0,0 +1,15 @@+# Galaxy
+galaxy_create_user: true # False by default, as e.g. you might have a 'galaxy' user provided by LDAP or AD.
+galaxy_separate_privileges: true # Best practices for security, configuration is owned by 'root' (or a different user) than the processes
+galaxy_manage_paths: true # False by default as your administrator might e.g. have root_squash enabled on NFS. Here we can create the directories so it's fine.
+galaxy_manage_systemd: true
+galaxy_layout: root-dir
+galaxy_root: /srv/galaxy
+galaxy_user: {name: "{{ galaxy_user_name }}", shell: /bin/bash}
+galaxy_commit_id: release_25.0
+galaxy_client_use_prebuilt: true
+galaxy_force_checkout: true
+miniconda_prefix: "{{ galaxy_tool_dependency_dir }}/_conda"
+miniconda_version: 25.3
+miniconda_distribution: miniforge
+miniconda_channels: ['conda-forge']
Consider updating the Galaxy Commit ID to the latest version of Galaxy available, this will probably give better results (given that dependencies are always updating) than using a potentially outdated version.
Again edit the galaxyservers group variables file and add a variable for galaxy_config. It will be a hash with one key, galaxy which will also be a hash. Inside here you can place all of your Galaxy configuration.
So the structure looks like:
galaxy_config:galaxy:key:value
Now you should set:
admin_users to the email address you will use with this Galaxy.
database_connection to point to the database you setup earlier (postgresql:///?host=/var/run/postgresql).
file_path to a place to store data, /data is fine for this lesson which sets up a single-node Galaxy. If you have separate compute machines, this will normally need to be storage shared between the Galaxy node and compute nodes.
tool_data_path to {{ galaxy_mutable_data_dir }}/tool-data, so that when tools are installed, due to privilege separation, this will happen in a directory Galaxy can actually write into.
object_store_store_by to uuid, this is a better way of storing files that will ensure better filesystem balancing than the older system.
id_secret to {{ vault_id_secret }}, we’ll define this variable next but it will be used to encode the IDs used in Galaxy URLs and for securing session cookies.
Galaxy datasets cannot be separated by user or other attribute currently, but you can spread data unintelligently across 1 or more storage pools.
If you want to run your database on a different machine, you will need to change the connection string. In your hosts file, place the hostname of the machine you’re installing on. ansible_connection can be left off entirely and it will connect over ssh. You may need to set ansible_user to the username of the admin user (who can run sudo).
Here you’ll need to re-use the connection details you specified during postgresql_objects_users. You can reference it like the following, for example. localhost may need to change if you’re hosting the database on another host.
In this step we use some templated variables. These are seen in our group variables, among other places, and look like miniconda_prefix: "{{ galaxy_tool_dependency_dir }}/_conda".
When Ansible runs:
It collects variables defined in group variables and other places
The first task for each machine is the setup module which gathers facts about the host, which are added to the available variables
As roles are executed:
Their defaults are added to the set of variables (the group variables having precedence over these variables)
They can also dynamically define more variables which may not be set until that role is run
Before use (in templates, commands, etc.), variables are resolved to their final value
So it is not always easy to tell what variables will be set, or what their finaly value will be, without running the playbook. It is possible, but non trivial.
In order to enable the Gunicorn + Webless strategy, we need to edit the Gravity configuration, which is (by default) configured in its own section of the Galaxy configuration. This has a default value, but we will have to override it. Add the following configuration as a child of the galaxy_config variable:
workers: Controls the number of Galaxy application processes Gunicorn will spawn. Increased web performance can be attained by increasing this value. If Gunicorn is the only application on the server, a good starting value is the number of CPUs * 2 + 1. 4-12 workers should be able to handle hundreds if not thousands of requests per second.
extra_args: You can specify additional arguments to pass to gunicorn here.
handlers: Two dedicated “webless” job handler processes will be started. These processes also handle workflow invocations.
Let’s set up our vault to store the secrets for these tutorials.
Code In: Bash
openssl rand -base64 24 > .vault-password.txt
Tell Ansible where to find the decryption key. Edit your file ansible.cfg and add the vault_password_file variable to the [defaults] section.
--- a/ansible.cfg
+++ b/ansible.cfg
@@ -5,6 +5,7 @@ inventory = hosts
 stdout_callback = yaml
 # Use the stdout_callback when running ad-hoc commands.
 bin_ansible_callbacks = True
+vault_password_file = .vault-password.txt

 # Show diffs of changes
 [diff]
Create the vault:
Code In: Bash
ansible-vault create group_vars/secret.yml
This will open the editor. Within that file, define your vault_id_secret to be a long random value.
vault_id_secret: secret # CHANGE ME NOW!!!
You can use the same command we ran before: openssl rand -base64 24 to get a good, secure id_secret for your Galaxy
Your vault should probably look something like this, it’s safe to commit to GitHub (or another public Distributed Version Control System (DVCS)) now that you’ve got the secrets safely encrypted.
If you’re using git, and storing all of these steps in your git history,
you’ll find that working with Vault secrets can be rather annoying as
the opaque blobs are impossible to read. There’s a way to make this
much easier though:
Create a file .gitattributes with the following content:
You can add this file to your repository with git add .gitattributes
to ensure colleagues get a copy of the file too. Just be sure.vault-password.txt is listed in your .gitignore file!
You will also need to run this command to define how the ansible-vault differ should work:
If you have more vault secrets, you can adjust this line (or add more,
wildcards are supported) to list all of your secret files. This tells
git to use ansible-vault to diff the two files, as you can see in
the following real (redacted) snippet from a vault stored in a public
github project.
Note: we have only included the galaxyservers play output and have stripped out the “diff” output for compactness, your output will be more verbose.
PLAY[galaxyservers]***********************************************************TASK[Gathering Facts]*********************************************************ok:[gat-0.eu.galaxy.training]TASK[Install Dependencies]****************************************************changed:[gat-0.eu.galaxy.training]TASK[galaxyproject.galaxy : Ensure that mutually exclusive options are not set]***ok:[gat-0.eu.galaxy.training]=>changed=falsemsg:AllassertionspassedTASK[galaxyproject.galaxy : Set privilege separation default variables]*******ok:[gat-0.eu.galaxy.training]TASK[galaxyproject.galaxy : Include layout vars]******************************ok:[gat-0.eu.galaxy.training]TASK[galaxyproject.galaxy : Set any unset variables from layout defaults]*****ok:[gat-0.eu.galaxy.training]=>(item=galaxy_venv_dir)ok:[gat-0.eu.galaxy.training]=>(item=galaxy_server_dir)ok:[gat-0.eu.galaxy.training]=>(item=galaxy_config_dir)ok:[gat-0.eu.galaxy.training]=>(item=galaxy_mutable_data_dir)ok:[gat-0.eu.galaxy.training]=>(item=galaxy_mutable_config_dir)ok:[gat-0.eu.galaxy.training]=>(item=galaxy_shed_tools_dir)ok:[gat-0.eu.galaxy.training]=>(item=galaxy_cache_dir)ok:[gat-0.eu.galaxy.training]=>(item=galaxy_local_tools_dir)ok:[gat-0.eu.galaxy.training]=>(item=galaxy_tool_data_path)TASK[galaxyproject.galaxy : Check that any explicitly set Galaxy config options match the values of explicitly set variables]***skipping:[gat-0.eu.galaxy.training]=>(item=tool_dependency_dir)skipping:[gat-0.eu.galaxy.training]=>(item=file_path)skipping:[gat-0.eu.galaxy.training]=>(item=job_working_directory)skipping:[gat-0.eu.galaxy.training]=>(item=shed_tool_config_file)skipping:[gat-0.eu.galaxy.training]TASK[galaxyproject.galaxy : Set any unset variables corresponding to Galaxy config options from galaxy_config or layout defaults]***ok:[gat-0.eu.galaxy.training]=>(item=tool_dependency_dir)ok:[gat-0.eu.galaxy.training]=>(item=file_path)ok:[gat-0.eu.galaxy.training]=>(item=job_working_directory)TASK[galaxyproject.galaxy : Include user creation tasks]**********************included:/home/ubuntu/galaxy/roles/galaxyproject.galaxy/tasks/user.ymlforgat-0.eu.galaxy.trainingTASK[galaxyproject.galaxy : Create Galaxy group]******************************skipping:[gat-0.eu.galaxy.training]TASK[galaxyproject.galaxy : Create Galaxy user]*******************************changed:[gat-0.eu.galaxy.training]TASK[galaxyproject.galaxy : Create Galaxy privilege separation user]**********skipping:[gat-0.eu.galaxy.training]TASK[galaxyproject.galaxy : Get group IDs for Galaxy users]*******************ok:[gat-0.eu.galaxy.training]=>(item=galaxy)ok:[gat-0.eu.galaxy.training]=>(item=root)TASK[galaxyproject.galaxy : Get group names for Galaxy users]*****************ok:[gat-0.eu.galaxy.training]=>(item=galaxy)ok:[gat-0.eu.galaxy.training]=>(item=root)TASK[galaxyproject.galaxy : Set Galaxy user facts]****************************ok:[gat-0.eu.galaxy.training]TASK[galaxyproject.galaxy : Determine whether to restrict to group permissions]***ok:[gat-0.eu.galaxy.training]TASK[galaxyproject.galaxy : Include path management tasks]********************included:/home/ubuntu/galaxy/roles/galaxyproject.galaxy/tasks/paths.ymlforgat-0.eu.galaxy.trainingTASK[galaxyproject.galaxy : Create galaxy_root]*******************************changed:[gat-0.eu.galaxy.training]TASK[galaxyproject.galaxy : Create additional privilege separated directories]***changed:[gat-0.eu.galaxy.training]=>(item=/srv/galaxy/venv)changed:[gat-0.eu.galaxy.training]=>(item=/srv/galaxy/server)changed:[gat-0.eu.galaxy.training]=>(item=/srv/galaxy/config)changed:[gat-0.eu.galaxy.training]=>(item=/srv/galaxy/local_tools)TASK[galaxyproject.galaxy : Create additional directories]********************changed:[gat-0.eu.galaxy.training]=>(item=/srv/galaxy/var)changed:[gat-0.eu.galaxy.training]=>(item=/srv/galaxy/var/config)changed:[gat-0.eu.galaxy.training]=>(item=/srv/galaxy/var/cache)changed:[gat-0.eu.galaxy.training]=>(item=/srv/galaxy/var/shed_tools)changed:[gat-0.eu.galaxy.training]=>(item=/srv/galaxy/var/dependencies)changed:[gat-0.eu.galaxy.training]=>(item=/data)changed:[gat-0.eu.galaxy.training]=>(item=/srv/galaxy/jobs)changed:[gat-0.eu.galaxy.training]=>(item=/srv/galaxy/var/tool_data)changed:[gat-0.eu.galaxy.training]=>(item=/srv/galaxy/var/log)TASK[galaxyproject.galaxy : Include clone tasks]******************************included:/home/ubuntu/galaxy/roles/galaxyproject.galaxy/tasks/clone.ymlforgat-0.eu.galaxy.trainingTASK[galaxyproject.galaxy : Update Galaxy to specified ref]*******************changed:[gat-0.eu.galaxy.training]TASK[galaxyproject.galaxy : Report Galaxy version change]*********************changed:[gat-0.eu.galaxy.training]=>msg:Galaxyversionchangedfrom''to'b338e10899e48a91eab0efca071a206620b13d9d'TASK[galaxyproject.galaxy : Create Galaxy virtualenv]*************************changed:[gat-0.eu.galaxy.training]TASK[galaxyproject.galaxy : Ensure pip is the desired release]****************changed:[gat-0.eu.galaxy.training]TASK[galaxyproject.galaxy : Remove orphaned .pyc files and compile bytecode]***changed:[gat-0.eu.galaxy.training]TASK[galaxyproject.galaxy : Include download tasks]***************************skipping:[gat-0.eu.galaxy.training]TASK[galaxyproject.galaxy : Include manage existing galaxy tasks]*************skipping:[gat-0.eu.galaxy.training]TASK[galaxyproject.galaxy : Include static config setup tasks]****************included:/home/ubuntu/galaxy/roles/galaxyproject.galaxy/tasks/static_setup.ymlforgat-0.eu.galaxy.trainingTASK[galaxyproject.galaxy : Ensure Galaxy version is set]*********************included:/home/ubuntu/galaxy/roles/galaxyproject.galaxy/tasks/_inc_galaxy_version.ymlforgat-0.eu.galaxy.trainingTASK[galaxyproject.galaxy : Collect Galaxy version file]**********************ok:[gat-0.eu.galaxy.training]TASK[galaxyproject.galaxy : Determine Galaxy version]*************************ok:[gat-0.eu.galaxy.training]TASK[galaxyproject.galaxy : Install additional Galaxy config files (static)]***skipping:[gat-0.eu.galaxy.training]TASK[galaxyproject.galaxy : Install additional Galaxy config files (template)]***skipping:[gat-0.eu.galaxy.training]TASK[galaxyproject.galaxy : Install local tools]******************************skipping:[gat-0.eu.galaxy.training]TASK[galaxyproject.galaxy : Install local_tool_conf.xml]**********************skipping:[gat-0.eu.galaxy.training]TASK[galaxyproject.galaxy : Append local_tool_conf.xml to tool_config_file Galaxy config option]***skipping:[gat-0.eu.galaxy.training]TASK[galaxyproject.galaxy : Append shed_tool_conf.xml to tool_config_file Galaxy config option]***skipping:[gat-0.eu.galaxy.training]TASK[galaxyproject.galaxy : Ensure dynamic job rules paths exists]************skipping:[gat-0.eu.galaxy.training]TASK[galaxyproject.galaxy : Install dynamic job rules (static)]***************skipping:[gat-0.eu.galaxy.training]TASK[galaxyproject.galaxy : Install dynamic job rules (template)]*************skipping:[gat-0.eu.galaxy.training]TASK[galaxyproject.galaxy : Ensure dynamic rule __init__.py's exist]**********skipping:[gat-0.eu.galaxy.training]TASK[galaxyproject.galaxy : Create Galaxy job metrics configuration file]*****skipping:[gat-0.eu.galaxy.training]TASK[galaxyproject.galaxy : Create Galaxy dependency resolvers configuration file]***skipping:[gat-0.eu.galaxy.training]TASK[galaxyproject.galaxy : Create Galaxy container resolvers configuration file]***skipping:[gat-0.eu.galaxy.training]TASK[galaxyproject.galaxy : Create Galaxy configuration file]*****************changed:[gat-0.eu.galaxy.training]TASK[galaxyproject.galaxy : Include dependency setup tasks]*******************included:/home/ubuntu/galaxy/roles/galaxyproject.galaxy/tasks/dependencies.ymlforgat-0.eu.galaxy.trainingTASK[galaxyproject.galaxy : Create Galaxy virtualenv]*************************ok:[gat-0.eu.galaxy.training]TASK[galaxyproject.galaxy : Ensure pip is the desired release]****************ok:[gat-0.eu.galaxy.training]TASK[galaxyproject.galaxy : Install Galaxy base dependencies]*****************changed:[gat-0.eu.galaxy.training]TASK[galaxyproject.galaxy : Collect Galaxy conditional dependency requirement strings]***ok:[gat-0.eu.galaxy.training]TASK[galaxyproject.galaxy : Install Galaxy conditional dependencies]**********changed:[gat-0.eu.galaxy.training]TASK[galaxyproject.galaxy : Install additional packages into galaxy's virtual environment]***skipping:[gat-0.eu.galaxy.training]TASK[galaxyproject.galaxy : Include mutable config setup tasks]***************included:/home/ubuntu/galaxy/roles/galaxyproject.galaxy/tasks/mutable_setup.ymlforgat-0.eu.galaxy.trainingTASK[galaxyproject.galaxy : Ensure Galaxy version is set]*********************skipping:[gat-0.eu.galaxy.training]TASK[galaxyproject.galaxy : Instantiate mutable configuration files]**********changed:[gat-0.eu.galaxy.training]=>(item={'src': 'shed_data_manager_conf.xml', 'dest': '/srv/galaxy/var/config/shed_data_manager_conf.xml'})changed:[gat-0.eu.galaxy.training]=>(item={'src': 'shed_tool_data_table_conf.xml', 'dest': '/srv/galaxy/var/config/shed_tool_data_table_conf.xml'})TASK[galaxyproject.galaxy : Instantiate mutable configuration templates]******changed:[gat-0.eu.galaxy.training]=>(item={'src': 'shed_tool_conf.xml.j2', 'dest': '/srv/galaxy/var/config/migrated_tools_conf.xml'})changed:[gat-0.eu.galaxy.training]=>(item={'src': 'shed_tool_conf.xml.j2', 'dest': '/srv/galaxy/var/config/shed_tool_conf.xml'})TASK[galaxyproject.galaxy : Include database management tasks]****************included:/home/ubuntu/galaxy/roles/galaxyproject.galaxy/tasks/database.ymlforgat-0.eu.galaxy.trainingTASK[galaxyproject.galaxy : Get current Galaxy DB version]********************ok:[gat-0.eu.galaxy.training]TASK[galaxyproject.galaxy : Get maximum Galaxy DB version]********************ok:[gat-0.eu.galaxy.training]TASK[galaxyproject.galaxy : Report current and max Galaxy database]***********skipping:[gat-0.eu.galaxy.training]TASK[galaxyproject.galaxy : Upgrade Galaxy DB]********************************skipping:[gat-0.eu.galaxy.training]TASK[galaxyproject.galaxy : Include client build tasks]***********************included:/home/ubuntu/galaxy/roles/galaxyproject.galaxy/tasks/client.ymlforgat-0.eu.galaxy.trainingTASK[galaxyproject.galaxy : Ensure client_build_hash.txt exists]**************changed:[gat-0.eu.galaxy.training]TASK[galaxyproject.galaxy : Get current client commit id]*********************ok:[gat-0.eu.galaxy.training]TASK[galaxyproject.galaxy : Check if Galaxy was checked out from git]*********ok:[gat-0.eu.galaxy.training]TASK[galaxyproject.galaxy : Get current Galaxy commit id]*********************ok:[gat-0.eu.galaxy.training]TASK[galaxyproject.galaxy : Set client build version fact]********************ok:[gat-0.eu.galaxy.training]TASK[galaxyproject.galaxy : Set client build version fact]********************ok:[gat-0.eu.galaxy.training]TASK[galaxyproject.galaxy : Report client version mismatch]*******************changed:[gat-0.eu.galaxy.training]=>msg:'Galaxyclientisoutofdate:new-unbuilt!=b338e10899e48a91eab0efca071a206620b13d9d'TASK[galaxyproject.galaxy : Ensure galaxy_node_version is set]****************included:/home/ubuntu/galaxy/roles/galaxyproject.galaxy/tasks/_inc_node_version.ymlforgat-0.eu.galaxy.trainingTASK[galaxyproject.galaxy : Collect Galaxy Node.js version file]**************ok:[gat-0.eu.galaxy.training]TASK[galaxyproject.galaxy : Set Galaxy Node.js version fact]******************ok:[gat-0.eu.galaxy.training]TASK[galaxyproject.galaxy : Report Node.js version file version]**************ok:[gat-0.eu.galaxy.training]=>galaxy_node_version:18.12.1TASK[galaxyproject.galaxy : Override Galaxy Node.js version]******************ok:[gat-0.eu.galaxy.training]TASK[galaxyproject.galaxy : Check whether nodeenv is available]***************ok:[gat-0.eu.galaxy.training]TASK[galaxyproject.galaxy : Create Galaxy virtualenv]*************************skipping:[gat-0.eu.galaxy.training]TASK[galaxyproject.galaxy : Ensure pip is the desired release]****************skipping:[gat-0.eu.galaxy.training]TASK[galaxyproject.galaxy : Install nodeenv if it doesn't exist]**************skipping:[gat-0.eu.galaxy.training]TASK[galaxyproject.galaxy : Report preferred Node.js version]*****************ok:[gat-0.eu.galaxy.training]=>galaxy_node_version:18.12.1TASK[galaxyproject.galaxy : Check if node is installed]***********************ok:[gat-0.eu.galaxy.training]TASK[galaxyproject.galaxy : Collect installed node version]*******************skipping:[gat-0.eu.galaxy.training]TASK[galaxyproject.galaxy : Remove node_modules directory when upgrading node]***ok:[gat-0.eu.galaxy.training]TASK[galaxyproject.galaxy : Install or upgrade node]**************************changed:[gat-0.eu.galaxy.training]TASK[galaxyproject.galaxy : Install yarn]*************************************changed:[gat-0.eu.galaxy.training]TASK[galaxyproject.galaxy : Include client build process]*********************included:/home/ubuntu/galaxy/roles/galaxyproject.galaxy/tasks/_inc_client_build_make.ymlforgat-0.eu.galaxy.trainingTASK[galaxyproject.galaxy : Build client]*************************************changed:[gat-0.eu.galaxy.training]TASK[galaxyproject.galaxy : Fetch client version]*****************************ok:[gat-0.eu.galaxy.training]TASK[galaxyproject.galaxy : Set client build version fact]********************ok:[gat-0.eu.galaxy.training]TASK[galaxyproject.galaxy : Ensure that client update succeeded]**************skipping:[gat-0.eu.galaxy.training]TASK[galaxyproject.galaxy : Include error document setup tasks]***************skipping:[gat-0.eu.galaxy.training]TASK[galaxyproject.galaxy : Include Gravity setup tasks]**********************included:/home/ubuntu/galaxy/roles/galaxyproject.galaxy/tasks/gravity.ymlforgat-0.eu.galaxy.trainingTASK[galaxyproject.galaxy : Register Galaxy config with Gravity (Gravity < 1)]***skipping:[gat-0.eu.galaxy.training]TASK[galaxyproject.galaxy : Deploy galaxyctl wrapper script]******************changed:[gat-0.eu.galaxy.training]TASK[galaxyproject.galaxy : Include systemd unit setup tasks (Galaxy)]********skipping:[gat-0.eu.galaxy.training]TASK[galaxyproject.galaxy : Include systemd unit setup tasks (Reports)]*******skipping:[gat-0.eu.galaxy.training]TASK[galaxyproject.galaxy : Include cleanup scheduling tasks]*****************skipping:[gat-0.eu.galaxy.training]TASK[galaxyproject.miniconda : Check for miniconda existence]*****************ok:[gat-0.eu.galaxy.training]TASK[galaxyproject.miniconda : Include install tasks]*************************included:/home/ubuntu/galaxy/roles/galaxyproject.miniconda/tasks/install.ymlforgat-0.eu.galaxy.trainingTASK[galaxyproject.miniconda : Create miniconda installer tempfile]***********changed:[gat-0.eu.galaxy.training]TASK[galaxyproject.miniconda : Collect miniconda installer]*******************changed:[gat-0.eu.galaxy.training]TASK[galaxyproject.miniconda : Run miniconda installer]***********************changed:[gat-0.eu.galaxy.training]TASK[galaxyproject.miniconda : Remove minicoda installer]*********************changed:[gat-0.eu.galaxy.training]TASK[galaxyproject.miniconda : Collect miniconda version]*********************ok:[gat-0.eu.galaxy.training]TASK[galaxyproject.miniconda : Update miniconda version (exact)]**************changed:[gat-0.eu.galaxy.training]TASK[galaxyproject.miniconda : Update miniconda version (latest)]*************skipping:[gat-0.eu.galaxy.training]TASK[galaxyproject.miniconda : Install packages to conda base environment]****skipping:[gat-0.eu.galaxy.training]TASK[galaxyproject.miniconda : Create conda envs]*****************************skipping:[gat-0.eu.galaxy.training]TASK[galaxyproject.miniconda : Update conda envs]*****************************skipping:[gat-0.eu.galaxy.training]TASK[galaxyproject.miniconda : Create Galaxy conda env]***********************skipping:[gat-0.eu.galaxy.training]RUNNINGHANDLER[galaxyproject.postgresql : Reload PostgreSQL]*****************changed:[gat-0.eu.galaxy.training]RUNNINGHANDLER[galaxyproject.galaxy : galaxy mule restart]*******************skipping:[gat-0.eu.galaxy.training]RUNNINGHANDLER[galaxyproject.galaxy : galaxy gravity restart]****************skipping:[gat-0.eu.galaxy.training]RUNNINGHANDLER[galaxyproject.galaxy : galaxyctl update]**********************skipping:[gat-0.eu.galaxy.training]RUNNINGHANDLER[galaxyproject.galaxy : galaxyctl update]**********************changed:[gat-0.eu.galaxy.training]RUNNINGHANDLER[galaxyproject.galaxy : galaxy gravity restart]****************changed:[gat-0.eu.galaxy.training]PLAYRECAP*********************************************************************gat-0.eu.galaxy.training:ok=101 changed=28 unreachable=0 failed=0 skipped=53 rescued=0 ignored=0
Comment: Free knowledge
You will notice the significant volume of output from this playbook! There are
many, many steps for deploying a production Galaxy, and there is a vast
amount of knowledge encoded into these playbooks by the developers and
admins who use them. While we recommend this, choosing to use Ansible
and the official playbooks means you are opting in to receive all of this
knowledge applied automatically to your systems. You are welcome to use
a different Configuration Management system which works for your infrastructure, but it might
mean re-creating a large amount of existing work that is maintained by a
large community of admins.
The deployment can be slowed down by the client build.
The client is only re-built when there are changes in the files needed for the Galaxy user interface (JavaScript, CSS). Because we are tracking a release branch, we’ll receive updates that are published to that branch during the training since the last time the playbook was run.
Did you get an error message like this?
fatal: [localhost]: FAILED! => {"msg": "Failed to set permissions on the temporary files Ansible needs to create when becoming an unprivileged user (rc: 1, err: chown: changing ownership of '/var/tmp/ansible-tmp-1607430009.739602-32983298209838/': Operation not permitted\nchown: changing ownership of '/var/tmp/ansible-tmp-1607430009.739602-32983298209838/source': Operation not permitted\n}). For information on working around this, see https://docs.ansible.com/ansible/become.html#becoming-an-unprivileged-user"}
You’re missing the setfacl command provided by the acl package. reference
Explore what has been set up for you.
Galaxy has been deployed to /srv/galaxy/server
The configuration lives in /srv/galaxy/config/galaxy.yml - be sure to look through it to see what options have been set for you
Note the ownership and permissions of the contents of /srv/galaxy
Some config files that Galaxy maintains itself, such as shed_tool_conf.xml, which controls what tools that you have installed from the Tool Shed will be loaded, have been instantiated in /srv/galaxy/var/config
A Python virtualenv - an isolated Python environment - with all of the Galaxy framework’s dependencies has been installed in /srv/galaxy/venv
Code In: Bash
tree -L 1 /srv/galaxy/
config holds all static Galaxy config files
jobs is where all job files will go (e.g. temporary working dirs, job scripts, etc.)
local_tools is a directory for custom, non-ToolShed tools managed by the Ansible playbook
server contains all of the Galaxy server code
var is a directory for all files created by Galaxy, e.g. whenever tools are installed from the ToolShed, the Galaxy-managed cache, and the integrated tool panel file.
venv contains the Galaxy virtual environment and all dependencies, like Gunicorn.
You’ll notice that the file is significantly different from the configuration you have set up in your group variables. The Ansible role adds a significant number of additional configuration options which all require a path, and templates the appropriate paths into all of them.
---#### This file is managed by Ansible. ALL CHANGES WILL BE OVERWRITTEN.##gravity:celery:concurrency:2loglevel:DEBUGgalaxy_root:/srv/galaxy/servergalaxy_user:galaxygunicorn:bind:unix:/srv/galaxy/var/config/gunicorn.sockextra_args:--forwarded-allow-ips="*"preload:trueworkers:2handlers:handler:pools:-job-handlers-workflow-schedulersprocesses:2process_manager:systemdvirtualenv:/srv/galaxy/venvgalaxy:admin_users:admin@example.orgbuilds_file_path:/srv/galaxy/server/tool-data/shared/ucsc/builds.txt.samplecontainer_resolvers_config_file:''data_dir:/srv/galaxy/vardata_manager_config_file:/srv/galaxy/server/config/data_manager_conf.xml.sampledatabase_connection:postgresql:///galaxy?host=/var/run/postgresqldatatypes_config_file:/srv/galaxy/server/config/datatypes_conf.xml.sampledependency_resolvers_config_file:/srv/galaxy/config/dependency_resolvers_conf.xmlexternal_service_type_config_file:/srv/galaxy/server/config/external_service_types_conf.xml.samplefile_path:/dataid_secret:BxI6zlQVhoHLPVf3gqQintegrated_tool_panel_config:/srv/galaxy/var/config/integrated_tool_panel.xmljob_metrics_config_file:/srv/galaxy/config/job_metrics_conf.xmljob_working_directory:/srv/galaxy/jobsmigrated_tools_config:/srv/galaxy/var/config/migrated_tools_conf.xmlobject_store_store_by:uuidopenid_config_file:/srv/galaxy/server/config/openid_conf.xml.sampleshed_data_manager_config_file:/srv/galaxy/var/config/shed_data_manager_conf.xmlshed_tool_config_file:/srv/galaxy/var/config/shed_tool_conf.xmlshed_tool_data_table_config:/srv/galaxy/var/config/shed_tool_data_table_conf.xmltool_config_file:/srv/galaxy/server/config/tool_conf.xml.sampletool_data_path:/srv/galaxy/var/tool-datatool_data_table_config_path:/srv/galaxy/server/config/tool_data_table_conf.xml.sampletool_dependency_dir:/srv/galaxy/var/dependenciestool_sheds_config_file:/srv/galaxy/server/config/tool_sheds_conf.xml.sampleucsc_build_sites:/srv/galaxy/server/tool-data/shared/ucsc/ucsc_build_sites.txt.samplevisualization_plugins_directory:config/plugins/visualizations
Galaxy is now configured with an admin user, a database, and a place to store data. We’ve immediately configured standalone Galaxy servers to handle jobs and workflow scheduling. Additionally, Galaxy’s process manager, Gravity, has written out systemd configuration files called service units that are used to define how to start and stop Galaxy’s various services. Your Galaxy server should now be running!
Hands On: Status Check
Log in and check the status with sudo galaxyctl status (You may need to run sudo galaxyctl -c /srv/galaxy/config/galaxy.yml status when running the first time.)
Code In: Bash
sudo galaxyctl status
Code Out: Bash
  UNIT                       LOAD   ACTIVE SUB     DESCRIPTION
  galaxy-celery-beat.service loaded active running Galaxy celery-beat
  galaxy-celery.service      loaded active running Galaxy celery
  galaxy-gunicorn.service    loaded active running Galaxy gunicorn
  galaxy-handler@0.service   loaded active running Galaxy handler (process 0)
  galaxy-handler@1.service   loaded active running Galaxy handler (process 1)
  galaxy.target              loaded active active  Galaxy

LOAD   = Reflects whether the unit definition was properly loaded.
ACTIVE = The high-level unit activation state, i.e. generalization of SUB.
SUB    = The low-level unit activation state, values depend on unit type.
6 loaded units listed.
To show all installed unit files use 'systemctl list-unit-files'.
To inspect individual services in detail, use sudo galaxyctl status <service> where <service> is a service from the Gravity configuration such as gunicorn or handler. Alternatively, you can invoke sudo systemctl status <service-unit> where <service-unit> (such as galaxy-gunicorn.service and galaxy-handler@0.service) can be found in the output above (the .service suffix is implied and optional, so you can leave it off for convenience).
If any of the services show as failed, inspect them using one of the above methods, e.g.:
$sudo galaxyctl status gunicorn
× galaxy-gunicorn.service - Galaxy gunicorn
Loaded: loaded (/etc/systemd/system/galaxy-gunicorn.service;disabled; vendor preset: enabled) Active: failed (Result: exit-code) since Thu 2023-03-16 01:15:15 UTC;1s ago
Process: 20306 ExecStart=/srv/galaxy/venv/bin/galaxyctl --config-file /srv/galaxy/config/galaxy.yml exec _default_ gunicorn (code=exited, status=1/FAILURE)
Main PID: 20306 (code=exited, status=1/FAILURE)
CPU: 3.381s
Mar 16 01:15:14 gat galaxyctl[20306]: File "/srv/galaxy/venv/lib/python3.10/site-packages/sqlalchemy/engine/base.py", line 1900, in _execute_context
Mar 16 01:15:14 gat galaxyctl[20306]: self.dialect.do_execute(
Mar 16 01:15:14 gat galaxyctl[20306]: File "/srv/galaxy/venv/lib/python3.10/site-packages/sqlalchemy/engine/default.py", line 736, in do_execute
Mar 16 01:15:14 gat galaxyctl[20306]: cursor.execute(statement, parameters)
Mar 16 01:15:14 gat galaxyctl[20306]: sqlalchemy.exc.ProgrammingError: (psycopg2.errors.InsufficientPrivilege) permission denied to create database
Mar 16 01:15:14 gat galaxyctl[20306]: [SQL: CREATE DATABASE bork ENCODING 'utf8' TEMPLATE template1]
Mar 16 01:15:14 gat galaxyctl[20306]: (Background on this error at: https://sqlalche.me/e/14/f405)
Mar 16 01:15:15 gat systemd[1]: galaxy-gunicorn.service: Main process exited, code=exited, status=1/FAILURE
Mar 16 01:15:15 gat systemd[1]: galaxy-gunicorn.service: Failed with result 'exit-code'.
Mar 16 01:15:15 gat systemd[1]: galaxy-gunicorn.service: Consumed 3.381s CPU time.
Check your /srv/galaxy/config/galaxy.yml and ensure that it lines up exactly with what you expect. You might observe a warning that Dynamic handlers are configured in Gravity but Galaxy is not configured to assign jobs to handlers dynamically. We will address this below, and you can disregard it for now.
Some things to note:
Although the playbook will restart Galaxy upon config changes, you will sometimes need to restart it by hand, which can be done with sudo galaxyctl restart galaxy
You can use sudo galaxyctl follow or journalctl -fu 'galaxy-*' to see the logs of Galaxy. You can see the logs of indivudual services using sudo galaxyctl follow <service> or journalctl -fu <service-unit>.
Sometimes Ansible tasks will fail. Usually due to misconfiguration, but occasionally due to other issues like your coworker restarted the server while you were doing maintenance, or network failures, or any other possible error. It happens. An unfortunate side effect can be observed in specific situations:
Let’s say you’re running a playbook that updates the galaxy.yml, which will in turn notify the handler Restart Galaxy. If this change is made, and notification triggered, but a failure occurs before Ansible can reach the step where it runs the handlers. The handlers will not run during this Ansible execution.
The next time you run the playbook, Ansible will not observe any configuration files changing (because they were changed in the last run), and so the handler that restarts Galaxy will not run.
If you encounter this situation you just have to be mindful of the fact, and remember to manually run the handler. There is no general solution to this problem unfortunately. This applies mostly to development setups. In production you’re probably running that playbook somewhat regularly and do not expect failures as everything is quite stable.
0-galaxy-up.sh
NGINX
With this we have:
PostgreSQL running
Galaxy running (managed by Gravity + systemd)
Although Gunicorn can serve HTTP for us directly, a reverse proxy in front of Gunicorn can automatically compress selected content, and we can easily apply caching headers to specific types of content like CSS or images. It is also necessary if we want to serve multiple sites at once, e.g. with a group website at / and Galaxy at /galaxy. Lastly, it can provide authentication as well, as noted in the External Authentication tutorial.
For this, we will use NGINX (pronounced “engine X” /ˌɛndʒɪnˈɛks/ EN-jin-EKS). It is possible to configure Galaxy with Apache and potentially other webservers but this is not the configuration that receives the most testing. We recommend NGINX unless you have a specific need for Apache.
Hands On: NGINX
Add the role galaxyproject.nginx to the end of your playbook and have it run as root.
We need to configure the virtualhost. This is a slightly more complex process as we have to write the proxying configuration ourselves. This may seem annoying, but it is often the case that sites have individual needs to cater to, and it is difficult to provide a truly generic webserver configuration. Additionally, we will enable secure communication via HTTPS using SSL/TLS certificates provided by certbot.
This is a lot of configuration but it is not very complex to understand. We’ll go through it step by step:
certbot_auto_renew_hour/minute: Certbot certificates are short lived, they only last 90 days. As a consequence, automated renewal is a significant part of the setup and well integrated. The certbot role installs a cron job which checks if the certificate needs to be renewed (when it has <30 days of lifetime left) and attempts to renew the certificate as needed. In order to reduce load on the certbot servers, we randomly set the time when the request will be made, so not all of the requests occur simultaneously. For training VMs this will likely never be reached. For real-life machines, this is more important.
certbot_auth_method: Multiple authentication methods are supported, we will use the webroot method since that integrates nicely with galaxyproject.nginx. This writes out a file onto the webserver’s root (that we specify in certbot_well_known_root) which certbot’s servers will check.
certbot_auto_renew: Automatically attempt renewing the certificate as the certbot_auto_renew_user
certbot_environment: The options here are production and staging, we will set this to staging and obtain a verified but invalid certificate as browsers are intentionally not configured to trust the certbot staging certificates. The staging environment has higher rate limits and allows requesting more certificates during trainings. If you are deploying on a production machine you should set this to production.
certbot_share_key_users: This variable automatically shares the certificates with any system users that might need to access them. Here just nginx needs access.
certbot_post_renewal: Often services need to be notified or restarted once the certificates have been updated.
certbot_domains: These are the domains that are requested for verification. Any entries you place here must all be publicly resolvable.
certbot_agree_tos: We automatically agree to the certbot TOS. You can read the current one on their website
Likewise the nginx configuration has a couple of important points:
nginx_selinux_allow_local_connections: Specific to CentOS hosts where Nginx will need to access Galaxy
nginx_enable_default_server/vhost: Most Nginx packages come with a default configuration for the webserver. We do not want this.
nginx_conf_http: Here we can write any extra configuration we have, client_max_body_size: 1g increases the POST limit to 1Gb which makes uploads easier.
These control the SSL configuration
nginx_conf_ssl_certificate/key: Location of the certificate / private key.
The configuration variables we added in our group variables file has the following variables
The galaxyproject.galaxy role expects to find two files with these names in templates/nginx/redirect-ssl.j2 and templates/nginx/galaxy.j2
If you want, you can run this with your own SSL certificates. You can read about all of the variables you need to set in the ansible NGINX role.
If you want, you can run this tutorial without SSL. We will provide a sketch of the configuration changes needed, but this is of course not recommended for production, so we will not go into detail here:
Create the directory templates/nginx (staying in galaxy directory, after which groups_vars, roles will be siblings of templates), where we will place our configuration files which should be templated out to the server.
Create the templates/nginx/redirect-ssl.j2 with the following contents:
Create templates/nginx/galaxy.j2 with the following contents:
--- /dev/null
+++ b/templates/nginx/galaxy.j2
@@ -0,0 +1,61 @@+upstream galaxy {
+ server {{ galaxy_config.gravity.gunicorn.bind }};
+
+ # Or if you serve galaxy at a path like http(s)://fqdn/galaxy
+ # Remember to set galaxy_url_prefix in the galaxy.yml file.
+ # server {{ galaxy_config.gravity.gunicorn.bind }}:/galaxy;
+}
+
+server {
+ # Listen on port 443
+ listen *:443 ssl default_server;
+ # The virtualhost is our domain name
+ server_name "{{ inventory_hostname }}";
+
+ # Our log files will go to journalctl
+ access_log syslog:server=unix:/dev/log;
+ error_log syslog:server=unix:/dev/log;
+
+ # The most important location block, by default all requests are sent to gunicorn
+ # If you serve galaxy at a path like /galaxy, change that below (and all other locations!)
+ location / {
+ # This is the backend to send the requests to.
+ proxy_pass http://galaxy;
+
+ proxy_set_header Host $http_host;
+ proxy_set_header X-Forwarded-For $proxy_add_x_forwarded_for;
+ proxy_set_header X-Forwarded-Proto $scheme;
+ proxy_set_header Upgrade $http_upgrade;
+ }
+
+ # Static files can be more efficiently served by Nginx. Why send the
+ # request to Gunicorn which should be spending its time doing more useful
+ # things like serving Galaxy!
+ location /static {
+ alias {{ galaxy_server_dir }}/static;
+ expires 24h;
+ }
+
+ # In Galaxy instances started with run.sh, many config files are
+ # automatically copied around. The welcome page is one of them. In
+ # production, this step is skipped, so we will manually alias that.
+ location /static/welcome.html {
+ alias {{ galaxy_server_dir }}/static/welcome.sample.html;
+ expires 24h;
+ }
+
+ # serve visualization and interactive environment plugin static content
+ location ~ ^/plugins/(?<plug_type>[^/]+?)/((?<vis_d>[^/_]*)_?)?(?<vis_name>[^/]*?)/static/(?<static_file>.*?)$ {
+ alias {{ galaxy_server_dir }}/config/plugins/$plug_type/;
+ try_files $vis_d/${vis_d}_${vis_name}/static/$static_file
+ $vis_d/static/$static_file =404;
+ }
+
+ location /robots.txt {
+ alias {{ galaxy_server_dir }}/static/robots.txt;
+ }
+
+ location /favicon.ico {
+ alias {{ galaxy_server_dir }}/static/favicon.ico;
+ }
+}
You’ll notice that we have set a 24 hour cache timeout on static content served by NGINX. Google’s PageSpeed Tools can identify any additional compression or caching improvements you can make.
If you didn’t, you might have missed the first step in this hands-on.
If you see this message:
nginx: [emerg] socket() [::]:80 failed (97: Address family not supported by protocol)
This may be due to missing IPv6 support on your machine. It is extremely unlikely your operating system doesn’t support it, instead it was probably disabled. Check /etc/sysctl.conf and /etc/sysctl.d/* for net.ipv6.conf.*.disable_ipv6=1, or /etc/default/grub for ipv6.disable=1
Check out the changes made to your server in /etc/nginx/sites-enabled/, particularly the directory containing the Galaxy virtualhost.
Check out the nginx logs with journalctl
Code In: Bash
journalctl -fu nginx
LetsEncrypt has rate limits on requesting trusted certificates to prevent abuse of their service.
In a training setting there is no need to request certificates that will be trusted by all browsers. So we will request a testing certificate to show how it works, and by changing staging to production, you can request browser trusted certificates.
You will probably see an error like this, when trying to access your Galaxy:
Throughout the playbook we added roles in a specific order. Partially this was to mimic the original training and build up a working Galaxy server from nothing, but partially this is also because of some hidden role dependencies on each other. Some must run before others, in order to set certain variables. Looking at the dependencies in detail:
Role
Role-Role Dependencies
galaxyproject.postgresql
None
galaxyproject.postgresql_objects
None
galaxyproject.galaxy
None
galaxyproject.miniconda
In our group variables, we define the path of miniconda_prefix to {{ galaxy_tool_dependency_dir }}/_conda, so Galaxy needs to have set those variables
galaxyproject.nginx
This requires Galaxy variables to find the static assets
Log in to Galaxy
Now that your production-ready Galaxy is running, try registering a new user and logging in!
In order to be the administrator user, you will need to register an account with the same email address you used in the group variables under the admin_users setting.
Job Configuration
One of the most important configuration files for a large Galaxy server is the job configuration. This tells Galaxy where to run all of the jobs that users execute. If Galaxy can’t find a job conf file or no job configuration has been specified inline in the galaxy.yml file, it will use a simple default configuration where all jobs are run on the Galaxy server and are handled by the web serving process, rather than the job handler(s). Galaxy’s job running system is highly configurable, the full range of configuration can be found in the sample job configuration file, job_conf.sample.yml.
The job configuration allows Galaxy to run jobs in multiple locations using a variety of different mechanisms. Some of these mechanisms include:
Local - Galaxy runs jobs on the same computer that Galaxy itself is running on.
DRMAA - Galaxy can connect to a cluster and submit jobs via a distributed resource manager such as Slurm, Condor, PBS Torque or Sun Grid Engine.
Pulsar - Galaxy can also send jobs to remote compute hosts over the internet using Pulsar.
The job configuration can either be defined inline in the Galaxy configuration under galaxy_config.galaxy.job_config, or in its own file, the path to which is specified in galaxy_config.galaxy.job_config_file. The syntax of the configuration is the same in both cases.
The job configuration - basics
The job configuration has three basic sections:
runners - This section lists the types of job management systems that this Galaxy server is configured to use, and tells Galaxy to load the drivers for each type.
execution - This section lists the different attributes such as locations, queues, etc. that Galaxy can send jobs to. Each set of attributes together are called an environment (formerly destination), has a name, and uses a plugin to communicate with that location. They can specify things like the number of CPUs, amount of RAM to be allocated, etc. for DRMAA locations. Usually, one of the destinations is set to be the default.
tools - This section lists the various tools that you would like to send to a non-default destination. Each line in this section pairs up a tool in Galaxy with a particular job destination. Every time Galaxy gets a job for that particular tool, it is always sent to that destination.
The above job configuration defines a runner and an execution to allow Galaxy to run user jobs on the local computer (i.e. The computer that Galaxy is running on.)
Firstly, the runners section contains a plugin called local_runner which loads the python code module for supporting local jobs. Next, the execution section contains an environment named local_env using the runner local_runner. It is also set as the default. So now everytime a user clicks “Execute” on a tool form, Galaxy will run the corresponding job locally using the python code specified.
Finally, we have explicitly mapped the local class of tools to run in the local_env environment. These special tools aren’t parameterized for remote execution - expression tools, upload, etc.
There are a lot of other plugins available for Galaxy for using other resources such as docker containers, kubernetes clusters, Pulsar servers, and HPC clusters to name a few. See the Galaxy documentation on job configuration for more details on these plugins and their configuration.
Hands On: Job Conf
Add a new job_config section to the galaxy section of galaxy_config in group_vars/galaxyservers.yml. Note: placement and whitespace is important here - job_config should be a child of galaxy_config.galaxy, at the same level as other options like id_secret.
In the local runner, workers: 4 means “number of jobs that can be running at one time”. For every other job runner, it means the number of threads that are created to handle Galaxy’s internal pre- and post-job tasks. E.g. if you are in a class and 50 people submit jobs, then there are four threads that can handle these jobs at once. But additional job handlers can be more useful as well.
In the environment local_env, tmp_dir: true means “create a temp directory in the job directory”. By default, it is set to false and if the job uses a temp directory it will create one in the /tmp/ partition and galaxy will not clean it at the end of the job. This can be problematic if the admin does not do regular cleanup of the /tmp/ partition or if the /tmp/ partition is rather small. That’s why we recommand to set this option to true so the admin does not need to worry about the /tmp/ partition for galaxy jobs.
Run the playbook. At the very end, you should see output like the following indicating that Galaxy has been restarted:
We have installed a fairly simple job configuration that does pretty much the same as the default, with one exception: the handling section contains an instruction for Galaxy to use the db-skip-locked method for assigning which process will handle Galaxy jobs. This causes Galaxy to use the job handler processes we defined earlier in the tutorial to handle jobs, rather than handling them in the (gunicorn) web server process. More details can be found in the Scaling and Load Balancing section of the Galaxy documentation.
Later tutorials will build on this simple job configuration.
Productionising Galaxy
This is a fantastic base Galaxy installation but there are numerous additional options we should be setting for a real production Galaxy.
Hands On: More Features!
Make the following changes to your group_vars/galaxyservers.yml:
Check out the full details in the Galaxy documentation, but we’ll discuss a couple briefly:
nginx_x_accel_redirect_base: This is required to have NGINX serve user files. You don’t want Galaxy to waste time reading a 100GB fastq file a user has asked for, so you offload that to NGINX. The request is passed through to Galaxy, so permissions checks still occur, but Galaxy instead replies to NGINX just the path to the file that it should send to the requesting user.
enable_quotas: You definitely want to set a default quota for your users!
expose_user_name: This exposes usernames in the history and dataset sharing forms which makes life easier for your users.
expose_dataset_path: This shares the entire dataset path and enable the user to have access to the command line that the wrapper launched.
cleanup_job: This prevents a job’s files from being cleaned up from disk if it failed, allowing you to debug and see what went wrong.
allow_user_impersonation: Users submit horrible bug reports (often screenshots of unrelated things), impersonation means you can just see their history and look at what went wrong.
Make the following changes to your templates/nginx/galaxy.j2:
--- a/templates/nginx/galaxy.j2
+++ b/templates/nginx/galaxy.j2
@@ -58,4 +58,14 @@ server {
 	location /favicon.ico {
 		alias {{ galaxy_server_dir }}/static/favicon.ico;
 	}
+
+	location /_x_accel_redirect {
+		internal;
+		alias /;
+	}
+
+	# Support click-to-run in the GTN-in-Galaxy Webhook
+	location /training-material/ {
+		proxy_pass https://training.galaxyproject.org/training-material/;
+	}
 }
The _x_accel_redirect is required for the NGINX file serving discussed above. For information on the GTN-in-Galaxy Webhook, see the Galaxy Documentation. It’s a very cool feature which helps your users access training materials directly in Galaxy.
Run the playbook
Code In: Bash
ansible-playbook galaxy.yml
1-galaxy-up.sh
Disaster Strikes! (Optional)
Because you’re an admin, you need to be prepared for any situation, including the worst case scenarios. So we’re going to simulate a disaster and show you how you can recover from it. It’ll be fun!
For this “disaster”, we will pretend that:
Your database is on another machine
Your datasets are on an NFS server or some other remote machine.
Hands On: Summon the Apocalypse
So let’s have a “worst case scenario”, where your Galaxy server gets destroyed
Log on to your machine.
Carefully, as root, rm -rf /srv/galaxy, completely wipe out your Galaxy home directory.
Your entire Galaxy server is gone! 😱
You were a responsible admin and had your user data and database stored on a separate system (and backed up), so at least those survived. Nevertheless, this is when most of us start feeling really bad; bosses start yelling, we start crying or reaching for bad coping habits.
But not you! You spent the day writing this Ansible playbook that describes your environment completely; all of the software that was installed, all of the configuration changes you have made. It leverages many community maintained roles and can be used to completely rebuild the server! With minimal effort on your part.
Hands On: Revert the Apocalypse
Run the playbook
Code In: Bash
ansible-playbook galaxy.yml
Get a hot beverage of your choice while it rebuilds.
Congratulate yourself for saving the day.
And with that, Galaxy should be up and running again. If you log in, you should see the results of any jobs you ran earlier, you should still be able to log in with your old account, and everything should just work.
Ansible can save you from some really bad scenarios, if and only if:
You can replace the hardware or find somewhere new to re-deploy
You’ve made absolutely certain that every change made to a system is recorded within your playbooks and roles (i.e. no manual package installation)
Then you can potentially use it to recover.
Comment: We have experience
We can tell you this, we can repeat it over and over, but unless you really have a disaster happen to you, it is hard to appreciate how important it is that machines are completely controlled in terms of configuration and software deployment.
We’ve experienced these incidents and we know how horribly stressful it can be if an important service like Galaxy goes down and you cannot immediately replace it with another instance. We hope you will immediately apply the lessons from this training material, it can potentially save you a lot of stress and worry.
Production & Maintenance
The time required to maintain a production Galaxy instance depends on the number of users and their specific needs, but a smallish server (<= 25 users) will typically require a day or two per month of maintenance. Large public servers like usegalaxy.org and usegalaxy.eu are largely full time jobs (although even their admins do find time to do other things).
Keeping Galaxy Updated
If you have set your galaxy_commit_id group variable to a branch name like release_25.0, then all you need to do to keep Galaxy up to date (e.g. for security and bug fixes) is to run the playbook regularly. The git module in Ansible checks if you are on the latest commit of a given branch, and will update the clone of the repository if it is not.
Upgrading Galaxy (Optional)
With Ansible, upgrading Galaxy to a new release is incredibly easy. Here is a commit from UseGalaxy.eu’s upgrade:
This is all that is required, changing the galaxy_commit_id and re-running the playbook. Everything else (building the client, database migrations, etc.) are taken care of for you.
It is recommend that you also do the following during an upgrade:
Check out the latest galaxy.yml.sample for the new release, and see if there are any variables you want to set for your server
Compare the other configuration files to see if there are new features you want to take advantage of (e.g. new job runner options or metrics you wish to capture.)
When you’ve read the documentation and checked out the new features, you can then run the playbook and you’re done!
User Support
There are many user support resources available to you and your users online. help.galaxyproject.org is the primary landing point for Galaxy users. For helping individual users, you might find it useful to impersonate them if they fail to send adequate bug reports.
Impersonating
You can activate user impersonation with:
allow_user_impersonation: true
It is recommended to ask permission or consent before impersonating a user: “Hey, mind if we look at your history?”
Also, since Galaxy is not normally a real-time collaborative activity, you should avoid running jobs in their history, which can confuse users when datasets show up unexpectedly.
Additionally you can automatically send failing job error reports, even if users do not submit one, and maybe proactively address those issues (depending on the number of your users).
Running on a cluster
If you need to run on a cluster with a shared file system, you will need to expose several directories to your cluster:
galaxy_shed_tools_dir
galaxy_tool_dependency_dir
galaxy_file_path
galaxy_job_working_directory
galaxy_server_dir
galaxy_venv_dir
But this isn’t strictly true, not every one of these directories needs to be exported over the network. Instead, there are a couple of those directories that can be recreated in different locations (e.g. locally to nodes) using playbook tasks or simply by copying them to the relevant locations. Sometimes admins choose to do this for performance reasons when NFS can be slow or simply unnecessary:
galaxy_server_dir
galaxy_venv_dir
Both of those directories can be re-created by running parts of the galaxyproject.galaxy role on different machines. As neither of these directories is written to during system operations, it is fine for them to be copies living on different machines, rather coming from a single source of truth like an NFS server. For the other directories (e.g. job working directory or tools directory) these need to be written to, and read from, simultaneously from different machines, and should be consistent across the network.
Most of us use NFS, those who are using something more exotic (ceph, gluster, etc) have some reason for that like “my uni provided it” or “we really wanted to try something shiny”. But NFS in most cases is decent and well tested and can be used. For larger deployments, a single NFS node may be insufficient, but at these scales it is common that your university or organisation provides some managed NFS service, e.g. Isilon which has load balancing built into its NFS service.
Other software
But what about your other software, things that are deployed along with Galaxy? Things without an ansible role or are quite weird and require “manual tricks” to deploy?
You can write roles for that! Sometimes they are really ugly roles, but it at least keeps it documented + in place. E.g. UseGalaxy.eu has a custom role for rewriting users and it’s ugly and untested and should not be used by anyone else in case it breaks their site. But it’s one of these manual tricks or bits of glue code, but we can encapsulate it as ansible. You can include tarballs in your role to be deployed and so on.
It may seem daunting to use ansible, but you don’t have to do everything in ansible! You can just do a little bit, for managing just Galaxy, and manage the rest of your stack separately. Whatever fits best for your deployment.
Loving Ansible? Convert your own servers!
A common question we get is:
Is it possible to transform a Galaxy server which was installed by hand, into an ansible-managed one?
Because of the great variance between sites and deployments it is not really possible to produce a guide for doing so. However, if you back your current deployment up and set all of the variables that control paths appropriately, it can be done!
It’s very possible to do this piecemeal, taking one component at a time to ansibilise. nginx is a very easy place to start, the database is as well. Galaxy can be rebuilt in a new location, many of us ran a hand-managed galaxy setup somewhere like /home/janedoe/work/projects/galaxy that suddenly became a permanent project, this is a good chance to keep that but rebuild an identical one in /srv/galaxy or similar, and then switch over the traffic to that new, production Galaxy. Relocating data is a bit tougher and can require rewriting entries in the database.
Final Notes
If you’ve been following along you should have a production-ready Galaxy, secured, everything ready to go.
Hands On: Time to git commit
It’s time to commit your work! Check the status with
git status
Add your changed files with
git add ... # any files you see that are changed
And then commit it!
git commit -m 'Finished Galaxy Installation with Ansible'
Hands On: Using Git with Ansible Vaults
When looking at git log to see what you changed, you cannot easily look into
Ansible Vault changes: you just see the changes in the encrypted versions, which
is unpleasant to read.
Instead we can use .gitattributes to tell git that we want to use a certain
program to convert some files before calculating their diffs,
in this case ansible-vault view.
Check your git log -p and see how the Vault changes look (you can type /vault to search). Notice that they’re just changed encoded content.
Create the file .gitattributes in the same folder as your galaxy.yml playbook, with the following contents:
This set the diff attribute to ansible-vault for the group_vars/secret.yml file.
Additionally, the merge=binary option tells git not to attempt to do a three-way merge of this file.
Run the following command to configure git to convert the files having the diff attribute set to ansible-vault, using the ansible-vault view command, before diffing them:
Figure 4: This approximately represents what you have setup today, NGINX proxies requests to Gunicorn which runs the Galaxy App. That talks to Postgres, and Storage.
Comment: Galaxy Admin Training Path
The yearly Galaxy Admin Training follows a specific ordering of tutorials. Use this timeline to help keep track of where you are in Galaxy Admin Training.
Did you use this material as an instructor? Feel free to give us feedback on how it went.
Did you use this material as a learner or student? Click the form below to leave feedback.
Hiltemann, Saskia, Rasche, Helena et al., 2023 Galaxy Training: A Powerful Framework for Teaching! PLOS Computational Biology 10.1371/journal.pcbi.1010752
Batut et al., 2018 Community-Driven Data Analysis Training for Biology Cell Systems 10.1016/j.cels.2018.05.012
@misc{admin-ansible-galaxy,
author = "Helena Rasche and Nate Coraor and Simon Gladman",
	title = "Galaxy Installation with Ansible (Galaxy Training Materials)",
	year = "",
	month = "",
	day = "",
	url = "\url{https://training.galaxyproject.org/training-material/topics/admin/tutorials/ansible-galaxy/tutorial.html}",
	note = "[Online; accessed TODAY]"
}
@article{Hiltemann_2023,
	doi = {10.1371/journal.pcbi.1010752},
	url = {https://doi.org/10.1371%2Fjournal.pcbi.1010752},
	year = 2023,
	month = {jan},
	publisher = {Public Library of Science ({PLoS})},
	volume = {19},
	number = {1},
	pages = {e1010752},
	author = {Saskia Hiltemann and Helena Rasche and Simon Gladman and Hans-Rudolf Hotz and Delphine Larivi{\`{e}}re and Daniel Blankenberg and Pratik D. Jagtap and Thomas Wollmann and Anthony Bretaudeau and Nadia Gou{\'{e}} and Timothy J. Griffin and Coline Royaux and Yvan Le Bras and Subina Mehta and Anna Syme and Frederik Coppens and Bert Droesbeke and Nicola Soranzo and Wendi Bacon and Fotis Psomopoulos and Crist{\'{o}}bal Gallardo-Alba and John Davis and Melanie Christine Föll and Matthias Fahrner and Maria A. Doyle and Beatriz Serrano-Solano and Anne Claire Fouilloux and Peter van Heusden and Wolfgang Maier and Dave Clements and Florian Heyl and Björn Grüning and B{\'{e}}r{\'{e}}nice Batut and},
	editor = {Francis Ouellette},
	title = {Galaxy Training: A powerful framework for teaching!},
	journal = {PLoS Comput Biol}
}
Funding
These individuals or organisations provided funding support for the development of this resource
Congratulations on successfully completing this tutorial!
5 stars
21
4 stars
8
3 stars
2
1 stars
1
0 stars
3
July 2024
4 stars:
Liked: Make me to the point
Disliked: Anyway, kinda stuck at some unexpected error en route (like my machine use python 3.12, hence lack 2to3 lib)
March 2023
5 stars:
Liked: Everything
August 2022
5 stars:
Liked: The instructions were clear and helpful (especially with the video alongside)
Disliked: It would be super helpful if there were more subsection links! I set followed this tutorial to setup a server for my team, and when they had questions or wanted more info on why or how I did certain things it would have been nice to be able to link them more specifically to the step I wanted instead of the bigger section and then giving them key words to search for
July 2022
5 stars:
Liked: relatively easy to follow, concept explanations are great
June 2022
1 stars:
Liked: tree -l 2 was helpful as otherwise unclear which file goes where
Disliked: Current version of the tutorial is broken, consider rolling back to archive. Ansible errors very hard to troubleshoot - ideally add more tips where things can go wrong, for ex ansible vault seems to enter an unfixable state if you mess up the secret yml file and have to make it again
March 2022
5 stars:
Liked: how seamless it was to deploy it
5 stars:
Liked: Clear and structured - everything ran without issues on my machines
5 stars:
Liked: the structure, it was very well organized
February 2022
4 stars:
Liked: Pretty simple step-by-step; A couple of syntax errors are included to make things "interesting" when trying to deploy.
Disliked: Found another syntax error in the referenced tutorial: In the galaxy.j2 file, "location /_x_accel_redirect" should be "location /_x_accel_redirect/"
January 2022
5 stars:
Liked: Code examples that you customize to your server set-up; hints and sidebars are very helpful; as is the in-depth explanation of what the code is doing.
Disliked: One solution to errors that arise would be to try newer playbook versions. Although the tutorial cautioned that newer versions could create problems - in my case it solved problems. I found that the version of galaxyproject.galaxy used in the tutorial-- version: 0.9.16 was incompatible with Ubuntu 20.04 LTS - resulting in a failure to install "futures". When I changed to the newest galaxyproject.galaxy version the problem was solved.
September 2021
4 stars:
Disliked: I think there is an error in the instructions around which galaxy release to use. https://training.galaxyproject.org/archive/2021-08-01/topics/admin/tutorials/ansible-galaxy/tutorial.html#galaxy step 9. Fails with a pip install error for attmap at galaxy dependency installation: FAILED! => {"changed": false, "cmd": ["/srv/galaxy/venv/bin/pip3", "install", "--index-url", "https://wheels.galaxyproject.org/simple/", "--extra-index-url", "https://pypi.python.org/simple", "-r", "/srv/galaxy/server/lib/galaxy/dependencies/pinned-requirements.txt"], "msg": "stdout: Looking in indexes: https://wheels.galaxyproject.org/simple, https://pypi.python.org/simple\nIgnoring importlib-metadata: markers 'python_version < \"3.8\"' don't match your environment\nIgnoring importlib-resources: markers 'python_version < \"3.7\"' don't match your environment\nIgnoring pathlib2: markers 'python_version < \"3.6\"' don't match your environment\nIgnoring ruamel.yaml.clib: markers 'platform_python_implementation == \"CPython\" and python_version < \"3.8\"' don't match your environment\nIgnoring typing: markers 'python_version < \"3.5\"' don't match your environment\nIgnoring zipp: markers 'python_version < \"3.8\"' don't match your environment\nCollecting adal==1.2.4\n Using cached adal-1.2.4-py2.py3-none-any.whl (55 kB)\nCollecting amqp==2.6.0\n Using cached amqp-2.6.0-py2.py3-none-any.whl (47 kB)\nCollecting appdirs==1.4.4\n Using cached appdirs-1.4.4-py2.py3-none-any.whl (9.6 kB)\nCollecting attmap==0.12.11\n Using cached attmap-0.12.11.tar.gz (9.9 kB)\n\n:stderr: ERROR: Command errored out with exit status 1:\n command: /srv/galaxy/venv/bin/python -c 'import io, os, sys, setuptools, tokenize; sys.argv[0] = '\"'\"'/tmp/pip-install-rswp62oy/attmap_d1e6f1f187954e539109df4d7760fde7/setup.py'\"'\"'; __file__='\"'\"'/tmp/pip-install-rswp62oy/attmap_d1e6f1f187954e539109df4d7760fde7/setup.py'\"'\"';f = getattr(tokenize, '\"'\"'open'\"'\"', open)(__file__) if os.path.exists(__file__) else io.StringIO('\"'\"'from setuptools import setup; setup()'\"'\"');code = f.read().replace('\"'\"'\\r\\n'\"'\"', '\"'\"'\\n'\"'\"');f.close();exec(compile(code, __file__, '\"'\"'exec'\"'\"'))' egg_info --egg-base /tmp/pip-pip-egg-info-2gc_ov_9\n cwd: /tmp/pip-install-rswp62oy/attmap_d1e6f1f187954e539109df4d7760fde7/\n Complete output (1 lines):\n error in attmap setup command: use_2to3 is invalid.\n ----------------------------------------\nWARNING: Discarding https://files.pythonhosted.org/packages/d0/d4/8b8fca155270a6675bac9a1e49b7c616ae763f66af7b836042ecfc805552/attmap-0.12.11.tar.gz#sha256=95b1f7dbcdad7278a3702fa921be6271046c96e1c9ed9feb10e0d4c13092b0a0 (from https://pypi.org/simple/attmap/). Command errored out with exit status 1: python setup.py egg_info Check the logs for full command output.\nERROR: Could not find a version that satisfies the requirement attmap==0.12.11 (from versions: 0.1, 0.1.1, 0.1.2, 0.1.4, 0.1.5, 0.1.6, 0.1.7, 0.1.8, 0.2, 0.3, 0.4, 0.5, 0.6, 0.7, 0.8, 0.9, 0.10, 0.11, 0.12, 0.12.1, 0.12.2, 0.12.3, 0.12.4, 0.12.5, 0.12.6, 0.12.7, 0.12.8, 0.12.9, 0.12.10, 0.12.11, 0.13.0)\nERROR: No matching distribution found for attmap==0.12.11\n"} This occurs with galaxy_commit_id: release_20.09 (as per the instructions), but changing to release_21.05 makes the error go away.
July 2021
5 stars:
Liked: Simple and short and easy THX
June 2021
5 stars:
Liked: All points were very well explained
February 2021
4 stars:
Liked: Some good things to note and keep track of regarding moving to production, especially updating the version.
5 stars:
Liked: Realy clear and solid explanations of how to use Ansible for Galaxy installation
January 2021
5 stars:
Liked: The clear explanation of every part of the roles, modules etc. What they do why they're there. Even if I wasn't interested in everything it's good to know that if I ever need that information I can look back to this tutorial
Disliked: I don't know if it can be improved but the actual time of the tutorial is really long. After watching it, I totally understand why but if it could be something like 1 hour videos (or less) that would be less tiring. Of course I am fully aware that there is a broad range of topics that need to be covered.
0 stars:
Liked: the step by step exercises
Disliked: for me as a noob some diagrams or schemes would often be helpful to see how things relate to each others
5 stars:
Liked: very easy to follow; excellent documentation
Disliked: note about using non- let's encrypt certificate
0 stars:
Liked: very structured and understandable
Disliked: templates/nginx/galaxy.j2 -> "uwsgi_pass 127.0.0.1:8080" should not be configured statically and changed to a variable from the groups_vars if the port is changed there in the uwsgi variable settings
August 2020
4 stars:
Liked: It is very practical tutorial
Disliked: I had to change those two variables to make it work on my ubuntu machine: "virtualenv_command: pyvenv" as it also recommends in README but not the default in the galaxy role "__galaxy_mutable_config_dir: "{{ galaxy_root }}/var/config" " my Ansible didn't understand the previous line defined variable, so I had to define "__galaxy_mutable_config_dir" base on "galaxy_root" variable
Questions:
Open image in new tab
Open image in new tab
Open image in new tab
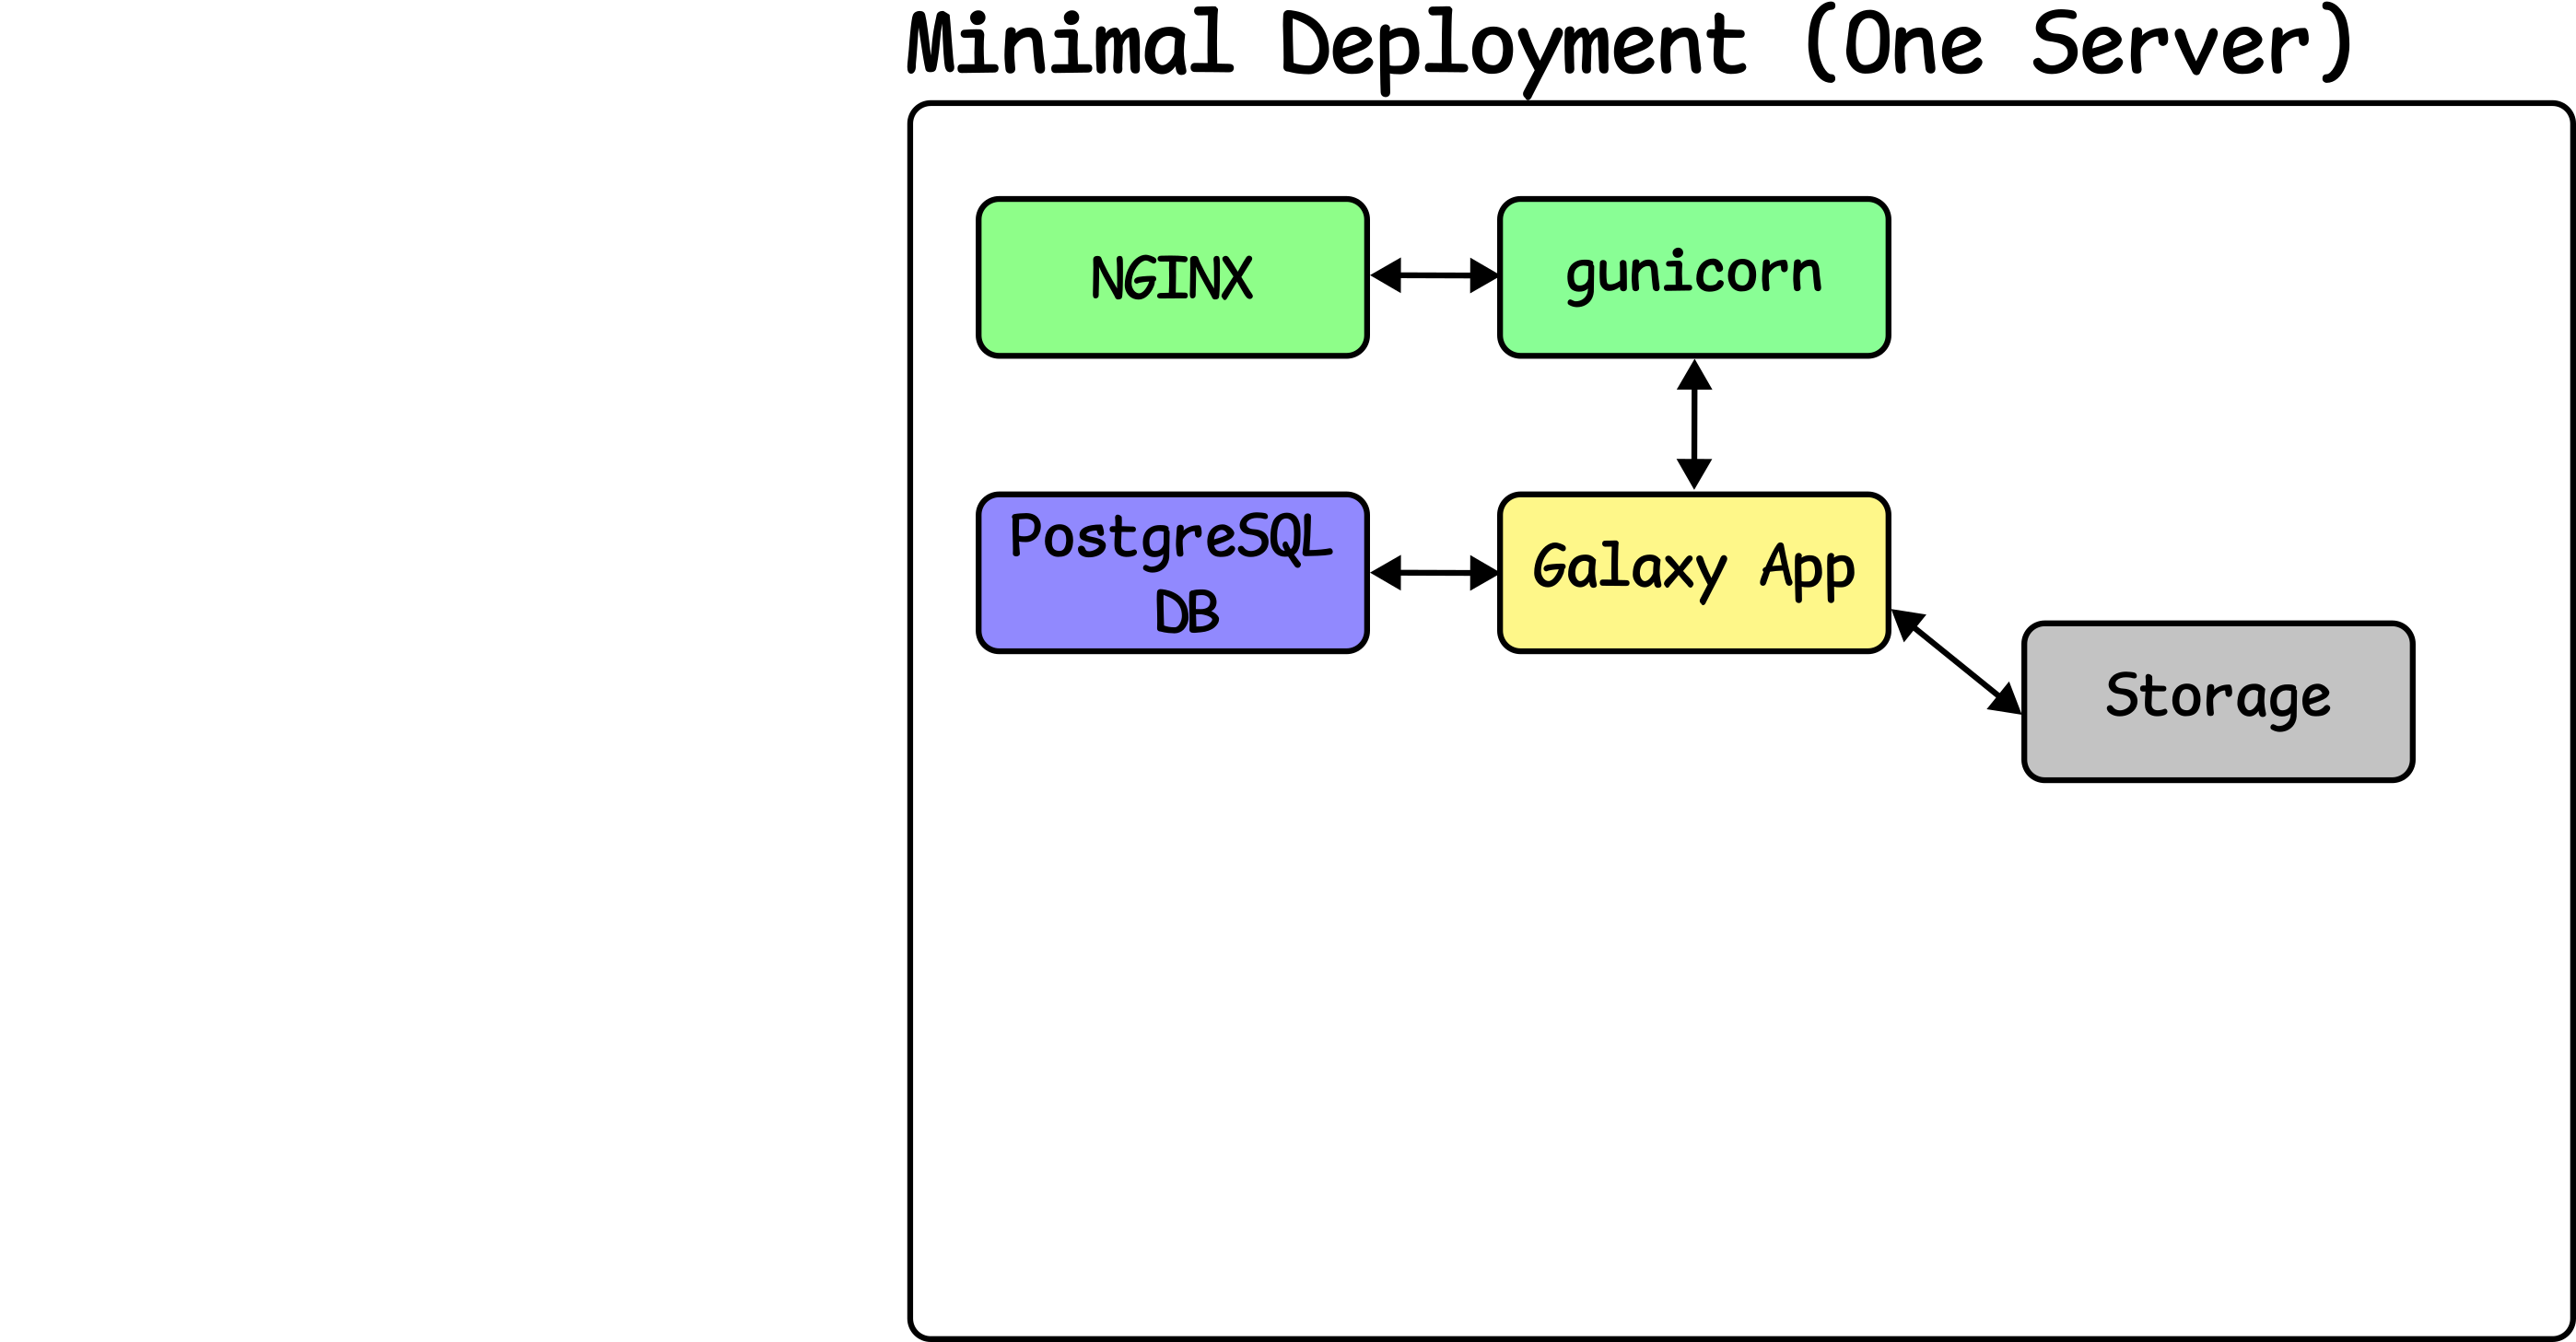 Open image in new tab