Galaxy Interactive Tools
| Author(s) |
|
| Reviewers |
|
OverviewQuestions:
Objectives:
What are Galaxy Interactive Tools?
How can I enable Interactive Tools on my Galaxy instance?
Requirements:
Understand what Galaxy Interactive Tools are and how they work
Be aware of the security implications of Interactive Tools
Have a basic understanding of the Interactive Tools (GxIT/GIE) Proxy, its purpose, and configuration
Be familiar with wildcard SSL certificates and how to get them from Let’s Encrypt
Configure your Galaxy to serve Interactive Tools using an Ansible Playbook
Start, run, and use an Interactive Tool
- slides Slides: Ansible
- tutorial Hands-on: Ansible
- slides Slides: Galaxy Installation with Ansible
- tutorial Hands-on: Galaxy Installation with Ansible
- slides Slides: Connecting Galaxy to a compute cluster
- tutorial Hands-on: Connecting Galaxy to a compute cluster
- tutorial Hands-on: Mapping Jobs to Destinations using TPV
Time estimation: 2 hoursSupporting Materials:Published: Feb 27, 2020Last modification: Jan 23, 2026License: Tutorial Content is licensed under Creative Commons Attribution 4.0 International License. The GTN Framework is licensed under MITpurl PURL: https://gxy.io/GTN:T00010rating Rating: 3.5 (0 recent ratings, 2 all time)version Revision: 30
Galaxy Interactive Tools (GxITs) are a method to run containerized tools that are interactive in nature. Interactive Tools typically run a persistent service accessed on a specific port, until terminated by the user. One common example of such a tool is Jupyter Notebook. Galaxy Interactive Tools are submitted through Galaxy’s job management system and thus are scheduled the same as any other Galaxy tool - on a Slurm cluster, for instance. Galaxy Interactive Tools were introduced in Galaxy Release 19.09.
Comment: Evolving TopicGalaxy Interactive Tools are a relatively new and rapidly evolving feature and there are some rough edges. Work to improve the experience of deploying and using them is ongoing. Please watch the Galaxy Release Notes for updates, changes, new documentation, and bug fixes.
You may find extra information about Interactive Tools on the Galaxy Documentation.
Warning: Before You Continue - Wildcard DNS CertificatesIf you are not completing this tutorial as part of a Galaxy Admin Training course, you will need a wildcard DNS record for your Galaxy server and a method for obtaining a wildcard SSL certificate for your Galaxy server.
Galaxy Interactive Tools require a wildcard SSL certificate. Because the Galaxy Installation with Ansible tutorial fetches Let’s Encrypt certificates, this tutorial fetches Let’s Encrypt wildcard certificates. However, this process is only valid for Galaxy Admin Training courses, because Let’s Encrypt wildcard certificates can only be fetched using the DNS-01 challenge method, which requires control of a dynamic DNS server (which we have preconfigured for use at training courses). Configuring your DNS service for dynamic updates is outside the scope of this tutorial, but it will show you how to request certificates using DNS-01, which can be adapted for your site.
If you are using Let’s Encrypt, a list of available DNS plugins for Certbot can be found in the Certbot documentation. If you are not using Let’s Encrypt, please consult your certificate vendor’s documentation for information on how to obtain a wildcard certificate. You will need a certificate with (at least) the subject alternative names
galaxy.example.organd*.ep.interactivetool.galaxy.example.org(wheregalaxy.example.orgis the hostname of your Galaxy server).You will also need a wildcard DNS
CNAMErecord for*.ep.interactivetool.galaxy.example.org. You can verify that your Galaxy server has such a record using thehostordigcommand line tools like so:$ host -t cname foo.ep.interactivetool.live.usegalaxy.eu foo.ep.interactivetool.live.usegalaxy.eu is an alias for usegalaxy.eu. $ host -t cname bar.ep.interactivetool.live.usegalaxy.eu bar.ep.interactivetool.live.usegalaxy.eu is an alias for usegalaxy.eu.Please consult your DNS server software or cloud provider’s documentation for information on how to set up a wildcard record.
Warning: Uses Ansible!If the terms “Ansible,” “role,” and “playbook” mean nothing to you, please check out the Ansible introduction slides and the Ansible introduction tutorial.
Warning: Have you installed Galaxy?This tutorial builds upon the work in the Galaxy Installation with Ansible tutorial, please ensure that you have completed that tutorial first.
Agenda
Installing Docker
Galaxy Interactive Tools run in Docker containers. Thus, the first step is ensuring that the nodes that will run interactive tools have Docker installed. We will use the Docker role by the prolific Ansible Galaxy publisher, Jeff Geerling (geerlingguy). Have a look at the geerlingguy.docker README and defaults/main.yml to get an understanding of what variables are used to control the role.
QuestionWhat variables might be relevant to using this role?
The
docker_usersvariable (a list) controls which users are able to interact with the Docker daemon, which our Galaxy user will need to do. Additionally, Docker Compose is configured by default, which we do not need, so it can be disabled withdocker_install_compose: false.
Comment: Ansible Best PracticesIf you’ve set up your Galaxy server using the Galaxy Installation with Ansible tutorial, you will have created a
galaxyserversgroup in your inventory file,hosts, and placed your variables ingroup_vars/galaxyservers.yml. Although for the purposes of this tutorial, the Galaxy server and cluster node are one and the same, in a real world deployment they are very likely to be different hosts. We will continue to use thegalaxyserversgroup for simplicity, but in your own deployment you should consider creating an additional group for cluster nodes.
Hands On: Installing Docker with Ansible
In your working directory, add the Docker role to your
requirements.yml:- src: geerlingguy.docker version: 7.8.0Install the requirements with
ansible-galaxy:ansible-galaxy role install -p roles -r requirements.ymlEdit the group variables file,
group_vars/galaxyservers.yml:The relevant variables to set for this role are:
Variable Type Description docker_userslist of strings List of users to be added to the dockergroupdocker_install_composeboolean Whether to install and configure Docker Compose Add the following lines to your
group_vars/galaxyservers.ymlfile:# Interactive Tools docker_install_compose: false docker_users: - "{{ galaxy_user.name }}"QuestionWhy is
"{{ galaxy_user.name }}"specified instead of just the usergalaxy?Duplicating values is never a good idea. If we needed to change the Galaxy user down the line or wanted to reuse this playbook on another host where the Galaxy username was different, we would have to change the value in multiple locations.
Add the new role to the list of roles under the
roleskey in your playbook,galaxy.yml:--- - hosts: galaxyservers become: true roles: # ... existing roles ... - geerlingguy.dockerRun the playbook:
ansible-playbook galaxy.yml
Congratulations, you’ve set up Docker. Verify the installation using the docker info command (but keep in mind: what users did we authorize to interact with Docker?).
Enabling the Interactive Tools Proxy
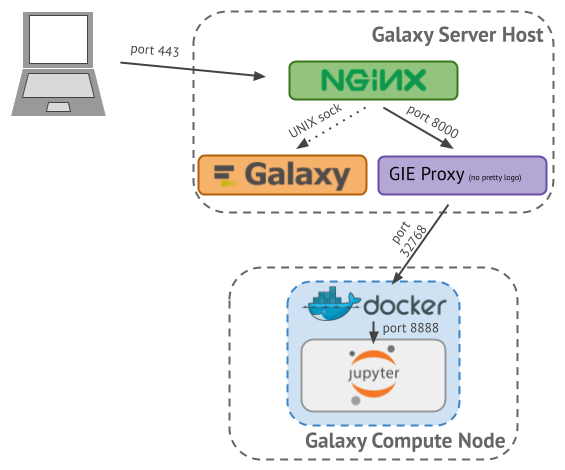
When an Interactive Tool’s Docker container starts, it will be assigned a random port. In order to connect clients to the Interactive Tool, Galaxy needs to determine this port (and the node on which the tool is running) and configure a proxy from Galaxy to the GxIT’s host and port. Consider the following example of running the Jupyter Notebook Interactive Tool, shown in Figure 1 below:
- nginx listens for requests from the client on port 443 (https)
- Requests for Galaxy are delivered from nginx to Galaxy over a UNIX domain socket
- Requests for Interactive Tools are delivered from nginx to the Interactive Tools Proxy over (by default) port 8000 (http)
- GxIT http requests are forwarded by the proxy to Docker on the node on the container’s (randomly assigned) port 32768
- GxIT http requests are again forwarded by Docker to Jupyter on its in-container “published” port 8888
 Open image in new tab
As you can see, the client only ever speaks to nginx on the Galaxy server running on the standard https port (443), never directly to the interactive tool (which may be running on a node that does not even have a public IP address). By default, the mapping of GxIT invocation and its corresponding host/port is kept in a SQLite database known as the Interactive Tools Session Map, and the path to this database is important, since both Galaxy and the proxy need access to it.
The GxIT Proxy is written in Node.js. A straightforward method to set it up is to use Galaxy’s process manager, Gravity, to install and configure it.
Hands On: Installing and configuring the Proxy using Gravity
Edit the group variables file,
group_vars/galaxyservers.yml; the GxIT Proxy configuration lives under thegravity['galaxy_config']['gx_it_proxy']section. The available settings are:
Setting Type Description enablebool Set to trueto enable the GxIT Proxy. Defaults tofalse.versionstr Version specifier for the GxIT Proxy Node.js package. Defaults to >=0.0.6.ipstr Public-facing IP of the proxy. Defaults to localhost.portint Public-facing port of the proxy. Defaults to 4002.sessionsstr Path to the Interactive Tools Session Map database. Defaults to database/interactivetools_map.sqlite.verbosebool Include verbose messages in the GxIT Proxy. Defaults to true.forward_ipstr Forward all requests to this IP. This is an advanced option that is only needed when proxying to remote interactive tool container that cannot be reached through the local network. forward_portint Forward all requests to this port. This is an advanced option that is only needed when proxying to remote interactive tool container that cannot be reached through the local network. reverse_proxystr Rewrite location blocks with proxy port. This is an advanced option that is only needed when proxying to remote interactive tool container that cannot be reached through the local network. Defaults to false.umaskstr Permissions mask under which service should be executed. start_timeoutint Value of supervisor startsecs, systemd TimeoutStartSec. Defaults to 10.stop_timeoutint Value of supervisor stopwaitsecs, systemd TimeoutStopSec. Defaults to 10.memory_limitfloat Memory limit (in GB). If the service exceeds the limit, it will be killed. Default is no limit or the value of the memory_limitsetting at the top level of the Gravity configuration, if set. Ignored ifprocess_managerissupervisor.environmentmapping Extra environment variables and their values to set when running the service. A dictionary where keys are the variable names. Configure the settings in the
group_vars/galaxyservers.ymlfile:# ... other settings ... # galaxy_config: galaxy: # ... other settings ... # # Interactive Tools interactivetools_enable: true interactivetools_map: "{{ gxit_proxy_sessions_path }}" # ... other settings ... # gravity: # ... other settings ... # gx_it_proxy: enable: true port: 4002 sessions: "{{ gxit_proxy_sessions_path }}" # ... other settings ... # # ... other settings ... # # ... other settings ... # gxit_proxy_sessions_path: "{{ galaxy_mutable_data_dir }}/interactivetools_map.sqlite"Run the playbook:
ansible-playbook galaxy.yml
Because the proxy runs as a systemd service, you can inspect the log of the service using journalctl. The service name is galaxy-gx-it-proxy:
$ sudo journalctl -eu galaxy-gx-it-proxy
Feb 14 17:38:49 gcc-4 systemd[1]: Started galaxy-gx-it-proxy.service - Galaxygx-it-proxy
...
Feb 14 17:38:49 gcc-4 node[3679]: Watching path /srv/galaxy/var/interactivetools_map.sqlite
Feb 14 17:38:49 gcc-4 node[3679]: Listening on localhost:4002
Comment: NoteYou can ignore errors about failing to read the sessions map file for now - Galaxy will create it when it’s needed.
Proxying the Proxy
As explained in the previous section, we will proxy the Interactive Tools Proxy with nginx so that it can serve requests on the standard HTTPS port, 443. Because we’ve configured nginx with Ansible, this is relatively simple.
Hands On: Configuring NGINX
Edit the group variables file,
group_vars/galaxyservers.ymland add a new item to the existingnginx_ssl_serversso it matches:nginx_ssl_servers: - galaxy - galaxy-gxit-proxyThe nginx configuration
galaxy-gxit-proxydoesn’t exist yet, but we’ll create it in a moment.Create
templates/nginx/galaxy-gxit-proxy.j2with the following contents:server { # Listen on port 443 listen *:443 ssl; # Match all requests for the interactive tools subdomain server_name *.interactivetool.{{ inventory_hostname }}; # Our log files will go here. access_log syslog:server=unix:/dev/log; error_log syslog:server=unix:/dev/log; # Proxy all requests to the GxIT Proxy application location / { proxy_redirect off; proxy_http_version 1.1; proxy_set_header Host $host; proxy_set_header X-Real-IP $remote_addr; proxy_set_header Upgrade $http_upgrade; proxy_set_header Connection "upgrade"; proxy_pass http://localhost:{{ galaxy_config.gravity.gx_it_proxy.port }}; } }To enable Path-based Interactive Tools, open
templates/nginx/galaxy.j2and add the following contents:server { # ... existing settings ... # Route all path-based interactive tool requests to the InteractiveTool proxy application location ~* ^/(interactivetool/.+)$ { proxy_redirect off; proxy_http_version 1.1; proxy_set_header Host $host; proxy_set_header X-Real-IP $remote_addr; proxy_set_header Upgrade $http_upgrade; proxy_set_header Connection "upgrade"; proxy_pass http://localhost:{{ galaxy_config.gravity.gx_it_proxy.port }}; } # ... other existing settings ... }Run the playbook:
ansible-playbook galaxy.yml
Getting a Wildcard SSL Certificate
During the Galaxy Installation with Ansible tutorial, we acquired an SSL certificate for our Galaxy server from Let’s Encrypt. This certificate was issued for the hostname of your Galaxy server (e.g. galaxy.example.org). SSL certificates are valid only for the name to which they were issued. This presents a problem for us due to the way that Galaxy Interactive Tools work.
In order to ensure each Interactive Tool’s cookies are unique, and to provide each tool with a unique entry point, they are served from a subdomain of your Galaxy server (e.g. <unique-id>.ep.interactivetool.galaxy.example.org). Your SSL cert is not valid for this subdomain. Further, in order to support the random <unique-id> in the hostname, we need a wildcard certificate for *.ep.interactivetool.galaxy.example.org.
This process is highly dependent on your site; specifically, your SSL certificate vendor, and your DNS server software or cloud provider.
Let’s Encrypt, the SSL certificate vendor we use in our tutorials, can only generate wildcard certificates using the DNS-01 challenge method, which works by issuing a dynamic DNS update to set the requested domain’s TXT record.
If you are completing this tutorial as part of a Galaxy Admin Training course, we might have precreated a dynamic DNS server that you will use for this step. The TSIG key that allows you to perform dynamic DNS updates will be provided to you. Your instructor will also tell you which option to follow (1 or 2), depending on the DNS provider that was chosen for this course.
As we use Let’s Encrypt in staging mode, the wildcard certificates generated with either option 1 or 2 will still be invalid, and you will still see a warning in your web browser when accessing an Interactive Tool. If this warning is not a problem for you, you can just skip this section of the tutorial, and move on to “Enabling Interactive Tools in Galaxy”.
Hands On: Requesting a Wildcard Certificate with Certbot using Ansible - Option 1 (rfc2136)This method uses a DNS provider hosted by the Galaxy Project.
Edit the group variables file,
group_vars/galaxyservers.yml:The relevant variables to set for this role are:
Variable Type Description certbot_domainslist List of domains to include as subject alternative names (the first will also be the certificate’s common name) certbot_dns_providerstring Name of Certbot DNS plugin to use certbot_dns_credentialsdictionary Plugin-specific credentials for performing dynamic DNS updates certbot_expandboolean Whether to “expand” an existing certificate (add new domain names to it)
Add a new item to the existing
certbot_domainslist so it matches:certbot_domains: - "{{ inventory_hostname }}" - "*.ep.interactivetool.{{ inventory_hostname }}"Comment out the existing
certbot_auth_methodlike so:#certbot_auth_method: --webrootAlthough this is not explicitly required (setting
certbot_dns_provideras we do overrides this setting), doing so is less confusing in the future, since it makes it clear that the “webroot” method for Let’s Encrypt WEB-01 challenges is no longer in use for this server.Add the following lines to your
group_vars/galaxyservers.ymlfile:certbot_dns_provider: rfc2136 certbot_dns_credentials: server: ns-training.galaxyproject.org port: 53 name: certbot-training. secret: <SECRET PROVIDED BY INSTRUCTOR> algorithm: HMAC-SHA512Run the playbook with
certbot_expand:ansible-playbook galaxy.yml -e certbot_expand=trueQuestionWhat is the
-eflag toansible-playbookand why did we use it?As per
ansible-playbook --help:-e EXTRA_VARS, --extra-vars EXTRA_VARS set additional variables as key=value or YAML/JSON, if filename prepend with @We used this flag because
certbot_expandonly needs to be set once, when we are adding a new domain to the certificate. It should not be enabled on subsequent runs of the playbook, or else we would request a new certificate on each run! Thus, it does not make sense to add it to a vars file.Be patient! The certificate request step can take time due to the time allowed for DNS propagation to occur.
Hands On: Requesting a Wildcard Certificate with Certbot using Ansible - Option 2 (route53)This method uses route53, the Amazon Web Services DNS provider. To manage connection to AWS, we will first install a specific role.
In your working directory, add the aws_cli role to your
requirements.yml:- src: usegalaxy_eu.aws_cli version: 0.0.1Install the requirements with
ansible-galaxy:ansible-galaxy role install -p roles -r requirements.ymlOpen
galaxy.ymlwith your text editor to add the roleusegalaxy_eu.aws_clijust before the nginx role:diff --git a/galaxy.yml b/galaxy.yml --- a/galaxy.yml +++ b/galaxy.yml @@ -21,6 +21,7 @@ become: true become_user: galaxy - usegalaxy_eu.galaxy_systemd + - usegalaxy_eu.aws_cli - galaxyproject.nginx - geerlingguy.dockerIf you haven’t worked with diffs before, this can be something quite new or different.
If we have two files, let’s say a grocery list, in two files. We’ll call them ‘a’ and ‘b’.
Code In: Old$ cat old
🍎
🍐
🍊
🍋
🍒
🥑Code Out: New$ cat new
🍎
🍐
🍊
🍋
🍍
🥑We can see that they have some different entries. We’ve removed 🍒 because they’re awful, and replaced them with an 🍍
Diff lets us compare these files
$ diff old new
5c5
< 🍒
---
> 🍍
Here we see that 🍒 is only in a, and 🍍 is only in b. But otherwise the files are identical.
There are a couple different formats to diffs, one is the ‘unified diff’
$ diff -U2 old new
--- old	2022-02-16 14:06:19.697132568 +0100
+++ new	2022-02-16 14:06:36.340962616 +0100
@@ -3,4 +3,4 @@
 🍊
 🍋
-🍒
+🍍
 🥑
This is basically what you see in the training materials which gives you a lot of context about the changes:
--- oldis the ‘old’ file in our view+++ newis the ‘new’ file- @@ these lines tell us where the change occurs and how many lines are added or removed.
- Lines starting with a - are removed from our ‘new’ file
- Lines with a + have been added.
So when you go to apply these diffs to your files in the training:
- Ignore the header
- Remove lines starting with - from your file
- Add lines starting with + to your file
The other lines (🍊/🍋 and 🥑) above just provide “context”, they help you know where a change belongs in a file, but should not be edited when you’re making the above change. Given the above diff, you would find a line with a 🍒, and replace it with a 🍍
Added & Removed Lines
Removals are very easy to spot, we just have removed lines
--- old	2022-02-16 14:06:19.697132568 +0100
+++ new	2022-02-16 14:10:14.370722802 +0100
@@ -4,3 +4,2 @@
 🍋
 🍒
-🥑
And additions likewise are very easy, just add a new line, between the other lines in your file.
--- old	2022-02-16 14:06:19.697132568 +0100
+++ new	2022-02-16 14:11:11.422135393 +0100
@@ -1,3 +1,4 @@
 🍎
+🍍
 🍐
 🍊
Completely new files
Completely new files look a bit different, there the “old” file is
/dev/null, the empty file in a Linux machine.$ diff -U2 /dev/null old
--- /dev/null 2022-02-15 11:47:16.100000270 +0100
+++ old 2022-02-16 14:06:19.697132568 +0100
@@ -0,0 +1,6 @@
+🍎
+🍐
+🍊
+🍋
+🍒
+🥑And removed files are similar, except with the new file being /dev/null
--- old	2022-02-16 14:06:19.697132568 +0100
+++ /dev/null	2022-02-15 11:47:16.100000270 +0100
@@ -1,6 +0,0 @@
-🍎
-🍐
-🍊
-🍋
-🍒
-🥑
Edit the group variables file,
group_vars/galaxyservers.yml:The relevant variables to set for this role are:
Variable Type Description certbot_domainslist List of domains to include as subject alternative names (the first will also be the certificate’s common name) certbot_dns_providerstring Name of Certbot DNS plugin to use certbot_dns_credentialsdictionary Plugin-specific credentials for performing dynamic DNS updates certbot_expandboolean Whether to “expand” an existing certificate (add new domain names to it)
Add a new item to the existing
certbot_domainslist so it matches:certbot_domains: - "{{ inventory_hostname }}" - "*.ep.interactivetool.{{ inventory_hostname }}"Comment out the existing
certbot_auth_methodlike so:#certbot_auth_method: --webrootAlthough this is not explicitly required (setting
certbot_dns_provideras we do overrides this setting), doing so is less confusing in the future, since it makes it clear that the “webroot” method for Let’s Encrypt WEB-01 challenges is no longer in use for this server.Add the following lines to your
group_vars/galaxyservers.ymlfile:certbot_dns_provider: route53 aws_cli_credentials: - access_key: "<SECRET PROVIDED BY INSTRUCTOR>" secret_key: "<SECRET PROVIDED BY INSTRUCTOR>" homedir: /root owner: root group: rootRun the playbook with
certbot_expand:ansible-playbook galaxy.yml -e certbot_expand=trueQuestionWhat is the
-eflag toansible-playbookand why did we use it?As per
ansible-playbook --help:-e EXTRA_VARS, --extra-vars EXTRA_VARS set additional variables as key=value or YAML/JSON, if filename prepend with @We used this flag because
certbot_expandonly needs to be set once, when we are adding a new domain to the certificate. It should not be enabled on subsequent runs of the playbook, or else we would request a new certificate on each run! Thus, it does not make sense to add it to a vars file.
You can verify that your certificate has been expanded using your browser’s developer tools:
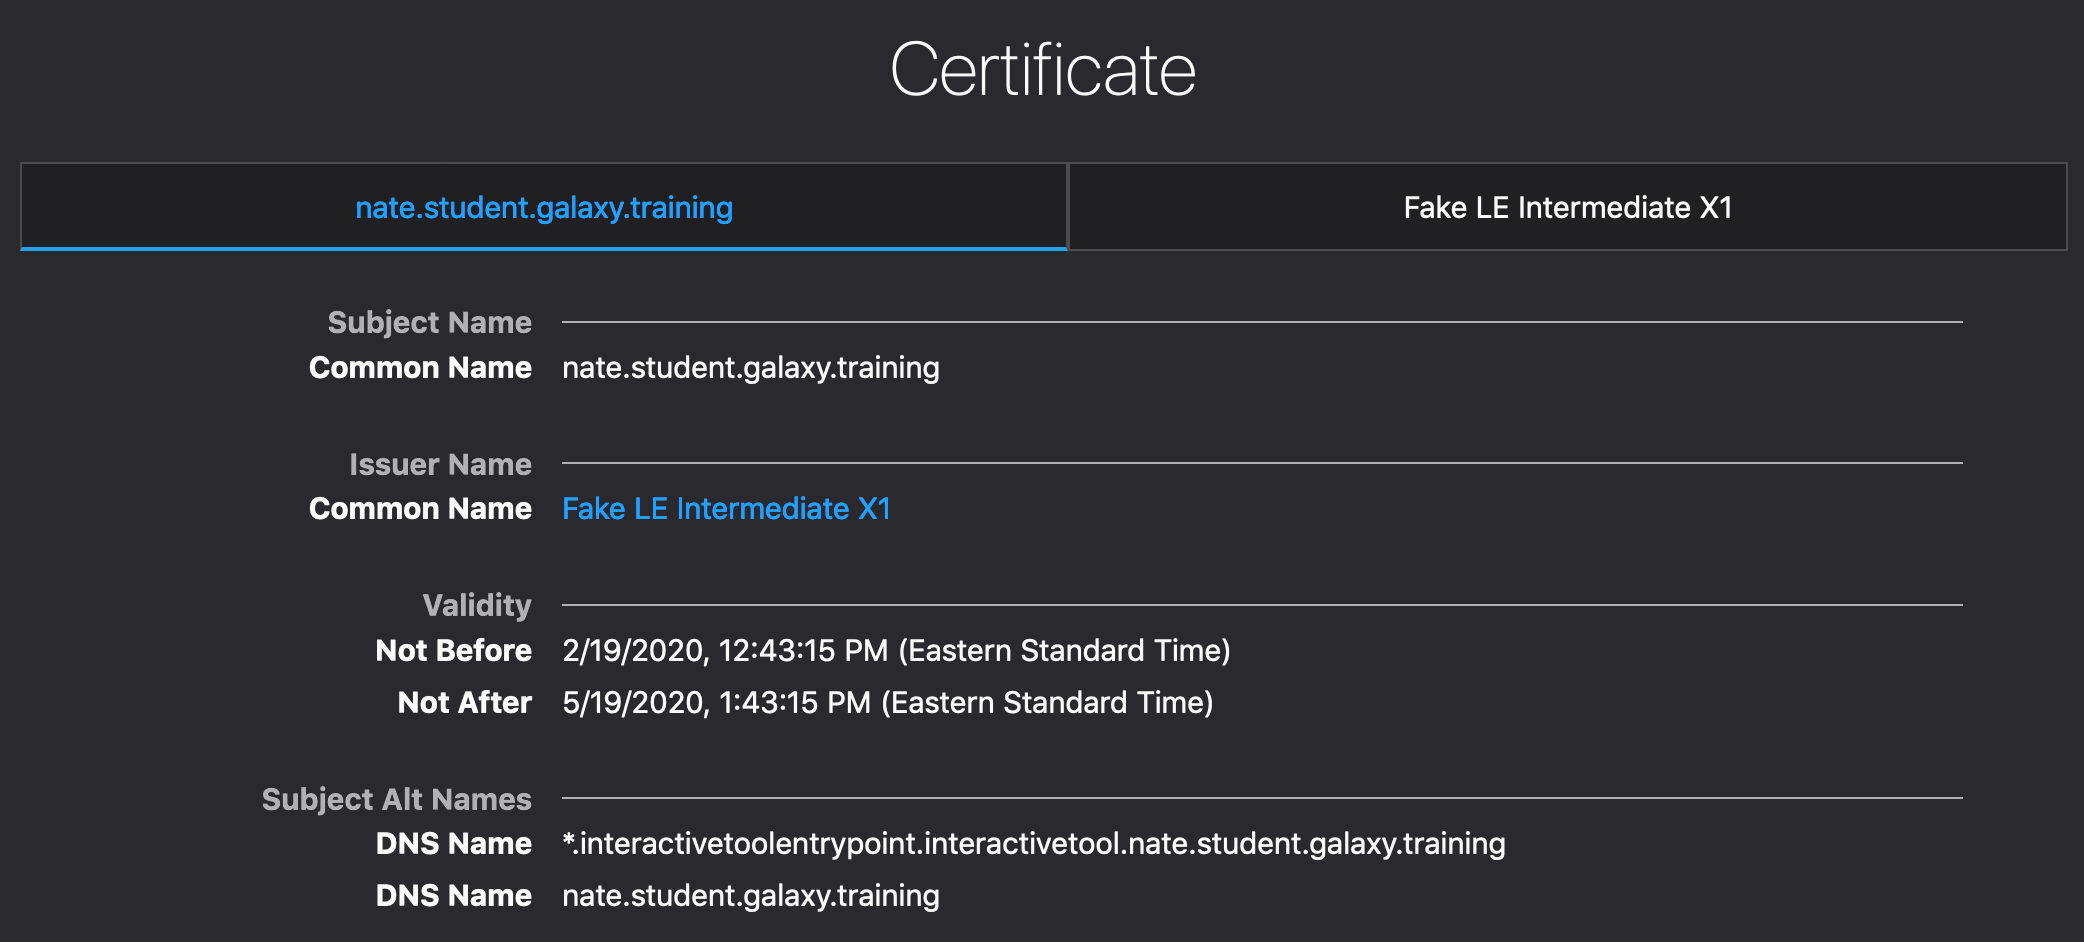 Open image in new tab
Enabling Interactive Tools in Galaxy
A few Interactive Tool wrappers are provided with Galaxy, but they are commented out in Galaxy’s default tool config file. As a result, we need to instruct the galaxyproject.galaxy role to install a tool panel configuration file containing at least one of these tools in order to try them out. For the purposes of this tutorial, a good choice is the EtherCalc GxIT, because it has a relatively small Docker image.
Hands On: Enabling Interactive Tools in Galaxy
Rather than modifying the default tool configuration file, we’ll add a new one that only references the Interactive Tools. This way, the default set of tools will still load without us having to incorporate the entire default tool config into our playbook.
If the folder does not exist, create
templates/galaxy/confignext to yourgalaxy.yml(mkdir -p templates/galaxy/config/)Create
templates/galaxy/config/tool_conf_interactive.xml.j2with the following contents:<toolbox monitor="true"> <section id="interactivetools" name="Interactive Tools"> <tool file="interactive/interactivetool_ethercalc.xml" /> <tool file="interactive/interactivetool_jupyter_notebook_1.0.1.xml" /> </section> </toolbox>We need to instruct Galaxy on how to run Interactive Tools (and specifically, how to run them in Docker). Let’s begin with a basic job configuration:
# ... other settings ... #
# Galaxy Job Configuration
galaxy_job_config:
  runners:
    local_runner:
      load: galaxy.jobs.runners.local:LocalJobRunner
      workers: 4
  execution:
    default: local_env
    environments:
      local_env:
        runner: local_runner
# ... other settings ... #
Comment: NoteDepending on the order in which you are completing this tutorial in relation to other tutorials, you may have already defined the
galaxy_job_configmapping in yourgroup_vars/galaxyservers.ymlfile, as well asgalaxy_config_templates. If this is the case, be sure to merge the changes in this section with your existing playbook.Next, we need to configure the interactive tools destination. Add a destination for submitting jobs as Docker containers using the advanced sample job configuration as a guide. Finally, use the EtherCalc GxIT’s tool ID to route executions of the EtherCalc GxIT to the newly created destination:
--- a/group_vars/galaxyservers.yml
+++ b/group_vars/galaxyservers.yml
     execution:
       default: local_env
       environments:
         local_env:
           runner: local_runner
+        local_interactive_env:
+          runner: local_runner
+          params:
+            docker_enabled: true
+            docker_volumes: $defaults
+            docker_sudo: false
+            docker_net: bridge
+            docker_auto_rm: true
+            docker_set_user: ""
+            require_container: true
+    tools:
+      - id: interactive_tool_ethercalc
+        environment: local_interactive_env
+      - id: interactive_tool_jupyter_notebook
+        environment: local_interactive_env
Of considerable note is the
docker_volumesparam: the variable expansions are explained in the advanced sample job configuration. We’ll use this volume configuration for now but it has some considerable data security problems. We’ll discuss a better solution at the end of this tutorial.Inform
galaxyproject.galaxyof what tool configuration files to load in your group variables (group_vars/galaxyservers.yml):galaxy_tool_config_files: - "{{ galaxy_server_dir }}/config/tool_conf.xml.sample" - "{{ galaxy_config_dir }}/tool_conf_interactive.xml"Next, deploy the new config template using the
galaxy_config_templatesvar in your group vars:galaxy_config_templates: # ... possible existing config file definitions - src: templates/galaxy/config/tool_conf_interactive.xml.j2 dest: "{{ galaxy_config_dir }}/tool_conf_interactive.xml"If you’ve configured container resolvers, make sure the explit docker container resolver is enabled, e.g in templates/galaxy/config/container_resolvers_conf.yml.j2
--- a/templates/galaxy/config/container_resolvers_conf.yml.j2
+++ b/templates/galaxy/config/container_resolvers_conf.yml.j2
@@ -9,3 +9,4 @@
 - type: build_mulled_singularity
   auto_install: False
   cache_directory: "{{ galaxy_mutable_data_dir }}/cache/singularity/built/"
 +- type: explicit
Run the playbook:
ansible-playbook galaxy.ymlFollow the Galaxy logs with
galaxyctl follow.
Run an Interactive Tool
You should now be ready to run an Interactive Tool in Galaxy!
Hands On: Running an Interactive Tool
- Ensure that you are logged in to your Galaxy server by checking the User menu in the masthead.
We’ll need an input for our test GxIT (EtherCalc). Any tabular file can be used, such as Galaxy’s 1.tabular test data. Copy this file’s URL:
https://raw.githubusercontent.com/galaxyproject/galaxy/release_20.01/test-data/1.tabular- Click galaxy-upload Upload at the top of the tool panel (on the left side of the Galaxy UI).
- In the resulting modal dialog, click the Paste/Fetch data button.
- Paste the URL in the text field that has just appeared.
- Give the new dataset a name such as
tabular, if you like.- Click Start and then Close.
- From the tool menu, click the Interactive Tools section, then click EtherCalc tool.
- Ensure that your newly uploaded tabular dataset is selected as the input Some tabular dataset, then click Execute.
Monitor the blue info box on the next page, which will inform you when the Interactive Tool is accessible and provide you with a link to access it.
If you navigate away from this page, you can view your running Interactive Tools from the Active InteractiveTools menu item in the User menu.
- Click the click here to display link.
If everything has worked correctly, your browser will load EtherCalc with your tabular data preloaded. Once you’re done working with the data, return to Galaxy and stop EtherCalc by deleting its output dataset from your history, or stopping it via the interface from the Active InteractiveTools menu item in the User menu.
Securing Interactive Tools
Inspecting the Docker container of a running Interactive Tool shows the volume configuration expanded from $galaxy_root in the job destination’s docker_volumes param:
$ docker inspect $(docker ps -q) | jq '.[0].HostConfig.Binds'
[
  "/srv/galaxy/server:/srv/galaxy/server:ro",                                     # Galaxy server dir
  "/srv/galaxy/server/tools/interactive:/srv/galaxy/server/tools/interactive:ro", # EtherCalc tool wrapper parent dir
  "/srv/galaxy/jobs/000/1:/srv/galaxy/jobs/000/1:ro",                             # Per-job root dir
  "/srv/galaxy/jobs/000/1/outputs:/srv/galaxy/jobs/000/1/outputs:rw",             # Job outputs dir
  "/srv/galaxy/jobs/000/1/configs:/srv/galaxy/jobs/000/1/configs:rw",             # Job config files dir
  "/srv/galaxy/jobs/000/1/working:/srv/galaxy/jobs/000/1/working:rw",             # Job working (cwd) dir
  "/data:/data:rw",                                                               # GALAXY USER DATASETS DIR (RW!)
  "/srv/galaxy/server/tool-data:/srv/galaxy/server/tool-data:ro"                  # Galaxy reference data dir
]
As hinted earlier, there is a concerning state here: The directory containing all of the the user-generated data in Galaxy (not just the data for this job) has been mounted read-write in to the container. This configuration grants users running interactive tools full access to all the data in Galaxy, which is a very bad idea. Unlike standard Galaxy tools, where the tool’s design prevents users from writing to arbitrary paths, Interactive Tools are fully user controllable. Although EtherCalc does not provide a mechanism for writing to this path, other Interactive Tools (such as Jupyter Notebook) do.
Two solutions are discussed in the advanced sample job configuration:
- Use the
outputs_to_working_directoryjob configuration option, which allows you to mount datasets read-only: this prevents manipulation, but still allows GxIT users to read any dataset in your Galaxy server. - Use Pulsar, Galaxy’s remote job execution engine, to provide full job isolation: this avoids all access to Galaxy data, with the performance penalty of copying input dataset(s) to the job directory.
Because we want to maintain dataset privacy, Pulsar is the better choice here. And in fact, we don’t even need to set up a Pulsar server: because we only need Pulsar’s input staging and isolation features, we can use Embedded Pulsar, which runs a Pulsar server within the Galaxy application to perform these tasks. Embedded Pulsar can even interface with your distributed resource manager (aka cluster scheduler) of choice, as long as your Galaxy server and cluster both have access to a common filesystem (otherwise, you will need to use Pulsar in standalone mode; see the Running Jobs on Remote Resources with Pulsar tutorial).
Hands On: Running Interactive Tools with Embedded Pulsar
Create a configuration file template for the Pulsar application at
templates/galaxy/config/pulsar_app.yml.j2.
If the folder does not exist, create
templates/galaxy/confignext to yourgalaxy.yml(mkdir -p templates/galaxy/config/).
Add the following contents to the template:
---

# The path where per-job directories will be created
staging_directory: "{{ galaxy_job_working_directory }}/_interactive"

# Where Pulsar state information will be stored (e.g. currently active jobs)
persistence_directory: "{{ galaxy_mutable_data_dir }}/pulsar"

# Where to find Galaxy tool dependencies
tool_dependency_dir: "{{ galaxy_tool_dependency_dir }}"

# How to run jobs (see https://pulsar.readthedocs.io/en/latest/job_managers.html)
managers:
  _default_:
    type: queued_python
    num_concurrent_jobs: 1
Modify the job configuration in
group_vars/galaxyservers.ymlto configure Interactive Tools to use the embedded Pulsar runner.
Add the embedded Pulsar runner to the
galaxy_job_configsection of the file:--- a/group_vars/galaxyservers.yml +++ b/group_vars/galaxyservers.yml runners: local_runner: load: galaxy.jobs.runners.local:LocalJobRunner workers: 4 + pulsar_embedded: + load: galaxy.jobs.runners.pulsar:PulsarEmbeddedJobRunner + pulsar_config: "{{ galaxy_config_dir }}/pulsar_app.yml" execution:Next, modify the
interactive_localdestination to use the new runner and set the new parametercontainer_monitor_resulttocallback(explained in more detail in the next step):Warning: Untrusted SSL CertificatesIf you are completing this tutorial as part of a Galaxy Admin Training course, you will also need the
envsetting shown below to prevent problems with the untrusted SSL certificates in use during the course. Galaxy servers with valid SSL certificates do not need this option.--- a/group_vars/galaxyservers.yml +++ b/group_vars/galaxyservers.yml execution: default: local_env environments: local_env: runner: local_runner local_interactive_env: - runner: local_runner + runner: pulsar_embedded params: docker_enabled: true docker_volumes: $defaults docker_sudo: false docker_net: bridge docker_auto_rm: true docker_set_user: "" require_container: true + container_monitor_result: callback + env: + - name: REQUESTS_CA_BUNDLE + value: /etc/ssl/certs/ca-certificates.crt tools:Open your
galaxyserversgroup variables file and instructgalaxyproject.galaxyto install the Pulsar configuration file:Comment: NoteDepending on the order in which you are completing this tutorial in relation to other tutorials, you may have already defined
galaxy_config_templates. If this is the case, be sure to merge the changes in this step with your existing playbook.galaxy_config_templates: - src: templates/galaxy/config/pulsar_app.yml.j2 dest: "{{ galaxy_config_dir }}/pulsar_app.yml"Additionally, you will need to set the
galaxy_infrastructure_urlconfig option:galaxy_config: galaxy: # ... existing configuration options in the `galaxy` section ... galaxy_infrastructure_url: "https://{{ inventory_hostname }}/"Galaxy must be made aware of the randomly selected port Docker has assigned after the GxIT begins operating, in order to update the proxy map. By default, this is done by writing a JSON file in the job directory. This method does not work with Pulsar since Pulsar uses a different job directory from the Galaxy job directory. As a result, Pulsar jobs use the
callbackmethod configured in the previous step to make a request to Galaxy’s API, the URL for which is set ingalaxy_infrastructure_url.Run the playbook:
ansible-playbook galaxy.yml
Once the playbook run is complete and your Galaxy server has restarted, run the EtherCalc Interactive Tool again.
QuestionOnce EtherCalc is running, check the mounts of its container. What do you observe?
$ docker inspect $(docker ps -q) | jq '.[0].HostConfig.Binds'
[
  "/srv/galaxy/jobs/_interactive/2:/srv/galaxy/jobs/_interactive/2:ro",                       # Per-job root dir
  "/srv/galaxy/jobs/_interactive/2/tool_files:/srv/galaxy/jobs/_interactive/2/tool_files:ro", # EtherCalc tool wrapper parent dir
  "/srv/galaxy/jobs/_interactive/2/outputs:/srv/galaxy/jobs/_interactive/2/outputs:rw",       # Job outputs dir
  "/srv/galaxy/jobs/_interactive/2/working:/srv/galaxy/jobs/_interactive/2/working:rw",       # Job working (cwd) dir
  "/srv/galaxy/server/tool-data:/srv/galaxy/server/tool-data:ro"                              # Galaxy reference data dir
]
Of note, the user data directory,
/data, is no longer mounted in the container!
High availability setup with PostgresSQL (Optional)
CommentThis section is only relevant if you are running a high-availability setup, meaning that you have multiple copies of Galaxy running behind a load balancer.
If you have installed Galaxy following the Galaxy Installation with Ansible tutorial, or are completing this tutorial as part of a Galaxy Admin Training course, please skip this section, as you are then not running a high-availability setup.
In a high availability setup, multiple redundant copies of Galaxy run simultaneously behind a load balancer to minimize downtime and service interruptions.
As explained in one of the previous sections, the Galaxy Interactive Tools Proxy redirects requests to each Interactive Tool’s host and port. By default, the mapping of GxIT invocations to their corresponding host/port is kept in a SQLite database known as the Interactive Tools Session Map.
By design, SQLite is the wrong choice for high availability setups, the showstopper being that the SQLite database file would have to be shared over a network filesystem, which are usually associated with too high latencies for RDBMS use. For this reason, Galaxy and the Interactive Tools Proxy can also store the Session Map in a PostgreSQL database.
Hands On: Preparing the databaseFirst, you need to create a database for the Interactive Tools Proxy.
WarningDo not use the Galaxy database for this purpose. The main Galaxy database is reserved for Galaxy’s core functionality, and Interactive Tools have not yet reached this stage. Since Galaxy does not expect to find the Interactive Tools Session Map in this database, storing it there can lead to errors.
On your database server, access PostgresSQL and create a
gxitproxydatabase to store the Interactive Tools Session Map. For simplicity, the same user that operates on the Galaxy main database, typically namedgalaxy, is also going to operate on this one and will own the new database.Code In: Bash# one-liner that connects to Postgres, creates the database and assigns ownership sudo -u postgres createdb -O galaxy gxitproxyConnect to the
gxitproxydatabase asgalaxy.Code In: Bashsudo -iu galaxy psql -d gxitproxyCode Out: SQLpsql (10.12 (Ubuntu 10.12-0ubuntu0.18.04.1)) Type "help" for help. gxitproxy=#Create a
gxitproxytable in the new database.Code In: SQLCREATE TABLE IF NOT EXISTS gxitproxy (key TEXT, key_type TEXT, token TEXT, host TEXT, port INTEGER, info TEXT, PRIMARY KEY (key, key_type));Code Out: SQLCREATE TABLEThis is enough to let Galaxy and the Interactive Tool Proxy store the Interactive Tools Session Map in PostgreSQL. But there is a catch: when the Interactive Tool Proxy uses SQLite, it knows the database has changed because it watches the file for changes. When using Postgres, this mechanism is not available. By default, the proxy simply polls the database at regular intervals. To let the user access interactive tools as fast as possible, the proxy can also be notified of updates via PostgreSQL asynchronous notifications. To enable them, you have to create a PostgreSQL trigger that sends a NOTIFY message to the channel
gxitproxyevery time the tablegxitproxychanges.Run the following commands to create to create a function that sends a NOTIFY message to the channel
gxitproxyand a trigger that runs the function every time the tablegxitproxychanges.Code In: SQLCREATE OR REPLACE FUNCTION notify_gxitproxy() RETURNS trigger AS $$ BEGIN PERFORM pg_notify('gxitproxy', 'Table "gxitproxy" changed'); RETURN NEW; END; $$ LANGUAGE plpgsql; CREATE TRIGGER gxitproxy_notify AFTER INSERT OR UPDATE OR DELETE ON gxitproxy FOR EACH ROW EXECUTE FUNCTION notify_gxitproxy();Code Out: SQLCREATE FUNCTION CREATE TRIGGER
The next step is configuring Galaxy and the Interactive Tool Proxy to use the new database.
Hands On: Configure Galaxy and the Interactive Tool Proxy
Adjust your
group_vars/galaxyservers.ymlfile as follows.# ... existing configuration options ... # galaxy_config: galaxy: # ... existing configuration options in the `galaxy` section ... # interactivetools_map: "{{ gxit_proxy_sessions_path }}" # comment, remove or leave this line in place (it will be overridden by the option below) interactivetoolsproxy_map: "{{ gxit_proxy_sessions_path }}" # ... other existing configuration options in the `galaxy` section ... # ... other existing configurations ... # gxit_proxy_sessions_path: "postgresql:///gxitproxy?host=/var/run/postgresql"Run the playbook:
ansible-playbook galaxy.yml
That’s it, once the playbook run is complete, both Galaxy and the Interactive Tools Proxy will be storing the Interactive Tools Session Map in PostgreSQL.
You've Finished the Tutorial
Key points
Galaxy Interactive Tools run as jobs in largely the same manner as any other Galaxy job
nginx routes GxIT requests to the GxIT(/GIE) Proxy, which routes them to the node/port on which the GxIT is running
GxITs require wildcard SSL certificates
GxITs expose your Galaxy server’s user datasets unless configured to use Pulsar
Frequently Asked Questions
Have questions about this tutorial? Have a look at the available FAQ pages and support channelsFeedback
Did you use this material as an instructor? Feel free to give us feedback on how it went.
Did you use this material as a learner or student? Click the form below to leave feedback.

Citing this Tutorial
- Nate Coraor, Simon Gladman, Helena Rasche, Anthony Bretaudeau, José Manuel Domínguez, Galaxy Interactive Tools (Galaxy Training Materials). https://training.galaxyproject.org/training-material/topics/admin/tutorials/interactive-tools/tutorial.html Online; accessed TODAY
- Hiltemann, Saskia, Rasche, Helena et al., 2023 Galaxy Training: A Powerful Framework for Teaching! PLOS Computational Biology 10.1371/journal.pcbi.1010752
- Batut et al., 2018 Community-Driven Data Analysis Training for Biology Cell Systems 10.1016/j.cels.2018.05.012
@misc{admin-interactive-tools,
author = "Nate Coraor and Simon Gladman and Helena Rasche and Anthony Bretaudeau and José Manuel Domínguez",
	title = "Galaxy Interactive Tools (Galaxy Training Materials)",
	year = "",
	month = "",
	day = "",
	url = "\url{https://training.galaxyproject.org/training-material/topics/admin/tutorials/interactive-tools/tutorial.html}",
	note = "[Online; accessed TODAY]"
}
@article{Hiltemann_2023,
	doi = {10.1371/journal.pcbi.1010752},
	url = {https://doi.org/10.1371%2Fjournal.pcbi.1010752},
	year = 2023,
	month = {jan},
	publisher = {Public Library of Science ({PLoS})},
	volume = {19},
	number = {1},
	pages = {e1010752},
	author = {Saskia Hiltemann and Helena Rasche and Simon Gladman and Hans-Rudolf Hotz and Delphine Larivi{\`{e}}re and Daniel Blankenberg and Pratik D. Jagtap and Thomas Wollmann and Anthony Bretaudeau and Nadia Gou{\'{e}} and Timothy J. Griffin and Coline Royaux and Yvan Le Bras and Subina Mehta and Anna Syme and Frederik Coppens and Bert Droesbeke and Nicola Soranzo and Wendi Bacon and Fotis Psomopoulos and Crist{\'{o}}bal Gallardo-Alba and John Davis and Melanie Christine Föll and Matthias Fahrner and Maria A. Doyle and Beatriz Serrano-Solano and Anne Claire Fouilloux and Peter van Heusden and Wolfgang Maier and Dave Clements and Florian Heyl and Björn Grüning and B{\'{e}}r{\'{e}}nice Batut and},
	editor = {Francis Ouellette},
	title = {Galaxy Training: A powerful framework for teaching!},
	journal = {PLoS Comput Biol}
}
Funding
These individuals or organisations provided funding support for the development of this resource