Amplicon sequencing is a powerful research method designed to explore and reveal the taxonomic composition of diverse microbial communities. By focusing on specific genetic regions, researchers can gain insights into the structure and function of these communities. Typically, ribosomal ribonucleic acid (rRNA) or ribosomal deoxyribonucleic acid (rDNA) is sequenced, with particular attention given to key marker genes. For bacteria and archaea, the 16S rRNA gene is commonly targeted; for eukaryotes, the 18S rRNA gene is used, while fungi are often studied through internal transcribed spacers (ITS) regions. These marker genes provide the genetic signatures necessary for identifying and categorizing the various organisms present within a sample.
In this tutorial, we will dive into the MGnify amplicon pipeline v5.0 on Galaxy, a sophisticated toolset for microbial analysis. This pipeline is a ported version of the same well-established amplicon pipeline used by MGnify, a leading metagenomics platform dedicated to the analysis and archiving of microbiome sequences. MGnify has seen significant adoption and growth in recent years (Richardson et al. 2022); as of the time of writing, over 500k analyses have been conducted using this pipeline for amplicon data alone (EMBL-EBI | MGnify). One of the key advantages of this workflow is that it does not require users to know their target region in advance—it automatically processes all amplicons for ITS, SSU, and LSU, and can even handle mixed amplicon datasets. This workflow does not currently generate ASVs (Amplicon Sequence Variants). If ASV-level resolution is required, we recommend reading the DADA2 tutorial or utilizing LotuS2 ( Galaxy version 2.32+galaxy0).
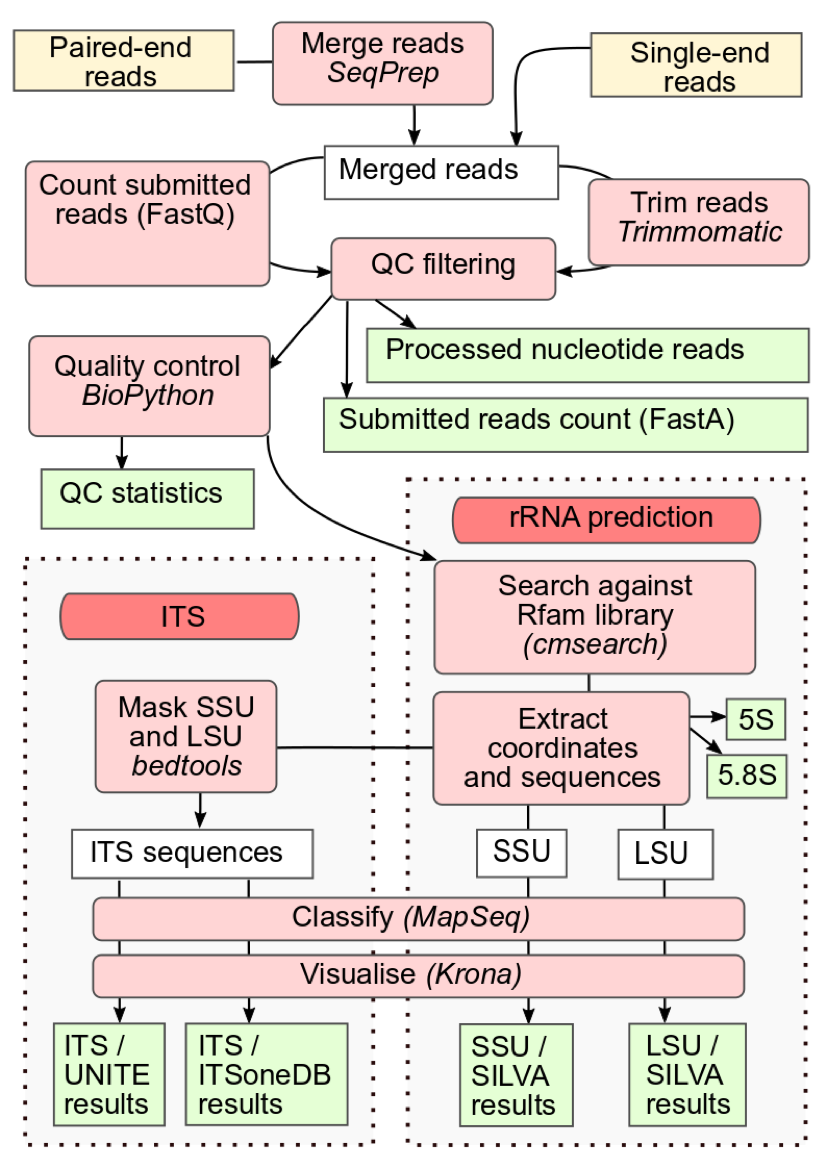
Figure 1:The workflow of the MGnify amplicon pipeline v5.0 (MGnify amplicon pipeline v5.0). The figure illustrates the workflow of the MGnify amplicon pipeline, beginning with quality control to filter low-quality reads. The processed reads then proceed to the rRNA-prediction step, where SSU and LSU regions are classified and their taxonomic abundance is visualized. Following this, the pipeline handles the ITS regions, classifying them and visualizing their taxonomic abundance using pie charts. Each stage is clearly outlined, showcasing how data moves through the pipeline and is analyzed to provide comprehensive insights into microbial communities.
Our journey through this tutorial will provide a comprehensive understanding of the different sub-workflows that make up the pipeline and how each contributes to the overall analysis process. We will explore how these workflows are executed within the Galaxy platform. Additionally, we will explore which databases and tools are integrated into the pipeline, giving us a clearer picture of the resources that power these analyses. By the end of this tutorial you will have the knowledge to apply the MGnify amplicon pipeline effectively in your own research.
Before diving into the tutorial, it is strongly recommended to review the Introduction to Microbiome Analysis slides or watch the corresponding video, which are linked in the requirements section above, especially if you are new to this field. These slides will provide essential background knowledge and help you better understand the concepts covered in this tutorial.
Warning: Slight discrepancy between runs
The outputs generated by this workflow may vary slightly between runs due to the non-deterministic behavior of the MAPseq version used. While this variation does not always occur, certain processing steps involve elements of randomness that can lead to minor differences in the results on different executions.
Figure 2:Beta diversity-based benchmark. Dissimilarity between MAPseq runs. Executed 10 times using identical configuration and the same sample from analysis MGYA00578954 to demonstrate MAPseq inconsistency. The term ’All’ refers to all ranks combined. Species rank was excluded, due to taxa absence at this rank. Bars represent the average dissimilarity values, while individual data points represent the values for each of the ten different runs.
In this tutorial, we’ll cover four different versions:
Executing the amplicon workflow using ENA data (default)
Executing the amplicon workflow using own reads, which requires some minor adjustments
Executing each subworkflow individually using ENA data
Executing each subworkflow individually using own reads
Hands-on: Choose Your Own Tutorial
This is a 'Choose Your Own Tutorial' (CYOT) section (also known as 'Choose Your Own Analysis' (CYOA)), where you can select between multiple paths. Click one of the buttons below to select how you want to follow the tutorial
Import datasets
Let’s begin with creating a history and giving it a suitable name.
Hands On: Create history
Create a new history
To create a new history simply click the new-history icon at the top of the history panel:
Rename the created history
Click on galaxy-pencil (Edit) next to the history name (which by default is “Unnamed history”)
Type the new name
Click on Save
To cancel renaming, click the galaxy-undo “Cancel” button
If you do not have the galaxy-pencil (Edit) next to the history name (which can be the case if you are using an older version of Galaxy) do the following:
Click on Unnamed history (or the current name of the history) (Click to rename history) at the top of your history panel
Type the new name
Press Enter
Hands On: Downloading datasets
Click on galaxy-uploadUpload Data at the top of left panel
Select galaxy-wf-editPaste/Fetch Data at the bottom
Copy copy and paste the following URLs into the text box:
Note: The file ribo.claninfo is required for the workflow to run properly. ribo.claninfo provides classification information for the rRNA models in ribo.cm, grouping them into so called clans.
fastq-dl ( Galaxy version 3.0.0+galaxy0) using the parameters:
param-files“select input type”: A list of ENA accession IDs, one per row
param-files“Accession”: accessions.csv
Hands On: Downloading datasets
Click on galaxy-uploadUpload Data at the top of left panel
Select galaxy-wf-editPaste/Fetch Data at the bottom
Copy copy and paste the following URLs into the text box:
Note: The file ribo.claninfo is required for the workflow to run properly. ribo.claninfo provides classification information for the rRNA models in ribo.cm, grouping them into so called clans.
Upload own data files
Hands On: Upload own data file
Upload the reads in fastqsanger or fastqsanger.gz format
Click on Upload Data on the top of the left panel
Click on Choose local file and select the files or drop the files in the Drop files here part
Click on Start
Click on Close
Create a collection out of the single-end datasets
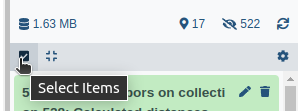
Click on galaxy-selectorSelect Items at the top of the history panel
Check all the datasets in your history you would like to include
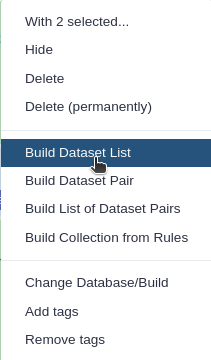
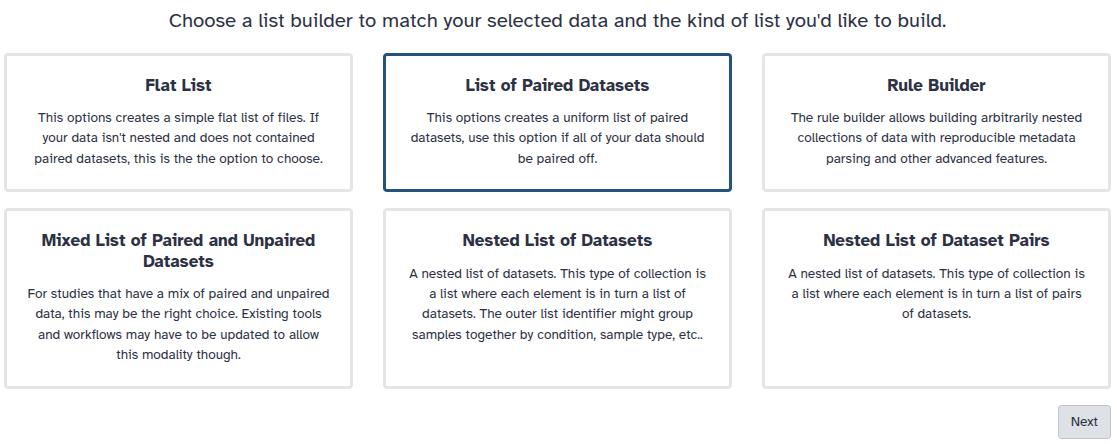
Click n of N selected and choose Advanced Build List
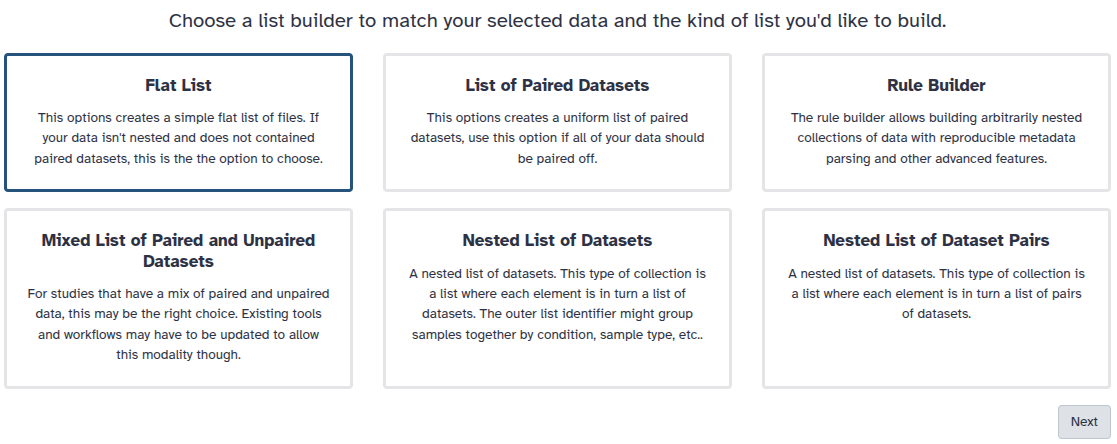
You are in collection building wizard. Choose Flat List and click ‘Next’ button at the right bottom corner.
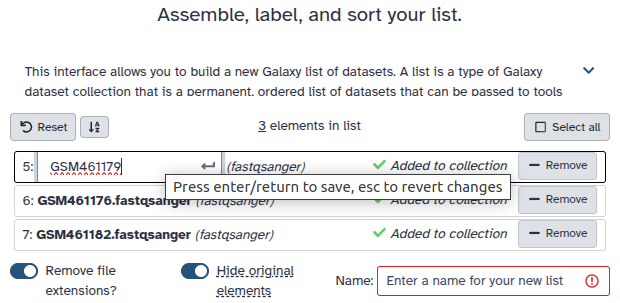
Double clcik on the file names to edit. For example, remove file extensions or common prefix/suffixes to cleanup the names.
Enter a name for your collection
Click Build to build your collection
Click on the checkmark icon at the top of your history again
Create a paired-end end collection for the paired-end datasets
Click on galaxy-selectorSelect Items at the top of the history panel
Check all the datasets in your history you would like to include
Click n of N selected and choose Advanced Build List
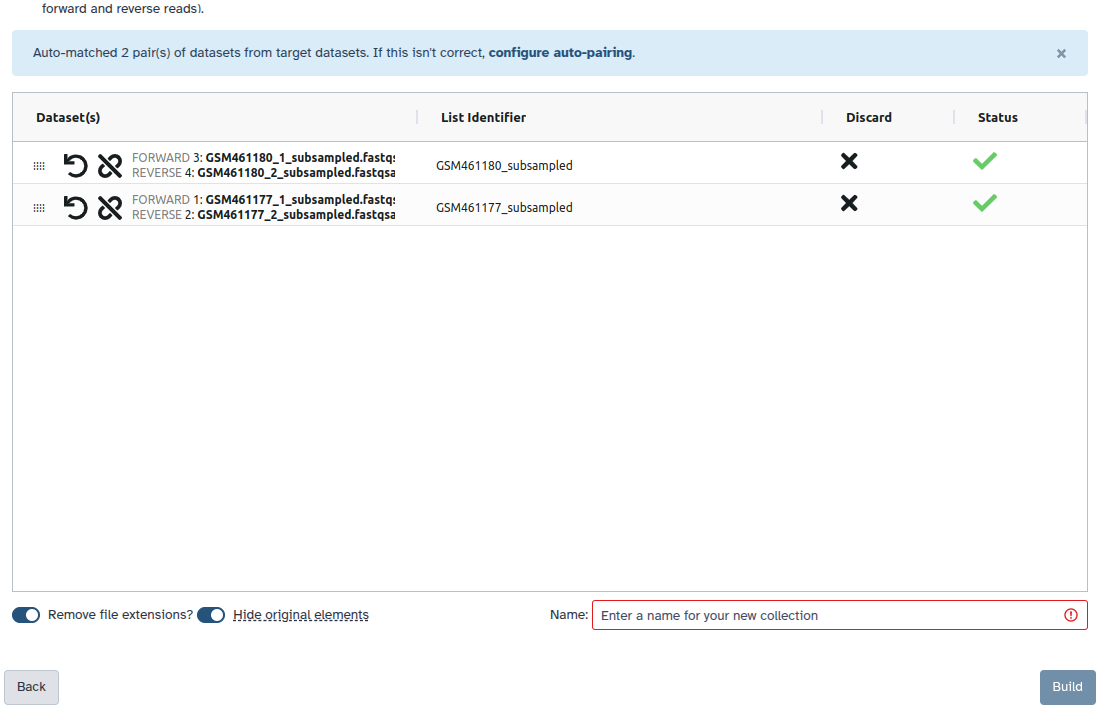
You are in the collection building wizard. Choose List of Paired Datasets and click ‘Next’ button at the right bottom corner.
Check and configure auto-pairing. Commonly matepairs have suffix _1 and _2 or _R1 and _R2. Click on ‘Next’ at the bottom.
Edit the List Identifier as required.
Enter a name for your collection
Click Build to build your collection
Click on the checkmark icon at the top of your history again
Workflow Selection Guidance
Before running the rRNA or ITS sub-workflows, it’s important to know the nature of your amplicon data:
If your sequencing targets 16S or 18S rRNA genes, use the rRNA-prediction workflow.
If your sequencing targets fungal ITS regions, use the ITS workflow.
You do not need to run both workflows unless your dataset includes both types of sequences.
Quality control
Quality control (QC) is a crucial first step in any metagenomic analysis pipeline. It ensures that sequencing reads are free from contaminants, low-quality bases, and adapter sequences, which can negatively impact downstream analyses. In the MGnify v5.0 pipeline, QC involves trimming, filtering, and assessing read quality using tools like Trimmomatic, SeqPrep, and FastQC. This process guarantees that only high-quality data progresses, providing reliable results for subsequent steps like taxonomic classification and diversity analysis.
The quality control phase in this amplicon pipeline is split into two sub-workflows: one dedicated to paired-end reads and another for single-end reads.
In addition to quality-controlled single- and paired-end reads, both subworkflows also generate a MultiQC report that summarizes quality metrics across all input files. To help you interpret the MultiQC report, we recommend reviewing the Quality Control tutorial linked in the requirements section.
Single-end reads
The quality control sub-workflow for single-end reads involves a series of tools that perform trimming, filtering, and quality assessment to ensure high-quality sequencing data. The workflow includes the following tools:
Trimmomatic ( Galaxy version 0.39+galaxy2) trims low quality sequencing regions. Using the following parameters:
“SLIDING WINDOW - Number of bases to average across”: 4
“SLIDING WINDOW - Average quality required”: 15
“LEADING”: 3
“TRAILING”: 3
“MINLEN”: 100
“Quality score encoding”: Phred33
Filter FASTQ ( Galaxy version 1.1.5) filters sequences shorter than 100 nucleotides in length out
PRINSEQ ( Galaxy version 0.20.4+galaxy2) provides advanced filtering, trimming, and data quality control, allowing for the removal of duplicate reads, low-complexity sequences, and additional quality filtering. Using the following parameters:
“Is this library paired- or single-end?”: Single-end
“Apply filter treatments?”: Yes
“Filter sequences based on their length?”: No
“Filter sequences based on quality score?”: No
“Filter sequences based on their base content?”: Yes
“Filter sequences based on their GC percentage?”: No
“Filter sequences based on their number of N bases?”: No
“Filter sequences based on their percentage of N bases?”: Yes
“Maximal N percentage threshold to conserve sequences”: 10
“Filter sequences with characters other than A, T, C, G and N?”: Yes
“Filter sequences based on their complexity?”: No
“Apply trimming treatments?”: No
convert FASTQ to FASTA ( Galaxy version 1.1.5) converts the quality control processed reads from FASTQ into FASTA format
FASTQC ( Galaxy version 0.74+galaxy0) performs comprehensive quality checks on sequencing data, providing visual summaries and detailed metrics for read quality
MultiQC ( Galaxy version 1.11+galaxy1) aggregates reports from multiple quality control FASTQC reports, into a single, consolidated report for easier interpretation. Using the following parameters:
Which tool was used generate logs?: FastQC
Type of FastQC output?: Raw data
Hands On: Executing the single-end quality control sub-workflow
Click on galaxy-workflows-activityWorkflows in the Galaxy activity bar (on the left side of the screen, or in the top menu bar of older Galaxy instances). You will see a list of all your workflows
Click on galaxy-uploadImport at the top-right of the screen
Provide your workflow
Option 1: Paste the URL of the workflow into the box labelled “Archived Workflow URL”
Option 2: Upload the workflow file in the box labelled “Archived Workflow File”
Click the Import workflow button
Below is a short video demonstrating how to import a workflow from GitHub using this procedure:
Video: Importing a workflow from URL
Runworkflow-run the single-end sub-workflow using the following input:
Single-end reads: Single-end data collection
Click on Workflows on the Activity Bar on the left.
At the top of the resulting page you will have the option to switch between the My workflows, Workflows shared with me and Public workflows tabs.
Select the tab you want to see all workflows in that category
Search for your desired workflow.
Click on the workflow name: a pop-up window opens with a preview of the workflow.
To run it directly: click Run (top-right).
Recommended: click Import (left of Run) to make your own local copy under Workflows / My Workflows.
Hands On: Executing the single-end quality control sub-workflow
Click on galaxy-workflows-activityWorkflows in the Galaxy activity bar (on the left side of the screen, or in the top menu bar of older Galaxy instances). You will see a list of all your workflows
Click on galaxy-uploadImport at the top-right of the screen
Provide your workflow
Option 1: Paste the URL of the workflow into the box labelled “Archived Workflow URL”
Option 2: Upload the workflow file in the box labelled “Archived Workflow File”
Click the Import workflow button
Below is a short video demonstrating how to import a workflow from GitHub using this procedure:
Video: Importing a workflow from URL
Click on galaxy-uploadUpload Data at the top of left panel
Click on tutorialChoose local file and select the desired single-end files in fastqsanger or fastqsanger.gz format
Click on Start and Close the window
When the upload is finished create a collection for all single-end reads files:
Click on galaxy-selectorSelect Items at the top of the history panel
Check all the datasets in your history you would like to include
Click n of N selected and choose Advanced Build List
You are in collection building wizard. Choose Flat List and click ‘Next’ button at the right bottom corner.
Double clcik on the file names to edit. For example, remove file extensions or common prefix/suffixes to cleanup the names.
Enter a name for your collection
Click Build to build your collection
Click on the checkmark icon at the top of your history again
Runworkflow-run the single-end sub-workflow using the following input:
Single-end reads: Single-end reads collection we just created
Click on Workflows on the Activity Bar on the left.
At the top of the resulting page you will have the option to switch between the My workflows, Workflows shared with me and Public workflows tabs.
Select the tab you want to see all workflows in that category
Search for your desired workflow.
Click on the workflow name: a pop-up window opens with a preview of the workflow.
To run it directly: click Run (top-right).
Recommended: click Import (left of Run) to make your own local copy under Workflows / My Workflows.
Paired-end reads
The quality control sub-workflow for paired-end reads is designed to optimize the accuracy and reliability of sequencing data by addressing the unique challenges of handling paired-end sequences. The tools included are:
fastp ( Galaxy version 0.23.4+galaxy1) A versatile tool that performs quality filtering, trimming, adapter removal, and other preprocessing tasks specifically for paired-end reads. Using the following parameters:
“Single-end or paired reads”: Paired
“Filter Options”:
“Quality filtering options”:
“Qualified quality phred”: 20
“Unqualified percent limit”: 20
“Length filtering options”:
“Length required”: 70
“Read Modification Options”:
“Base correction by overlap analysis options”:
“Enable base correction”: Yes
SeqPrep ( Galaxy version 1.3.2+galaxy0) Merges the forward and reverse reads. Using the default parameters.
Trimmomatic ( Galaxy version 0.39+galaxy2) trims low quality sequencing regions. Using the following parameters:
“SLIDING WINDOW - Number of bases to average across”: 4
“SLIDING WINDOW - Average quality required”: 15
“LEADING”: 3
“TRAILING”: 3
“MINLEN”: 100
“Quality score encoding”: Phred33
Filter FASTQ ( Galaxy version 1.1.5) filters sequences shorter than 100 nucleotides in length out
PRINSEQ ( Galaxy version 0.20.4+galaxy2) provides advanced filtering, trimming, and data quality control, allowing for the removal of duplicate reads, low-complexity sequences, and additional quality filtering. Using the following parameters:
“Is this library paired- or single-end?”: Single-end
“Apply filter treatments?”: Yes
“Filter sequence based on their length?”: No
“Filter sequences based on quality score?”: No
“Filter sequences based on their base content?”: Yes
“Filter sequences based on their GC percentage?”: No
“Filter sequences based on their number of N bases?”: No
“Filter sequences based on their percentage of N bases?”: Yes
“Maximal N percentage threshold to conserve sequences”: 10
“Filter sequences with characters other than A, T, C, G and N?”: Yes
“Filter sequences based on their complexity?”: No
“Apply trimming treatments?”: No
convert FASTQ to FASTA ( Galaxy version 1.1.5) converts the quality control processed reads from FASTQ into FASTA format
FASTQC ( Galaxy version 0.74+galaxy0) performs comprehensive quality checks on sequencing data, providing visual summaries and detailed metrics for read quality
MultiQC ( Galaxy version 1.11+galaxy1) aggregates reports from multiple quality control FASTQC reports, into a single, consolidated report for easier interpretation. Using the following parameters:
“Which tool was used generate logs?”: FastQC
“Type of FastQC output?”: Raw data
Hands On: Executing the paired-end quality control sub-workflow
Click on galaxy-workflows-activityWorkflows in the Galaxy activity bar (on the left side of the screen, or in the top menu bar of older Galaxy instances). You will see a list of all your workflows
Click on galaxy-uploadImport at the top-right of the screen
Provide your workflow
Option 1: Paste the URL of the workflow into the box labelled “Archived Workflow URL”
Option 2: Upload the workflow file in the box labelled “Archived Workflow File”
Click the Import workflow button
Below is a short video demonstrating how to import a workflow from GitHub using this procedure:
Video: Importing a workflow from URL
Runworkflow-run the paired-end sub-workflow using the following input:
Paired-end reads: Pair-end data collection
Click on Workflows on the Activity Bar on the left.
At the top of the resulting page you will have the option to switch between the My workflows, Workflows shared with me and Public workflows tabs.
Select the tab you want to see all workflows in that category
Search for your desired workflow.
Click on the workflow name: a pop-up window opens with a preview of the workflow.
To run it directly: click Run (top-right).
Recommended: click Import (left of Run) to make your own local copy under Workflows / My Workflows.
Hands On: Executing the paired-end quality control sub-workflow
Click on galaxy-workflows-activityWorkflows in the Galaxy activity bar (on the left side of the screen, or in the top menu bar of older Galaxy instances). You will see a list of all your workflows
Click on galaxy-uploadImport at the top-right of the screen
Provide your workflow
Option 1: Paste the URL of the workflow into the box labelled “Archived Workflow URL”
Option 2: Upload the workflow file in the box labelled “Archived Workflow File”
Click the Import workflow button
Below is a short video demonstrating how to import a workflow from GitHub using this procedure:
Video: Importing a workflow from URL
Click on galaxy-uploadUpload Data at the top of left panel
Click on tutorialChoose local file and select the desired paired-end files in fastqsanger or fastqsanger.gz format
Click on Start and Close the window
When the upload is finished create a paired collection for all paired-end reads files:
Click on galaxy-selectorSelect Items at the top of the history panel
Check all the datasets in your history you would like to include
Click n of N selected and choose Advanced Build List
You are in the collection building wizard. Choose List of Paired Datasets and click ‘Next’ button at the right bottom corner.
Check and configure auto-pairing. Commonly matepairs have suffix _1 and _2 or _R1 and _R2. Click on ‘Next’ at the bottom.
Edit the List Identifier as required.
Enter a name for your collection
Click Build to build your collection
Click on the checkmark icon at the top of your history again
Runworkflow-run the paired-end sub-workflow using the following input:
Paired-end reads: Paired-end reads collection, which was created in the steps above
Click on Workflows on the Activity Bar on the left.
At the top of the resulting page you will have the option to switch between the My workflows, Workflows shared with me and Public workflows tabs.
Select the tab you want to see all workflows in that category
Search for your desired workflow.
Click on the workflow name: a pop-up window opens with a preview of the workflow.
To run it directly: click Run (top-right).
Recommended: click Import (left of Run) to make your own local copy under Workflows / My Workflows.
rRNA-prediction
The rRNA prediction sub-workflow focuses on identifying and classifying ribosomal RNA (rRNA) sequences, particularly small subunit (SSU) and large subunit (LSU) rRNAs. This workflow uses several tools for comparison against covariance models, filtering, classification, and visualization:
CMseach ( Galaxy version 1.1.4+galaxy0) the datasets are compared against the LSU and SSU models from Rfam (v13.0). Using the following parameters:
“Calculate E-values as if the search space size is ‘x’ megabases (Mb)”: 1000
“Options controlling acceleration heuristics”: Use HMM only, don't use a CM at all (--hmmonly)
“Omit the alignment section from the main input”: Yes
cmsearch-deoverlap ( Galaxy version 0.08+galaxy2) removes overlapping reads that belong to the same clan. Using the default parameters.
bedtools getfasta ( Galaxy version 2.30.0+galaxy1) extract sequences from a FASTA file
MAPseq ( Galaxy version 2.1.1+galaxy0) classifies matching OTUs to the reads, used in conjunction with SILVA (v132) SSU and LSU databases. Using the following parameters:
“Use cached database or database from history”: Cached database
*“Using built-in mapseq DB**. MAPseq is used in conjunction with the following databases:
MGnify LSU (v5.0.7) - silva_lsu-20200130 downloaded at 2023-09-26
MGnify SSU (v5.0.7) - silva_ssu-20200130 downloaded at 2023-09-26
“Create OTU table”: Yes
“Create taxon table for Krona”: Yes
“Top hits”: 80
“Top OTUs”: 40
“Output format”: simple
Krona ( Galaxy version 2.7.1+galaxy0) generates pie charts demonstrating the taxonomic abundance. Using the following parameters:
“What is the type of your input data”: Tabular
“Provide a name for the basal rank”: Root
biom-convert ( Galaxy version 2.1.15+galaxy1) converts the taxonomic abundance tables to JSON and HDF5 formats. Using the following parameters:
“Choose the source BIOM format”: Tabular File
“Process metadata associated with observations when converting”: taxonomy
“Choose the output type”: BIOM
“Table Type”: OTU table
“BIOM format type”:
JSON-formatted table(BIOM1)
HDF5-formatted table(BIOM2)
Hands On: Executing the rRNA-prediction sub-workflow
Click on galaxy-workflows-activityWorkflows in the Galaxy activity bar (on the left side of the screen, or in the top menu bar of older Galaxy instances). You will see a list of all your workflows
Click on galaxy-uploadImport at the top-right of the screen
Provide your workflow
Option 1: Paste the URL of the workflow into the box labelled “Archived Workflow URL”
Option 2: Upload the workflow file in the box labelled “Archived Workflow File”
Click the Import workflow button
Below is a short video demonstrating how to import a workflow from GitHub using this procedure:
Video: Importing a workflow from URL
Using Merge collections merge both quality processed single- and paired-end reads collections: Single-end post quality control FASTA files and Paired-end post quality control FASTA files
Runworkflow-run the rRNA-prediction sub-workflow using the following inputs:
Click on Workflows on the Activity Bar on the left.
At the top of the resulting page you will have the option to switch between the My workflows, Workflows shared with me and Public workflows tabs.
Select the tab you want to see all workflows in that category
Search for your desired workflow.
Click on the workflow name: a pop-up window opens with a preview of the workflow.
To run it directly: click Run (top-right).
Recommended: click Import (left of Run) to make your own local copy under Workflows / My Workflows.
ITS
The ITS (Internal Transcribed Spacer) workflow is designed for the identification and taxonomic classification of fungal sequences, specifically focusing on ITS regions. The sub-workflow includes several tools to mask, classify, and visualize taxonomic data:
bedtools MaskFastaBed ( Galaxy version 2.30.0) masks SSU and LSU regions from a FASTA file based on intervals defined in a BED regions file. Using the default parameters.
MAPseq ( Galaxy version 2.1.1+galaxy0) classifies matching OTUs to the reads, used in conjunction with the UNITE (v8.0) and ITSoneDB (v1.138) databases. Using the following parameters:
“Use cached database or database from history”: Cached database
*“Using built-in mapseq DB**. MAPseq is used in conjunction with the following databases:
MGnify ITS ITSonedb (v5.0.7) - ITSoneDB-20200214 downloaded at 2023-09-26
MGnify ITS UNITE (v5.0.7) - UNITE-20200214 downloaded at 2023-09-26
“Create OTU table”: Yes
“Create taxon table for Krona”: Yes
“Top hits”: 80
“Top OTUs”: 40
“Output format”: simple
Krona ( Galaxy version 2.7.1+galaxy0) generates pie charts demonstrating the taxonomic abundance. Using the following parameters:
“What is the type of your input data”: Tabular
“Provide a name for the basal rank”: Root
biom-convert ( Galaxy version 2.1.15+galaxy1) converts the taxonomic abundance tables to JSON and HDF5 formats. Using the following parameters:
“Choose the source BIOM format”: Tabular File
“Process metadata associated with observations when converting”: taxonomy
Click on galaxy-workflows-activityWorkflows in the Galaxy activity bar (on the left side of the screen, or in the top menu bar of older Galaxy instances). You will see a list of all your workflows
Click on galaxy-uploadImport at the top-right of the screen
Provide your workflow
Option 1: Paste the URL of the workflow into the box labelled “Archived Workflow URL”
Option 2: Upload the workflow file in the box labelled “Archived Workflow File”
Click the Import workflow button
Below is a short video demonstrating how to import a workflow from GitHub using this procedure:
Video: Importing a workflow from URL
Runworkflow-run the ITS sub-workflow using the following inputs:
“LSU and SSU BED”: LSU and SSU BED regions
“Processed sequence”: Quality processed sequences (merged single-end and paired-end collection)
Click on Workflows on the Activity Bar on the left.
At the top of the resulting page you will have the option to switch between the My workflows, Workflows shared with me and Public workflows tabs.
Select the tab you want to see all workflows in that category
Search for your desired workflow.
Click on the workflow name: a pop-up window opens with a preview of the workflow.
To run it directly: click Run (top-right).
Recommended: click Import (left of Run) to make your own local copy under Workflows / My Workflows.
Summary tables
The summary tables sub-workflow takes as input the taxonomic abundance tables generated from all datasets within the pipeline. It processes these tables to create two comprehensive taxonomic summary tables:
Full Taxonomic Summary Table: This table provides detailed taxonomic information spanning all levels, from superkingdom down to species. It offers a complete overview of the taxonomic composition across all samples, facilitating in-depth analyses of microbial communities.
Phylum-Level Summary Table: Focused specifically on the phylum level, this table aggregates data to provide a clear view of the phylum distribution within the datasets. This level-specific summary is particularly useful for high-level comparisons and identifying major trends within the microbial communities.
Both summary tables serve as essential inputs for downstream interpretation, helping to visualize and compare the taxonomic profiles across multiple samples (for example, see our tutorial onCalculating α and β diversity).
Hands On: Executing the summary tables sub-workflow
Click on galaxy-workflows-activityWorkflows in the Galaxy activity bar (on the left side of the screen, or in the top menu bar of older Galaxy instances). You will see a list of all your workflows
Click on galaxy-uploadImport at the top-right of the screen
Provide your workflow
Option 1: Paste the URL of the workflow into the box labelled “Archived Workflow URL”
Option 2: Upload the workflow file in the box labelled “Archived Workflow File”
Click the Import workflow button
Below is a short video demonstrating how to import a workflow from GitHub using this procedure:
Video: Importing a workflow from URL
Runworkflow-run the summary tables sub-workflow 4 times using the following inputs:
Click on Workflows on the Activity Bar on the left.
At the top of the resulting page you will have the option to switch between the My workflows, Workflows shared with me and Public workflows tabs.
Select the tab you want to see all workflows in that category
Search for your desired workflow.
Click on the workflow name: a pop-up window opens with a preview of the workflow.
To run it directly: click Run (top-right).
Recommended: click Import (left of Run) to make your own local copy under Workflows / My Workflows.
Complete Workflow (including all sub-workflows)
If you’re working with SSU, LSU, and ITS data, it’s beneficial to run the entire workflow to take full advantage of its capabilities. Even if you’re unsure which of these datasets you have, executing the complete workflow ensures that all relevant analyses are applied, maximizing the insight gained from your microbial data.
Hands On: Executing the complete MGnify amplicon pipeline
Click on galaxy-workflows-activityWorkflows in the Galaxy activity bar (on the left side of the screen, or in the top menu bar of older Galaxy instances). You will see a list of all your workflows
Click on galaxy-uploadImport at the top-right of the screen
Provide your workflow
Option 1: Paste the URL of the workflow into the box labelled “Archived Workflow URL”
Option 2: Upload the workflow file in the box labelled “Archived Workflow File”
Click the Import workflow button
Below is a short video demonstrating how to import a workflow from GitHub using this procedure:
Video: Importing a workflow from URL
Runworkflow-run the workflow using the following inputs:
“SRA accession list”: accessions.csv
“Clan information file”: ribo.claninfo
Click on Workflows on the Activity Bar on the left.
At the top of the resulting page you will have the option to switch between the My workflows, Workflows shared with me and Public workflows tabs.
Select the tab you want to see all workflows in that category
Search for your desired workflow.
Click on the workflow name: a pop-up window opens with a preview of the workflow.
To run it directly: click Run (top-right).
Recommended: click Import (left of Run) to make your own local copy under Workflows / My Workflows.
Hands On: Executing the complete MGnify amplicon pipeline
Click on galaxy-workflows-activityWorkflows in the Galaxy activity bar (on the left side of the screen, or in the top menu bar of older Galaxy instances). You will see a list of all your workflows
Click on galaxy-uploadImport at the top-right of the screen
Provide your workflow
Option 1: Paste the URL of the workflow into the box labelled “Archived Workflow URL”
Option 2: Upload the workflow file in the box labelled “Archived Workflow File”
Click the Import workflow button
Below is a short video demonstrating how to import a workflow from GitHub using this procedure:
Video: Importing a workflow from URL
Adjust workflow:
Click on galaxy-workflows-activityWorkflows in the left side-bar
Search for “MGnify’s amplicon pipeline v5.0 - complete” workflow
Click on galaxy-wf-editEdit
Remove the steps:
“1: SRA accession list”
“22: fastq-dl”
*“23: Convert compressed file to uncompressed”
*“24: Convert compressed file to uncompressed”
*“25: Text reformatting”
*“26: Text reformatting”
*“27: Convert uncompressed file to compressed”
*“28: Convert uncompressed file to compressed”
Click on Inputs in the left side-panel and add an Input dataset collection
Add the “Label”: Single-end reads
Connect it to the “Single-end reads” input in step “29: MGnify’s amplicon pipeline v5.0 - Quality control SE”
Click on Inputs in the left side-panel and add an Input dataset collection
Add the “Label”: Paired-end reads
Change “Collection type” to list:paired
Connect it to the “Paired-end reads” input in step “30: MGnify’s amplicon pipeline v5.0 - Quality control PE”
Click on galaxy-saveSave and then workflow-runRun in the right side-panel
Runworkflow-run the workflow using the following inputs:
“Single-end reads”: Single-end reads collection
“Paired-end reads”: Paired-end reads collection
“Clan information file”: Upload the clan information file, which contains details about the sequence family assignments required for accurate taxonomic classification ribo.claninfo
“Covariance models”: Provide the covariance models necessary for the rRNA prediction step, enabling accurate alignment and prediction of ribosomal RNA sequences ribo.cm
Click on Workflows on the Activity Bar on the left.
At the top of the resulting page you will have the option to switch between the My workflows, Workflows shared with me and Public workflows tabs.
Select the tab you want to see all workflows in that category
Search for your desired workflow.
Click on the workflow name: a pop-up window opens with a preview of the workflow.
To run it directly: click Run (top-right).
Recommended: click Import (left of Run) to make your own local copy under Workflows / My Workflows.
To achieve results comparable to those from MGnify, it is recommended that your sequence headers follow this format: @accession.spotID-$spotName-$readNumber. For example: @ERR2015153.1-M01170:20:000000000-AMCTR:1:1101:17071:1623-2
MAPseq-to-ampvis2
The MAPseq to ampvis2 workflow transforms MAPseq OTU tables and accompanying metadata into a format compatible with ampvis2. This process restructures the MAPseq output into well-organized object files that can be directly used in ampvis2 for downstream analyses such as rank abundance plots, heatmaps, and other visualizations.
Hands On: Downloading datasets
Click on galaxy-uploadUpload Data at the top of left panel
Select galaxy-wf-editPaste/Fetch Data at the bottom
Click on galaxy-workflows-activityWorkflows in the Galaxy activity bar (on the left side of the screen, or in the top menu bar of older Galaxy instances). You will see a list of all your workflows
Click on galaxy-uploadImport at the top-right of the screen
Provide your workflow
Option 1: Paste the URL of the workflow into the box labelled “Archived Workflow URL”
Option 2: Upload the workflow file in the box labelled “Archived Workflow File”
Click the Import workflow button
Below is a short video demonstrating how to import a workflow from GitHub using this procedure:
Video: Importing a workflow from URL
Runworkflow-run the workflow using the following inputs:
“MAPseq outputs”: Provide the OTU tables generated by MAPseq, which need to be reformatted for ampvis2
“Metadata”: Contextual information associated with the data from the OTU tables
Click on Workflows on the Activity Bar on the left.
At the top of the resulting page you will have the option to switch between the My workflows, Workflows shared with me and Public workflows tabs.
Select the tab you want to see all workflows in that category
Search for your desired workflow.
Click on the workflow name: a pop-up window opens with a preview of the workflow.
To run it directly: click Run (top-right).
Recommended: click Import (left of Run) to make your own local copy under Workflows / My Workflows.
With the ampvis2 object now successfully generated, users can proceed to create a variety of informative visualizations—such as heatmaps—to explore and interpret microbial community composition, identify patterns across samples, and support further ecological or statistical analysis.
Hands On: Utilizing the ampvis2 object to generate a heatmap
ampvis2 heatmap ( Galaxy version 2.8.9+galaxy1):
Ampvis2 RDS dataset: Choose Ampvis2 object from your history
The taxonomic level to aggregate the OTUs: Order
How to show OTUs without taxonomic information: Remove OTUs without taxonomic information
Select light blue for Start color for the heatmap
Select dark red for End color for the heatmap
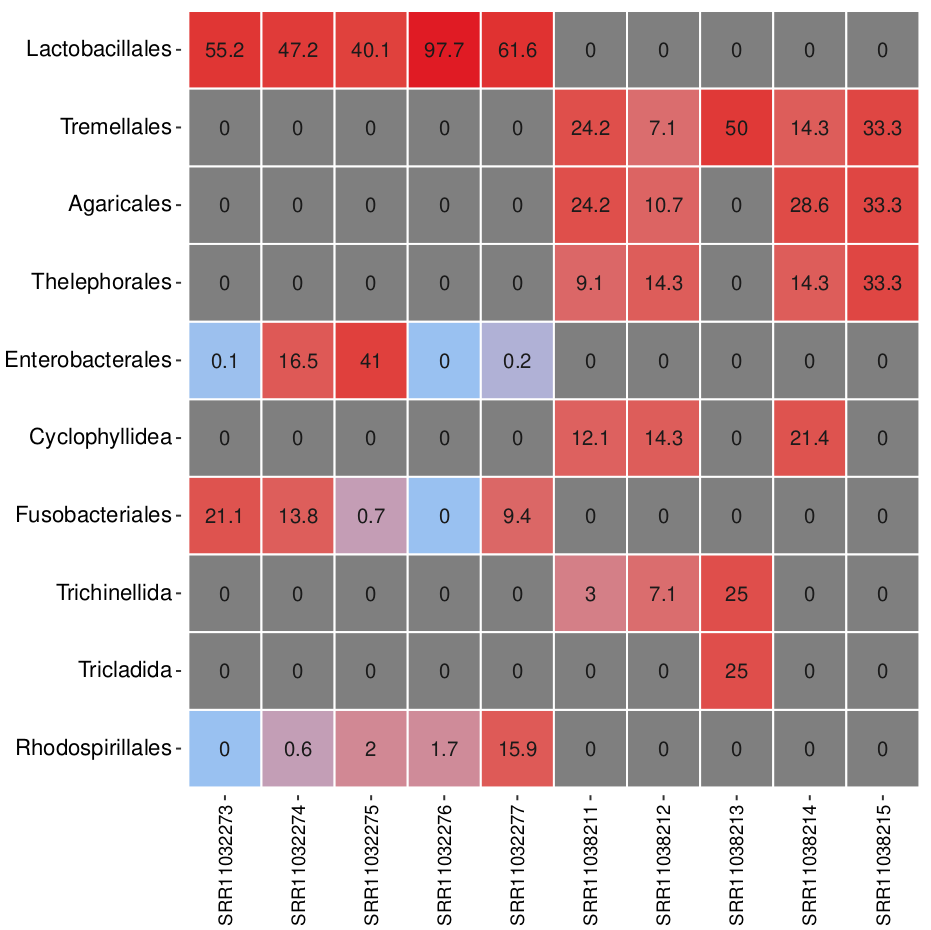
Let us now take a look at the generated heatmap.
Question: i
Which sample has the highest relative abundance of Lactobacillales?
Which taxonomic order is most dominant in sample SRR1038213?
Sample SRR11032276 has the highest relative abundance of Lactobacillales at 97.7%, indicating it is strongly dominated by this bacterial order.
In sample SRR11038213, Tremellales is the most dominant order, with a relative abundance of 50%.
This was a brief glimpse into the capabilities of ampvis2. We encourage you to further explore the full range of features available in Ampvis2, as well as other powerful visualization tools offered on the Galaxy platform.
Conclusion
This tutorial provided a step-by-step guide to executing the different sub-workflows of the MGnify v5.0 amplicon pipeline on Galaxy. By following these steps, you should be able to process, analyze, and visualize your amplicon sequencing data efficiently.
You've Finished the Tutorial
Please also consider filling out the Feedback Form as well!
Frequently Asked Questions
Have questions about this tutorial? Have a look at the available FAQ pages and support channels
Further information, including links to documentation and original publications, regarding the tools, analysis techniques and the interpretation of results described in this tutorial can be found here.
References
Richardson, L., B. Allen, G. Baldi, M. Beracochea, M. L. Bileschi et al., 2022 MGnify: the microbiome sequence data analysis resource in 2023. Nucleic Acids Research 51: D753–D759. 10.1093/nar/gkac1080
Did you use this material as an instructor? Feel free to give us feedback on how it went.
Did you use this material as a learner or student? Click the form below to leave feedback.
Hiltemann, Saskia, Rasche, Helena et al., 2023 Galaxy Training: A Powerful Framework for Teaching! PLOS Computational Biology 10.1371/journal.pcbi.1010752
Batut et al., 2018 Community-Driven Data Analysis Training for Biology Cell Systems 10.1016/j.cels.2018.05.012
@misc{microbiome-mgnify-amplicon,
author = "Rand Zoabi",
	title = "MGnify v5.0 Amplicon Pipeline (Galaxy Training Materials)",
	year = "",
	month = "",
	day = "",
	url = "\url{https://training.galaxyproject.org/training-material/topics/microbiome/tutorials/mgnify-amplicon/tutorial.html}",
	note = "[Online; accessed TODAY]"
}
@article{Hiltemann_2023,
	doi = {10.1371/journal.pcbi.1010752},
	url = {https://doi.org/10.1371%2Fjournal.pcbi.1010752},
	year = 2023,
	month = {jan},
	publisher = {Public Library of Science ({PLoS})},
	volume = {19},
	number = {1},
	pages = {e1010752},
	author = {Saskia Hiltemann and Helena Rasche and Simon Gladman and Hans-Rudolf Hotz and Delphine Larivi{\`{e}}re and Daniel Blankenberg and Pratik D. Jagtap and Thomas Wollmann and Anthony Bretaudeau and Nadia Gou{\'{e}} and Timothy J. Griffin and Coline Royaux and Yvan Le Bras and Subina Mehta and Anna Syme and Frederik Coppens and Bert Droesbeke and Nicola Soranzo and Wendi Bacon and Fotis Psomopoulos and Crist{\'{o}}bal Gallardo-Alba and John Davis and Melanie Christine Föll and Matthias Fahrner and Maria A. Doyle and Beatriz Serrano-Solano and Anne Claire Fouilloux and Peter van Heusden and Wolfgang Maier and Dave Clements and Florian Heyl and Björn Grüning and B{\'{e}}r{\'{e}}nice Batut and},
	editor = {Francis Ouellette},
	title = {Galaxy Training: A powerful framework for teaching!},
	journal = {PLoS Comput Biol}
}
Funding
These individuals or organisations provided funding support for the development of this resource
Questions:
 Open image in new tab
Open image in new tab