Text-Mining Differences in Chinese Newspaper Articles
| Author(s) |
|
| Reviewers |
|
OverviewQuestions:
Objectives:
How can I automatically compare two Chinese newspaper articles?
What characters were censored in a Chinese newspaper published in Hong Kong in the 1930s?
Requirements:
Learn to clean and compare two texts.
Extract specific information from texts.
Visualise your results in a word cloud.
Time estimation: 1 hourLevel: Intermediate IntermediateSupporting Materials:
- Datasets
- Workflows
- galaxy-history-answer Answer Histories
- FAQs
- instances Available on these Galaxies
Published: Feb 28, 2025Last modification: May 6, 2026License: Tutorial Content is licensed under Creative Commons Attribution 4.0 International License. The GTN Framework is licensed under MITpurl PURL: https://gxy.io/GTN:T00530rating Rating: 5.0 (1 recent ratings, 3 all time)version Revision: 7
The British Hong Kong Government censored Chinese newspapers before their publication in the colony in the 1930s (Ng 2022). Replacement characters like × visibly marked those redactions, making them obvious even to those who did not read any Chinese.
 Open image in new tab
The schematic example in Figure 1, adapted from Schneider 2024, shows what such a censored Chinese article looked like. It is read from right to left and top to bottom. The two more prominent lines on the right are the article title, and the following text is the article’s main body. It contains the character × several times, indicating various instances where it was censored.
Despite this obvious form of censorship, no research is looking into what Chinese characters the × replaced. My dissertation (Schneider 2024), which informs this workflow, started at this point. Through extensive research, I found several articles censored in the Hong Kong edition of Da gong bao (大公報) as uncensored versions. Those mostly came from Chinese editions printed in mainland China, where different censorship regulations applied. Those articles from China were not censored and openly showed the characters redacted in the Hong Kong versions. An example of a censored article could be Anon. 1938-10-16 and of the uncensored version Anon. 1938-10-16.
This tutorial uses text mining to compare two newspaper articles, a censored and an uncensored text to answer what characters were censored in a Chinese newspaper published in Hong Kong in the 1930s.
AgendaIn this tutorial, we will cover:
Upload the texts
The machine-readable versions of the Chinese newspaper articles I originally used in my dissertation come from a proprietary database and can not be shared here. Instead, I generated a dummy article with a similar setup in GPT and manually adapted the censorship symbols based on my research. As a result, those dummy articles differ in style and punctuation, as the articles in my research. Therefore, the input files are two texts in traditional Chinese. The first is censored, containing ×, and the second one is uncensored and does not contain replacement symbols. Both texts slightly differ in their layout, which will be unified later.
Hands On: Upload the Texts
Create a new history for this tutorial
To create a new history simply click the new-history icon at the top of the history panel:
Import the files from Zenodo
https://zenodo.org/records/14899614/files/Example_Chinese_newspaper_censored.txt
https://zenodo.org/records/14899614/files/Example_Chinese_newspaper_uncensored.txt
- Copy the link location
Click galaxy-upload Upload at the top of the activity panel
- Select galaxy-wf-edit Paste/Fetch Data
Paste the link(s) into the text field
Press Start
- Close the window
- Rename the datasets, if necessary
Check that the datatype is
txt.
- Click on the galaxy-pencil pencil icon for the dataset to edit its attributes
- In the central panel, click galaxy-chart-select-data Datatypes tab on the top
- In the galaxy-chart-select-data Assign Datatype, select
datatypesfrom “New Type” dropdown
- Tip: you can start typing the datatype into the field to filter the dropdown menu
- Click the Save button


Question: What do the uploaded texts look like?
- Name at least one visual difference you notice between the two texts. (No need to understand their content here.)
- Visual differences you notice might be:
- The texts have different headlines
- The uncensored text contains more paragraphs
- The censored text contains the symbol × several times
- The censored text contains additional symbols at the end
- The texts use slightly different punctuation (impressive catch!)
Clean both texts
We pre-process and clean both texts to make the comparison easier and more apparent. Regular Expressions (Regex) help unify the text and find and replace certain text parts. Here, the Regex also helps to restructure the text.
Regular Expressions are a powerful tool to modify text automatically based on word patterns. To read more about Regex’s specifics, see its documentation. You can check what your input matches in Regex 101. Enter the Regular Expression you want to try in the top field. Insert a sample text below to see what content your Regex catches and to find out how to adapt it.
We will use Regular Expressions in a tool called “Replace text” with four different sub-steps. Those will vary if you upload different texts. Apply this step first to the censored and then to the uncensored text to get two cleaned texts.
Hands On: Cleaning the Text with Regular Expressions
- Replace Text in entire line ( Galaxy version 9.5+galaxy3) with the following parameters:
- param-file “File to process”:
Example_Chinese_newspaper_censored.txt(censored text you uploaded)- In “Replacement”:
- param-repeat “Insert Replacement”
- “Find pattern”:
\r- “Additional sed commands before replacement”:
:a;N;$!ba;- param-repeat “Insert Replacement”
- “Find pattern”:
\n- param-repeat “Insert Replacement”
- “Find pattern”:
\s- param-repeat “Insert Replacement”
- “Find pattern”:
(.)- “Replace with:”:
\1\n- Click “Run Tool”.
Now repeat those steps with the uncensored text.
Comment: Explaining the above Regular ExpressionsRegular expressions can not only find particular words, as you might be familiar with from regular text editors. It is more powerful and can find particular patterns, for example, only capitalised words or all numbers. In this step, we mostly delete unnecessary placeholders. The first pattern we want to find is
\r. It catches a specific form of invisible line breaks that would create unwanted gaps in the comparison later. We delete those by leaving the optional “Replace with” field blank. The additional sed commands before replacement:a;N;$!ba;catch all blank spaces with this tool. It is necessary only once to ensure that particular end-of-line characters are removed consistently. Similarly,\nmarks linebreaks. We also delete those by leaving the optional “Replace with” field blank. The next expression we search for is\s. Those are spaces as you see them between words on your computer. We delete those. As a result, there are no gaps in our text anymore. In the last step, we want to choose each character with(.)and reformat it. We want to have one character per line. Therefore, we replace all characters with\1\n.\1means the responding character, and\nadds a linebreak after each. The result is a clean and reformatted text.Regular expressions are a standardized way of describing patterns in textual data. They can be extremely useful for tasks such as finding and replacing data. They can be a bit tricky to master, but learning even just a few of the basics can help you get the most out of Galaxy.
Finding
Below are just a few examples of basic expressions:
Regular expression Matches abcan occurrence of abcwithin your data(abc|def)abcordef[abc]a single character which is either a,b, orc[^abc]a character that is NOT a,b, norc[a-z]any lowercase letter [a-zA-Z]any letter (upper or lower case) [0-9]numbers 0-9 \dany digit (same as [0-9])\Dany non-digit character \wany alphanumeric character \Wany non-alphanumeric character \sany whitespace \Sany non-whitespace character .any character \.literal . (period) {x,y}between x and y repetitions ^the beginning of the line $the end of the line Note: you see that characters such as
*,?,.,+etc have a special meaning in a regular expression. If you want to match on those characters, you can escape them with a backslash. So\?matches the question mark character exactly.Examples
Regular expression matches \d{4}4 digits (e.g. a year) chr\d{1,2}chrfollowed by 1 or 2 digits.*abc$anything with abcat the end of the line^$empty line ^>.*Line starting with >(e.g. Fasta header)^[^>].*Line not starting with >(e.g. Fasta sequence)Replacing
Sometimes you need to capture the exact value you matched on, in order to use it in your replacement, we do this using capture groups
(...), which we can refer to using\1,\2etc for the first and second captured values. If you want to refer to the whole match, use&.
Regular expression Input Captures chr(\d{1,2})chr14\1 = 14(\d{2}) July (\d{4})24 July 1984 \1 = 24,\2 = 1984An expression like
s/find/replacement/gindicates a replacement expression, this will search (s) for any occurrence offind, and replace it withreplacement. It will do this globally (g) which means it doesn’t stop after the first match.Example:
s/chr(\d{1,2})/CHR\1/gwill replacechr14withCHR14etc.You can also use replacement modifier such as convert to lower case
\Lor upper case\U. Example:s/.*/\U&/gwill convert the whole text to upper case.Note: In Galaxy, you are often asked to provide the find and replacement expressions separately, so you don’t have to use the
s/../../gstructure.There is a lot more you can do with regular expressions, and there are a few different flavours in different tools/programming languages, but these are the most important basics that will already allow you to do many of the tasks you might need in your analysis.
Tip: RegexOne is a nice interactive tutorial to learn the basics of regular expressions.
Tip: Regex101.com is a great resource for interactively testing and constructing your regular expressions, it even provides an explanation of a regular expression if you provide one.
Tip: Cyrilex is a visual regular expression tester.
Remember to apply those steps to both the censored and the uncensored text. Rename both new texts in a meaningful way. Choose, for example, “Cleaned Censored Text” and “Cleaned Uncensored Text”.
Question: Take a look at the texts
- What do the texts look like now? How have they changed?
- Before, the texts had many sentences per line. Now, both texts show one character per line and have more lines. The layout is entirely different.
Compare the censored and uncensored text
We can now compare the two cleaned texts. This will visualise the differences between the two texts and mark them by colour. Make sure to upload the cleaned, censored text with the replacement characters like ‘×’ first. As text two, upload the cleaned, uncensored text without the replacement characters. This version (HTML version) creates an HTML file, which colour codes differences as additions (green) or extractions (red) when comparing the texts.
Create a diff file for researchers
Hands On: Comparing the texts using diff tool
- diff ( Galaxy version 3.10+galaxy1) with the following parameters:
- param-file “First input file”:
Cleaned Censored Text(output of Replace Text tool)- param-file “Second input file”:
Cleaned Uncensored Text(output of Replace Text tool)- “Choose a report format”:
Generates an HTML report to visualize the differences- Click “Run Tool”
The result is two files: an HTML file and a raw output as a by-product.
Question: Take a look at the HTML report
- What can you see in lines 19 / 21?
- Line 19 on the left shows a red comma on the left side of the table. It corresponds with line 21 on the right, which contains a colon in green. This means the punctuation in the file differs. The censored version contains a comma, while the uncensored one includes a colon.
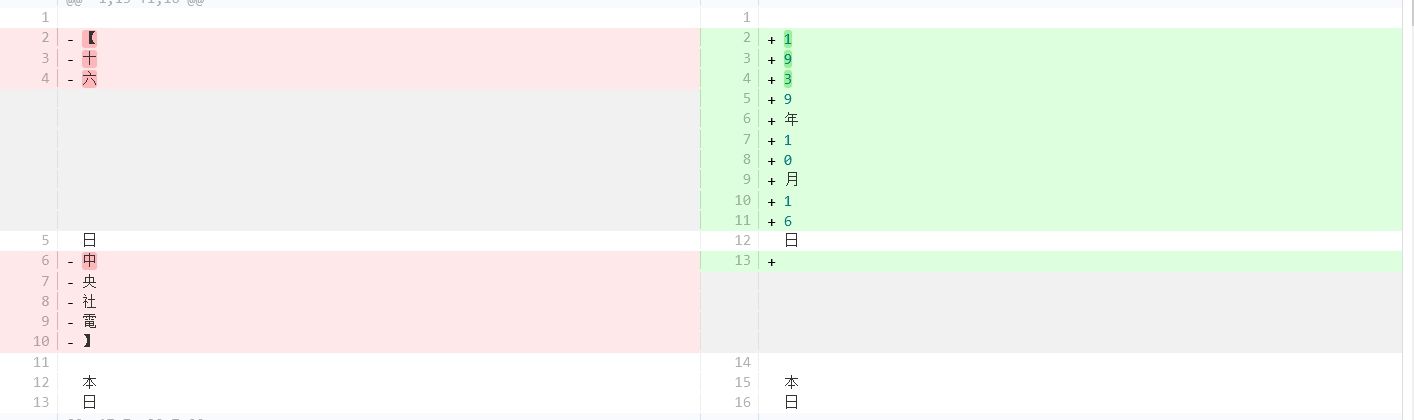
The HTML file could look like this:
 Open image in new tab
It shows what passages differ in the two texts. Red parts indicate deletions, and green areas indicate additions. If passages are identical in both texts, they remain uncoloured. This output is very convenient for researchers, as it shows differences quickly. If all you want to do is compare the two texts - you have achieved your goal and can stop here. Congratulations!
If you want to extract the censored passages in the next steps, this HTML output is not helpful for further technical processing with Galaxy. For this, we run this diff tool a second time with slightly changed parameters. The output is the basis for our further analysis steps.
Create a diff file for further processing
This step runs the text comparison line by line again to create another raw file that the computer can work with.
It is less intuitive to understand at first glance. Again, select the cleaned, censored text containing × first and the uncensored text second.
But this time, choose another report format.
Hands On: Run another diff tool
- diff ( Galaxy version 3.10+galaxy1) with the following parameters:
- param-file “First input file”:
Cleaned Censored Text(output of Replace Text tool)- param-file “Second input file”:
Cleaned Uncensored Text(output of Replace Text tool)- “Choose a report format”:
Text file, side-by-side (-y)- Click “Run Tool”
Comment: The output formatAs you can see above, the output of this file is a text file, compared to the HTML output in the last step.
- Rename your file
diff raw.
Question: Look at the diff raw file
- How does this file differ from the HTML file in the last step?
- This output is a text file. Changes between the two texts are not coloured. Instead, they are marked by additional symbols like ‘>’ or ‘<’.
Great, we can use this file for our next steps.
Select only censored lines
Now we want to extract only specific lines. To determine what content was redacted in the first text, we filter the last steps’ raw output for lines containing the censorship symbol ×.
Hands On: Select text
- Select lines that match an expression with the following parameters:
- param-file “Select lines”:
diff_raw(output of diff tool)- “that are”:
Matching- “the pattern”:
×- Click “Run Tool”
- Rename your file
Selected lines.
Question: What output do you get?
- How many lines contain ×?
- 13
Check the datatype of this file, it should be txt.
The tools we use in the next steps need tabular files instead.
Therefore, we will change the datatype of this file to tabular to enable the next steps:
Hands On: Change Datatype
Set the datatype of
Selected linesgalaxy-pencil totabular.
- Click on the galaxy-pencil pencil icon for the dataset to edit its attributes
- In the central panel, click galaxy-chart-select-data Datatypes tab on the top
- In the galaxy-chart-select-data Assign Datatype, select
tabularfrom “New Type” dropdown
- Tip: you can start typing the datatype into the field to filter the dropdown menu
- Click the Save button
When you have changed the format successfully, you should see × in Column 1 and the Chinese characters in Column 9.
Ensure consistent file format
After filtering for censored lines, we add a sub-step to ensure smooth computation. The previous setup could cause an error if the characters filtered in the last step were erased. Then the extracted file would lack the last column, causing an error. This is invisible to the researchers in the file. The compute step covers this potential error and ensures all necessary columns exist.
Hands On: Compute to ensure all columns exist
- Compute ( Galaxy version 2.1+galaxy0) with the following parameters:
- param-file “Input file”:
Selected lines(output of Select tool)- “Input has a header line with column names?”:
No
- In “Expressions”: - “Add expression”:
c9- “Mode of the operation”:Replace- “Use new column to replace column number”:9- In “Error handling”:
- “If an expression cannot be computed for a row”:
Produce an empty column value for the row- Click “Run Tool”
- Rename the result to
Censored lines.
Summarise your findings
This step summarises how often each character appeared in the table previously.
Hands On: Task description
- Datamash ( Galaxy version 1.9+galaxy0) with the following parameters:
- param-file “Input tabular dataset”:
Censored lines(output of Compute tool)- “Group by fields”:
9- “Sort input”:
Yes- In “Operation to perform on each group”:
- param-repeat “Insert Operation to perform on each group”
- “Type”:
count- “On column”:
column 9- Click “Run Tool”
- Rename the output file
Quantified Results.
Question
- How many lines does the file have now?
- Three lines showing different characters: 寇, 敵 and 日.
Sort your findings
Particularly if you get a long list in the last step, sorting the results from the most to least frequent characters is necessary. If you are only interested in the quantitative results, this can be your final output.
Hands On: Sort
- Sort ( Galaxy version 9.5+galaxy3) with the following parameters:
- param-file “Sort Query”:
Quantified Results(output of Datamash tool)- “Sort on column”:
Column 2- “in”:
Descending order- “using sort flavor”:
Fast numeric sort- Click “Run Tool”
Rename the output file
Sorted Results.Comment: How to sort?Select column
c2because it contains the character frequency.
Question: Check your results
- How often did the most frequently censored character appear?
- The character 敵, meaning enemy, was censored 10 times in the first text.
Why would the British Hong Kong Government consistently censor this character? Jump to the conclusion to find out!
Cut out the censored characters only
If you want to visualise your results, this step gets you there. We use the file Censored lines that we created in the “Ensure consistent file format” step.
Unlike the last step, this tabular file contains all 13 lines in 9 columns.
From this file, we cut out all uncensored characters. The result is a single column with multiple rows of Chinese characters.
It allows scaling words by frequency in the word cloud in the next step. As a result, characters that appear more often appear bigger, making the results evident at first sight.
Hands On: Select the censored characters
- Cut with the following parameters:
- “Cut columns”:
c9- param-file “From”:
Censored lines(output of Compute tool)- Click “Run Tool”
Rename the output file
Uncensored characters.
c9means column 9. It contains the uncensored characters from text two and is, therefore, cut out in this step.
Generate a word cloud
The last step is to visualise the results within a word cloud. It shows which characters were censored in the first text. The bigger the word, the more often it appeared in the text.
Hands On: Task description
- Generate a word cloud ( Galaxy version 1.9.6+galaxy0) with the following parameters:
- param-file “Input file”:
Uncensored characters(output of Cut tool)- *“Do you want to select a special font?”:
Select from a list of fonts:Noto Sans Traditional Chinese- “Smallest font size to show”:
8- “Color option”:
Colormap- “Ratio of times to try horizontal fitting as opposed to vertical”:
1.0- “Scaling of words by frequency (0 - 1)”:
0.9- Click “Run Tool”
Rename the output file
Wordcloud of uncensored characters.You can choose different colours to suit your needs. The higher the “Ratio of times to try horizontal fitting as opposed to vertical” is towards “1”, the more likely the character or word will appear horizontally. “Scaling of words by frequency (0 - 1)” allows you to scale the words according to their frequency. The smaller this number, the more equal-sized the characters in your word cloud will be, no matter their number.
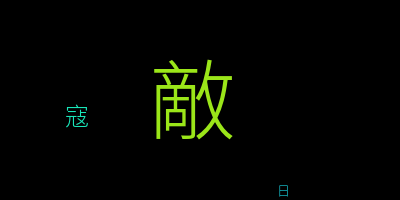
Your word cloud should look similar to this:
Conclusion
This tutorial used text mining to extract censored characters from a Chinese newspaper.
 Open image in new tab
The uploaded dummy texts differed in several ways. They used slightly different punctuation, and some sentences and characters differed. The most obvious difference is that the second text was published uncensored in China, whereas the original, published in Hong Kong, contained censorship symbols. This allowed us to extract what characters were censored in the text from Hong Kong.
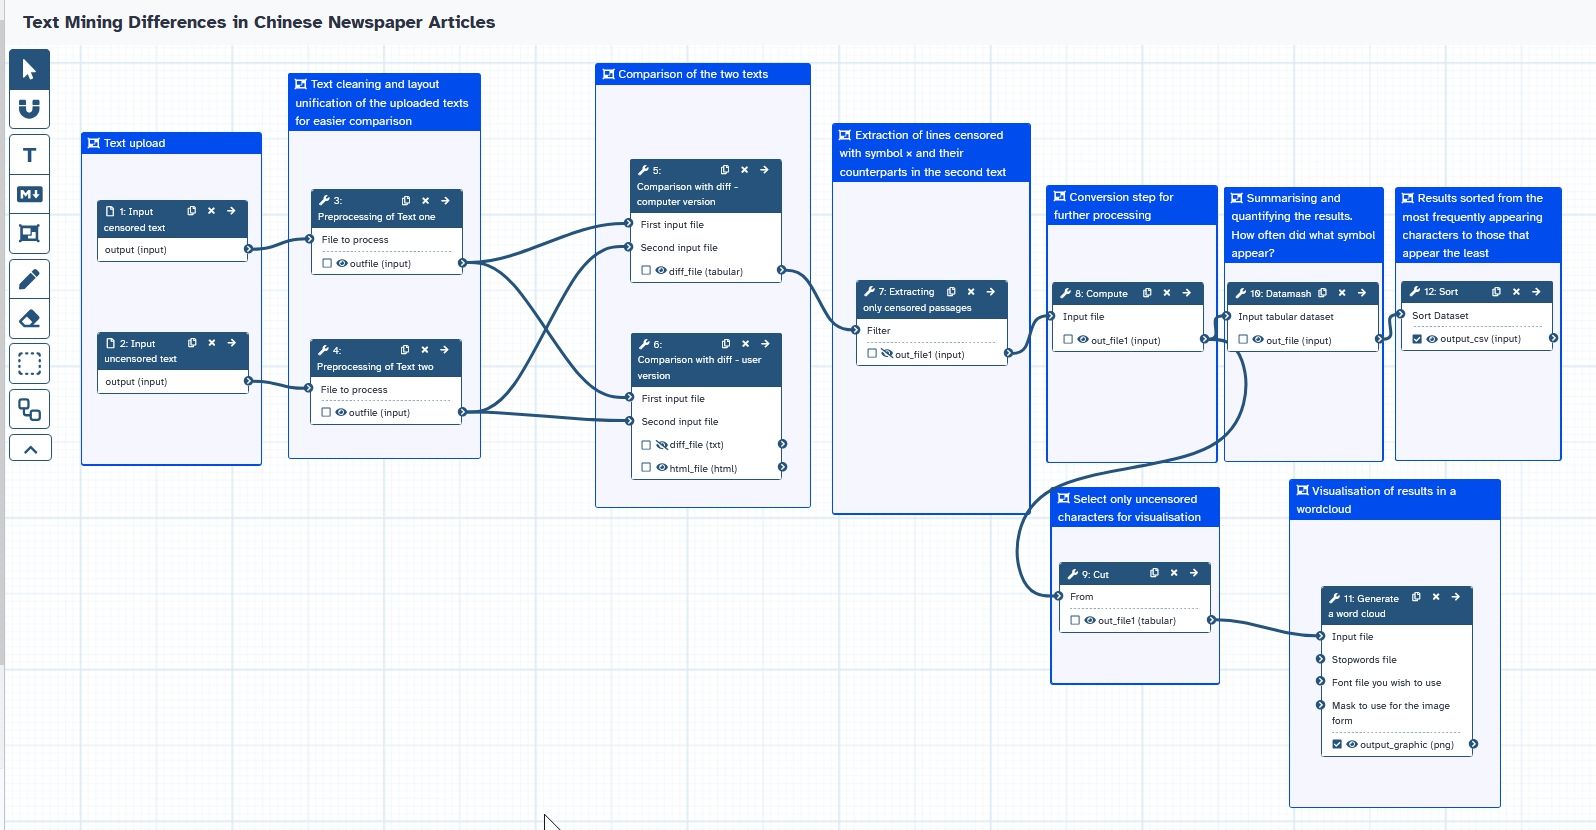
Within this workflow, we first unified the layout of both texts, showing one character per line for an easier comparison with the diff tool. The tool marked the differences between the two texts in colour. Afterwards, we extracted only lines censored with ×. The extraction of the results ran in two strands: One was counting and sorting the results. This will answer what characters the British Hong Kong Government censored in Chinese newspapers in the 1930s: Based on the (simplified) dummy texts, the characters were 敵 (enemy), 寇 (brave) and 日 (Japan). The character for enemy dominates and was censored five times more often than the character for brave.
What do those findings tell us? The British Hong Kong Government avoided publishing newspapers with a strong stand against Japan. Why? The British colony of Hong Kong, with a large Chinese population, is located very close to the Chinese mainland. Especially after the Japanese army invaded China in the summer of 1937, the British had to walk a tightrope. They tried to support the Chinese efforts without offending Japan. As a British outpost, Hong Kong had little military power and would not withstand a Japanese attack for long. Therefore, the British tried to appease the Japanese Government and avoid an attack. Calling them brave or enemies openly would have been dangerous. The one redaction of 日 (Japan) is very uncommon. This shows that the censorship practices were adaptable and not always unified. Censoring Hong Kong’s newspapers to avoid anti-Japanese content is therefore a practical example of how the British Government’s appeasement policies were implemented locally. This newspaper comparison is consistent with the findings in archival sources that I also researched for my dissertation (Schneider 2024) and lays the censored characters open for the first time.
You've Finished the Tutorial
Key points
The diff tool allows comparing two similar texts automatically
The word cloud shows redactions from the texts at a glance
Frequently Asked Questions
Have questions about this tutorial? Have a look at the available FAQ pages and support channelsReferences
- Anon., 1938-10-16 Zhong zhi wei hui 中執委會 [Central Executive Committee]. Da gong bao Xianggang ban p. 3. https://sls.hkpl.gov.hk/digital-collection/p.html?cta_id=2495df409cb711ef9c2
- Anon., 1938-10-16 Zhongyang mian yue junmin kangzhan 中央勉粵軍民抗戰 [The Central Government Encourages the Guangdong Military and Civilians to Resist the War]. Da gong bao Hankou ban p. 2.
- Ng, M., 2022 Political Censorship in British Hong Kong. Cambridge University Press. ISBN: 9781108830027
- Schneider, D., 2024 Passed by the Censor. Press Censorship in the British Empire With a Special Focus on Hong Kong, 1938–1941 [Unpublished Dissertation]: Albert Ludwigs Universität Freiburg im Breisgau.
Feedback
Did you use this material as an instructor? Feel free to give us feedback on how it went.
Did you use this material as a learner or student? Click the form below to leave feedback.

Citing this Tutorial
- Daniela Schneider, Text-Mining Differences in Chinese Newspaper Articles (Galaxy Training Materials). https://training.galaxyproject.org/training-material/topics/digital-humanities/tutorials/text_mining_chinese/tutorial.html Online; accessed TODAY
- Hiltemann, Saskia, Rasche, Helena et al., 2023 Galaxy Training: A Powerful Framework for Teaching! PLOS Computational Biology 10.1371/journal.pcbi.1010752
- Batut et al., 2018 Community-Driven Data Analysis Training for Biology Cell Systems 10.1016/j.cels.2018.05.012
@misc{digital-humanities-text_mining_chinese,
author = "Daniela Schneider",
	title = "Text-Mining Differences in Chinese Newspaper Articles (Galaxy Training Materials)",
	year = "",
	month = "",
	day = "",
	url = "\url{https://training.galaxyproject.org/training-material/topics/digital-humanities/tutorials/text_mining_chinese/tutorial.html}",
	note = "[Online; accessed TODAY]"
}
@article{Hiltemann_2023,
	doi = {10.1371/journal.pcbi.1010752},
	url = {https://doi.org/10.1371%2Fjournal.pcbi.1010752},
	year = 2023,
	month = {jan},
	publisher = {Public Library of Science ({PLoS})},
	volume = {19},
	number = {1},
	pages = {e1010752},
	author = {Saskia Hiltemann and Helena Rasche and Simon Gladman and Hans-Rudolf Hotz and Delphine Larivi{\`{e}}re and Daniel Blankenberg and Pratik D. Jagtap and Thomas Wollmann and Anthony Bretaudeau and Nadia Gou{\'{e}} and Timothy J. Griffin and Coline Royaux and Yvan Le Bras and Subina Mehta and Anna Syme and Frederik Coppens and Bert Droesbeke and Nicola Soranzo and Wendi Bacon and Fotis Psomopoulos and Crist{\'{o}}bal Gallardo-Alba and John Davis and Melanie Christine Föll and Matthias Fahrner and Maria A. Doyle and Beatriz Serrano-Solano and Anne Claire Fouilloux and Peter van Heusden and Wolfgang Maier and Dave Clements and Florian Heyl and Björn Grüning and B{\'{e}}r{\'{e}}nice Batut and},
	editor = {Francis Ouellette},
	title = {Galaxy Training: A powerful framework for teaching!},
	journal = {PLoS Comput Biol}
}
Funding
These individuals or organisations provided funding support for the development of this resource
Congratulations on successfully completing this tutorial!


You can use Ephemeris's
shed-tools installcommand to install the tools used in this tutorial.shed-tools install [-g GALAXY] [-a API_KEY] -t <(curl https://training.galaxyproject.org/training-material/api/topics/digital-humanities/tutorials/text_mining_chinese/tutorial.json | jq .admin_install_yaml -r)Alternatively you can copy and paste the following YAML
---
install_tool_dependencies: true
install_repository_dependencies: true
install_resolver_dependencies: true
tools:
- name: diff
  owner: bgruening
  revisions: be2d899bf34a
  tool_panel_section_label: Text Manipulation
  tool_shed_url: https://toolshed.g2.bx.psu.edu/
- name: text_processing
  owner: bgruening
  revisions: ab83aa685821
  tool_panel_section_label: Text Manipulation
  tool_shed_url: https://toolshed.g2.bx.psu.edu/
- name: text_processing
  owner: bgruening
  revisions: ab83aa685821
  tool_panel_section_label: Text Manipulation
  tool_shed_url: https://toolshed.g2.bx.psu.edu/
- name: wordcloud
  owner: bgruening
  revisions: 45c4cc885ddb
  tool_panel_section_label: Graph/Display Data
  tool_shed_url: https://toolshed.g2.bx.psu.edu/
- name: column_maker
  owner: devteam
  revisions: 61f9ddbc63ca
  tool_panel_section_label: Text Manipulation
  tool_shed_url: https://toolshed.g2.bx.psu.edu/
- name: datamash_ops
  owner: iuc
  revisions: aaafc0ac4dd2
  tool_panel_section_label: Join, Subtract and Group
  tool_shed_url: https://toolshed.g2.bx.psu.edu/