Text-Mining articles with GROBID
Under Development!
This tutorial is not in its final state. The content may change a lot in the next months. Because of this status, it is also not listed in the topic pages.
| Author(s) |
  Daniela Schneider
|
| Reviewers |
 |
OverviewQuestions:
Objectives:
What is GROBID?
How to get started with GROBID in Galaxy?
Log in to Galaxy
Upload files to the platform
Use GROBID to extract information from publications
Time estimation: 1 hourLevel: Introductory IntroductorySupporting Materials:Published: Aug 13, 2026Last modification: Aug 13, 2026License: Tutorial Content is licensed under Creative Commons Attribution 4.0 International License. The GTN Framework is licensed under MITpurl PURL: https://gxy.io/GTN:T00590version Revision: 1
This tutorial shows you how you can use GROBID on Galaxy. The first couple of steps derive from A short introduction to Galaxy.
AgendaIn this tutorial, we will cover:
What is GROBID?
GROBID stands for GeneRation Of BIbliographic Data. It is a text mining library for large-scale extraction of bibliographical metadata and is now available on Galaxy.
Why use GROBID in Galaxy?
Galaxy is an open-source data analysis platform. Using GROBID on Galaxy gives you access to 4000+ tools to work with - all without programming skills. Moreover, Galaxy allows you to leverage high-performance computing (HPC) resources from within your browser. This is particularly useful if you are working on large amounts of text.
If your texts are not machine-readable, you could use Tesseract directly in Galaxy, or perform further text-mining tasks or visualise your results after running GROBID. All directly in Galaxy. You can chain different tools into workflows that you can rerun easily, allowing you to automate your analysis steps and make your tasks shareable.
Additionally, FAIR and reproducible research are at the core of what we do. Galaxy supports best practices in Research Data Management (RDM) across all steps of the research data life cycle and makes reproducibility a built-in default to support your research. Learn more on Galaxy in our Introduction to Digital Humanities and more on the platform’s RDM features in the Introduction to Galaxy as an RDM platform.
Get started in Galaxy
Create an account on Galaxy
To use Galaxy’s full potential, you must register and create an account. You can skip this step if you already have a Galaxy account.
To create an account at any public Galaxy instance, choose your server from the available list of Galaxy Platforms.
There are several UseGalaxy servers:
UseGalaxy.ca (CA)
UseGalaxy.org.au (AU)
UseGalaxy.fr (FR)
UseGalaxy.eu (EU)
UseGalaxy.org (US)
Click on “Login or Register” in the masthead on the server.
On the login page, find the Register here link and click on it.
Fill in the the registration form, then click on Create.
Your account should now get created, but will remain inactive until you verify the email address you provided in the registration form.
Check for a Confirmation Email in the email you used for account creation.
Missing? Check your Trash and Spam folders.
Click on the Email confirmation link to fully activate your account.
galaxy-info Delivery of the confimation email is blocked by your email provider or you mistyped the email address in the registration form?
Please do not register again, but follow the instructions to change the email address registered with your account! The confirmation email will be resent to your new address once you have changed it.
Trouble logging in later? Account email addresses and public names are caSe-sensiTive. Check your activation email for formats.


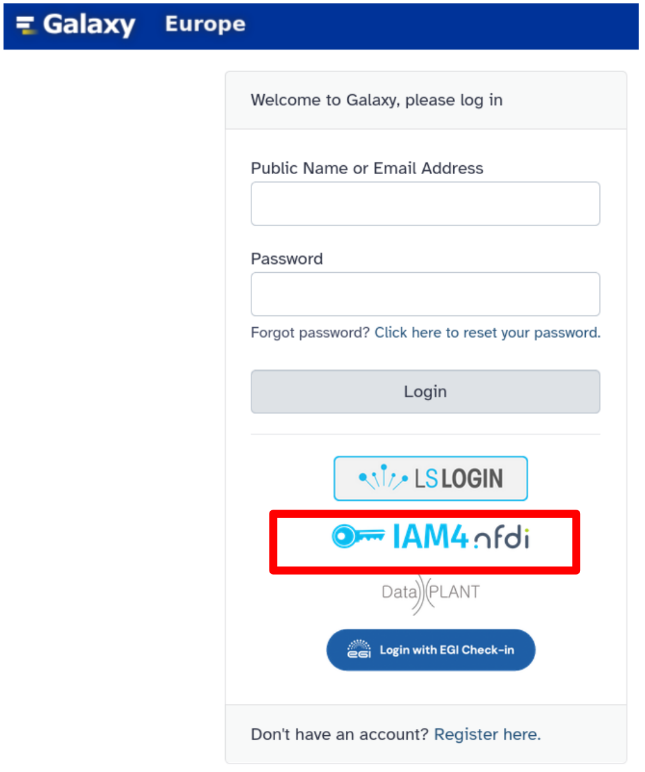
Alternatively, you can access Galaxy using a single sign-on of your choice, for example, from IAM4NFDI on Galaxy Europe. The interface could look like this:
Log in to Galaxy
Hands On: Log in to Galaxy
- Open your favourite browser (Chrome, Safari, Edge or Firefox as your browser, not Internet Explorer!)
- Browse to your Galaxy instance, for example Galaxy Europe
- Log in with your credentials
Comment: Different Galaxy serversThis is an image of Galaxy Europe, located at usegalaxy.eu
The particular Galaxy server you are using may look slightly different and have a different web address.
You can also find more possible Galaxy servers at the top of this tutorial in Available on these Galaxies
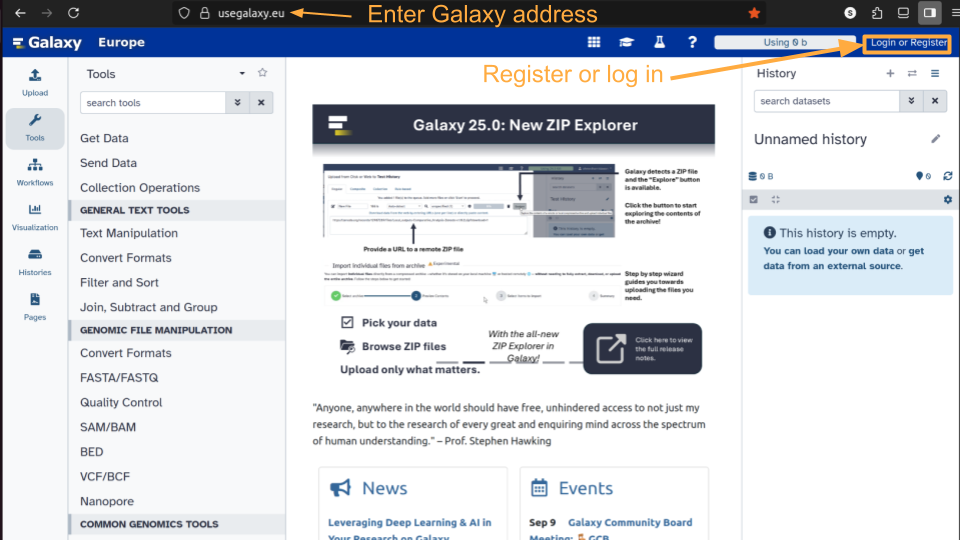
The Galaxy homepage is divided into four sections (panels):
- The Activity Bar on the left: This is where you will navigate to the resources in Galaxy (Tools tool, Workflows galaxy-workflows-activity, Histories galaxy-history-storage-choice, etc.)
- Currently active “Activity Panel” on the left: By default, the tool Tools activity will be active and its panel will be expanded
- Viewing panel in the middle: The main area for context for your analysis
- History of analysis and files on the right: Shows your “current” history; i.e.: Where any new files for your analysis will be stored
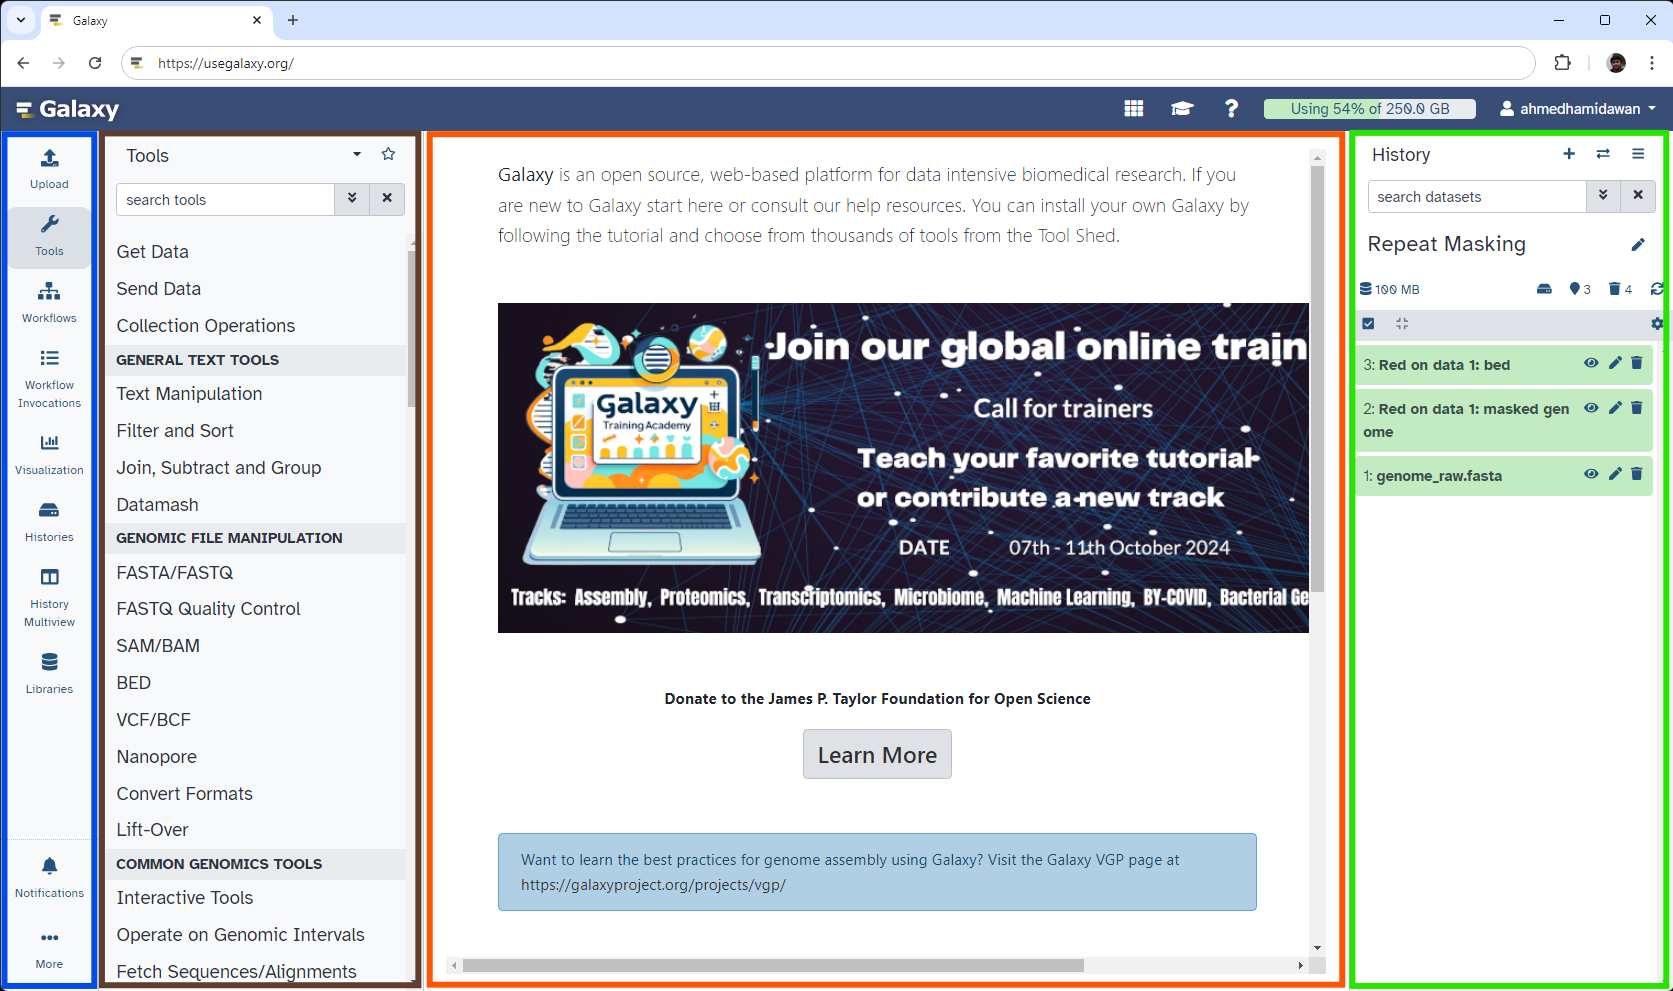
The first time you use Galaxy, your history panel is empty.
Name your current history
Your “History” is on the panel on the right. It is a record of the actions you have taken.
Hands On: Name history
- Go to the History panel (on the right)
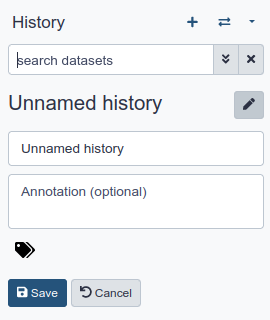
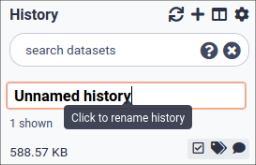
Click galaxy-pencil (Edit) next to the history name (which by default is “Unnamed history”)
CommentIn some previous versions of Galaxy, you will need to click the history name to rename it as shown here:
- Type in a new name, for example, “Testing GROBID”
- Click Save
Comment: Renaming not an option?If renaming does not work, you may not be logged in, so try logging in to Galaxy first. Anonymous users can have only one history and cannot rename it.
Upload a file to Galaxy
There are many ways to get data into Galaxy. The “Activity Bar” is located on the leftmost part of the interface. It shows you various options.
For this tutorial, we suggest you use a scientific article of your choice. Make sure that the article provider allows text mining before you take the next steps.
Hands On: Upload a file
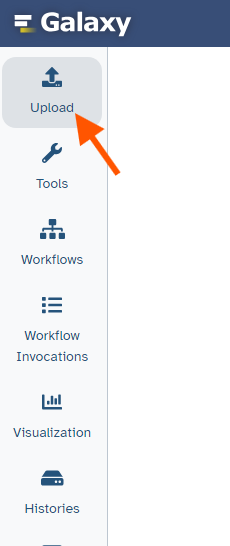
At the top of the Activity Bar, click the galaxy-upload Upload activity
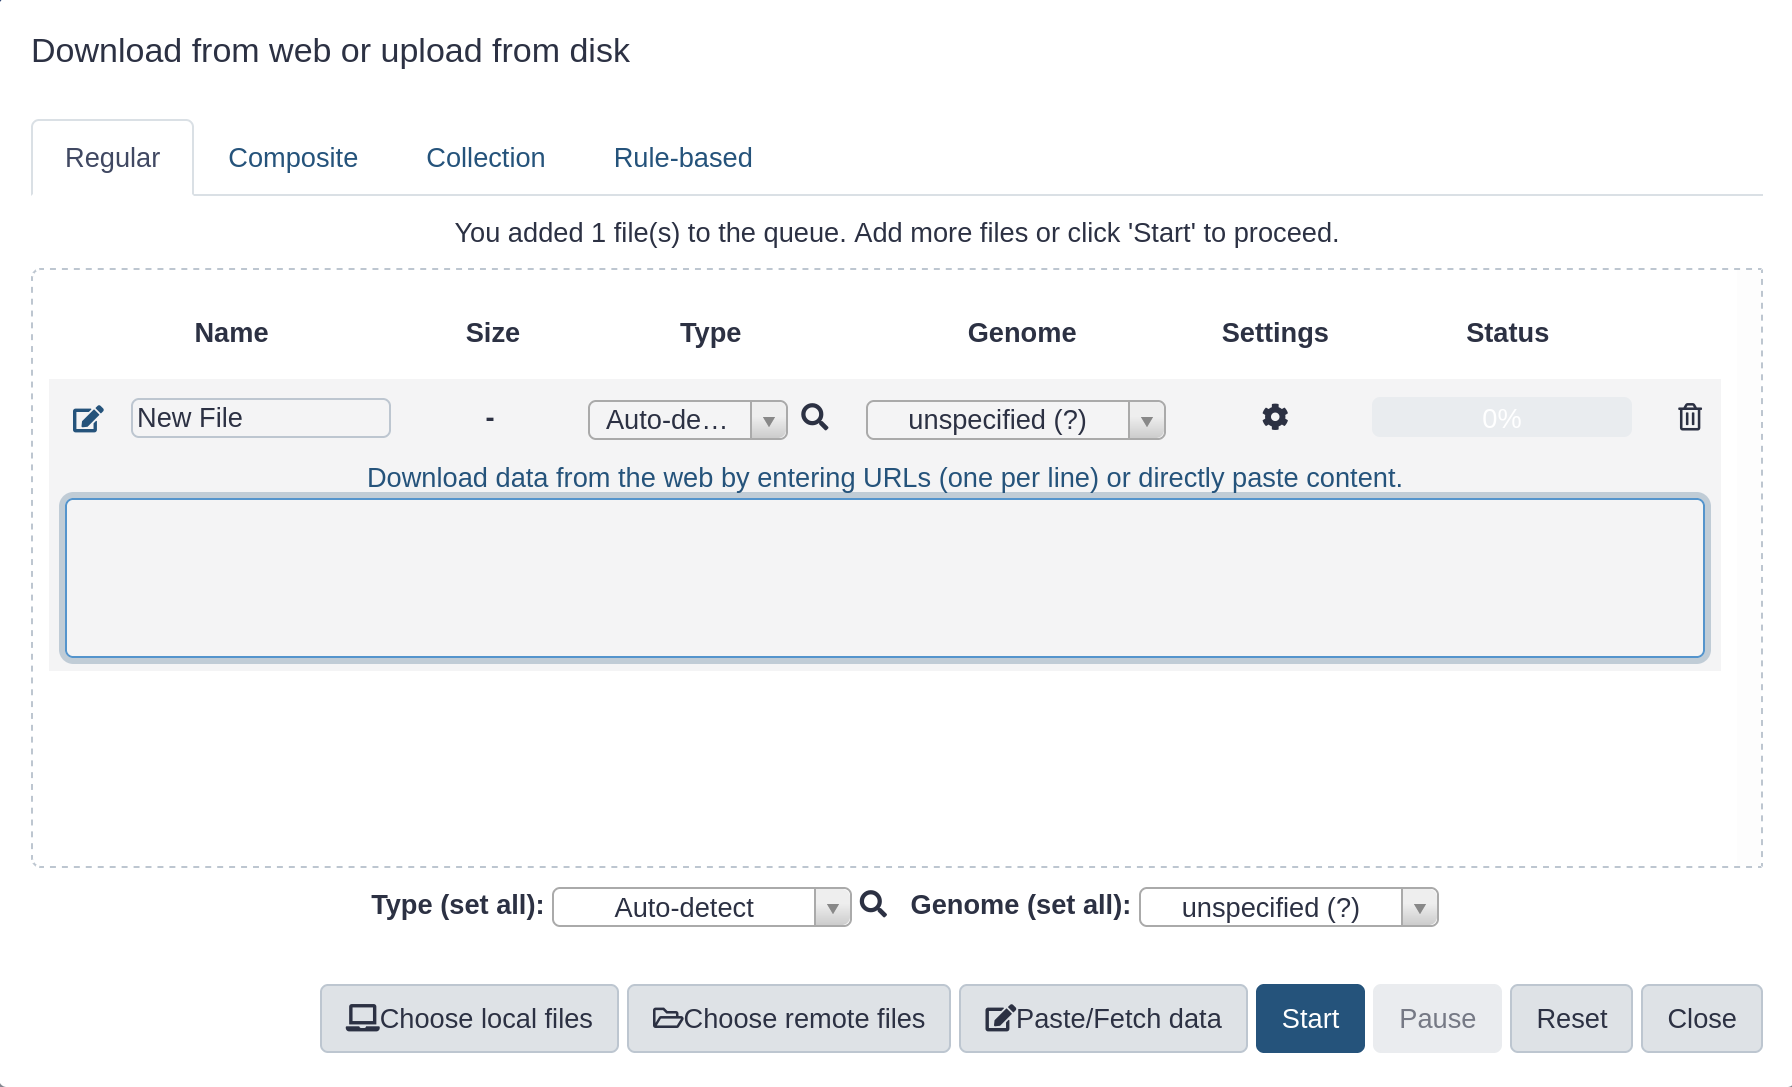
This brings up a box:
- Click Paste/Fetch data
- Paste in the address of the files you want to upload here.
- Click Start
- Click Close
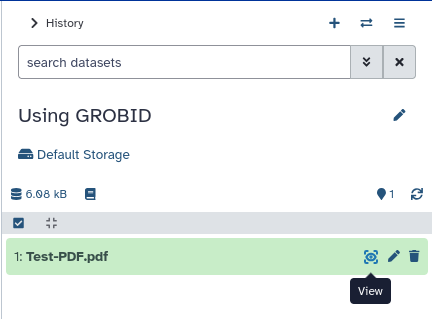
Your uploaded file is now in your current history. When the file has been uploaded to Galaxy, it will turn green.
CommentAfter this, you will see your first history item (called a “dataset”) in Galaxy’s right panel. It will go through the grey (preparing/queued) and yellow (running) states to become green (success).
The contents of the file will be displayed in the central Galaxy panel. If the dataset is large, you will see a warning message which explains that only the first megabyte is shown.
Hands On: View the text files content
Click the galaxy-eye (eye) icon next to the dataset name to look at the file content.
Check the datatype - is it PDF? Then you are all set. Otherwise, adapt the datatype.
- Click on the galaxy-pencil pencil icon for the dataset to edit its attributes
- In the central panel, click galaxy-chart-select-data Datatypes tab on the top
- In the galaxy-chart-select-data Assign Datatype, select
datatypesfrom “New Type” dropdown
- Tip: you can start typing the datatype into the field to filter the dropdown menu
- Click the Save button
If you want to work with multiple articles at once, we suggest uploading them all at once and creating a collection from them.
When does it make sense for you to create a collection?
Datasets versus collections
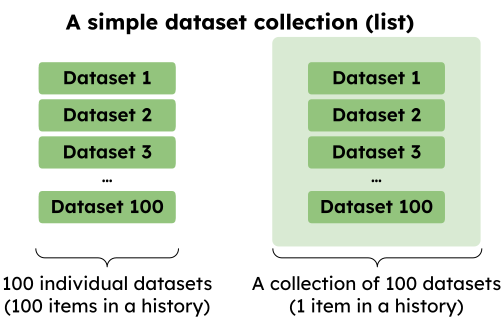
In Galaxy’s history datasets can be present as individual entries or they can be combined into Collections. Why do we need collections? Collections combine multiple individual datasets into a single entity which is easy to manage. Galaxy tools can use collections directly as inputs. Collection can be simple or nested.
Simple collections
Imagine that you’ve uploaded a hundred FASTQ files corresponding to a hundred samples. These will appear as a hundred individual datasets in your history making it very long. But the chances are that when you analyze these data you will do the same thing on each dataset.
To simplify this process you can combine all hundred datasets into a single entity called a dataset collection (or simply a collection or a list). It will appear as a single box in your history making it much easier to understand. Galaxy tools are designed to take collections as inputs. So, for example, if you want to map each of these datasets against a reference genome using, say, Minimap2 , you will need to provide
minmap2with just one input, the collection, and it will automatically start 100 jobs behind the scenes and will combine all outputs into a single collection containing BAM files.
There is a number of situations when simple collections are not sufficient to reflect the complexity of the data. To deal with this situation Galaxy allows for nested collections.
Nested collections
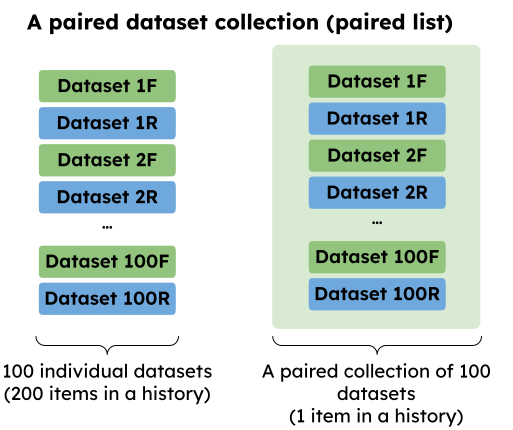
Probably the most common example of this is paired end data when each sample is represented by two files: one containing forward reads and another containing reverse reads. In Galaxy you can create nested collection that reflects the hierarchy of the data. In the case of paired data Galaxy supports paired collections.
How can you create collections from single datasets?
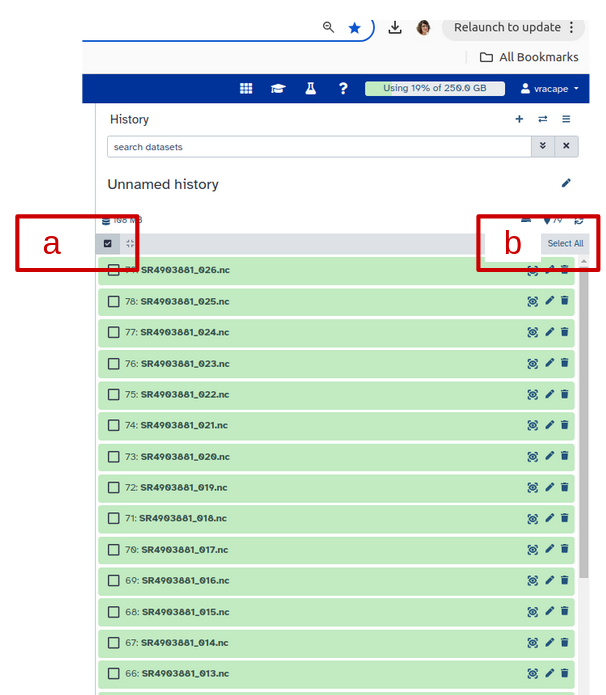
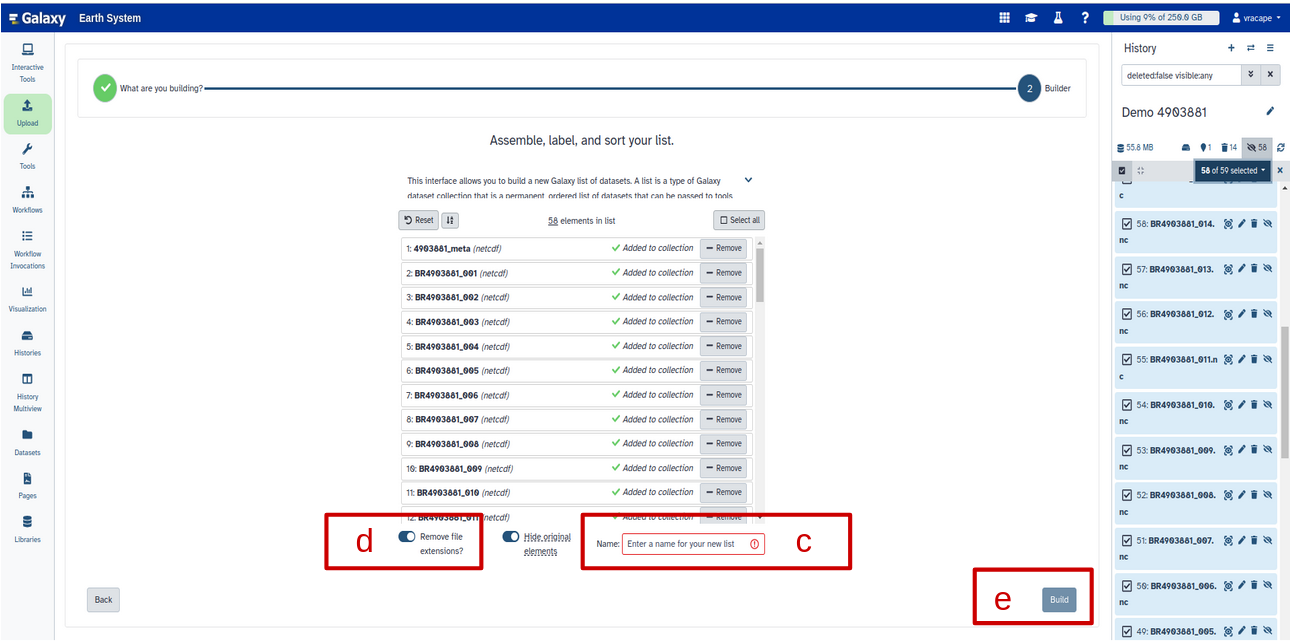
- Click on galaxy-selector Select Items at the top of the history panel (letter a)
- Check all the datasets in your history you would like to include (letter b)
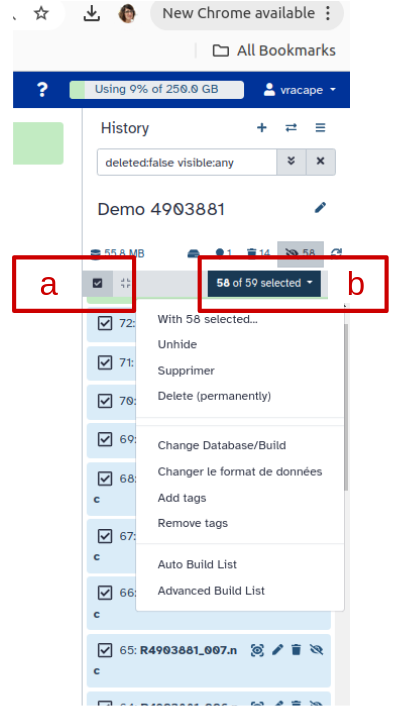
Click n of N selected (see letter b below) and choose Auto build List
- Enter a name for your collection (letter c)
Turn off Remove file extension (letter d)
- Click Build to build your collection (letter e)
- Click on the checkmark icon at the top of your history again (first letter a)
Once the collection is created, all files turn green. You can limit visible files using the eye icons in the history panel.
Your articles are now on Galaxy, great! The next steps now depend on your article: was it born-digital? Then you can jump ahead to using GROBID.
Is it a scanned text? In that case, your text will not be machine-readable or searchable. In this case, you need to first perform optical character recognition (OCR) to properly use GROBID with your article. This is possible in Galaxy in various ways; you could, for example, use Tesseract ( Galaxy version 5.5.2+galaxy4) on Galaxy and make your PDF machine-readable.
Once your article is ready, we can run GROBID on it.
Run GROBID on Galaxy
Navigate to the activity bar on the left-hand side and click on tool tools. Enter GROBID in the search bar. Click on the search result GROBID extract ( Galaxy version 0.9.0+galaxy0) (or this link) to see the tool.
Now, you can select how to process your PDF or PDFs.
Hands On: Processing files with GROBID
Click on the dropdown menu to select Scientific article PDF to TEI
Scientific article PDF: Select the article or articles you want to process. You can select single datasets, multiple datasets and a Dataset collection. You can use the dropdown menu or drag and drop them from your history on the right-hand side.
Optionally, you can click on Advanced options to further specify your output.
Once you are done, click on the workflow-run Run Tool button at the top or bottom of the tool to run it.
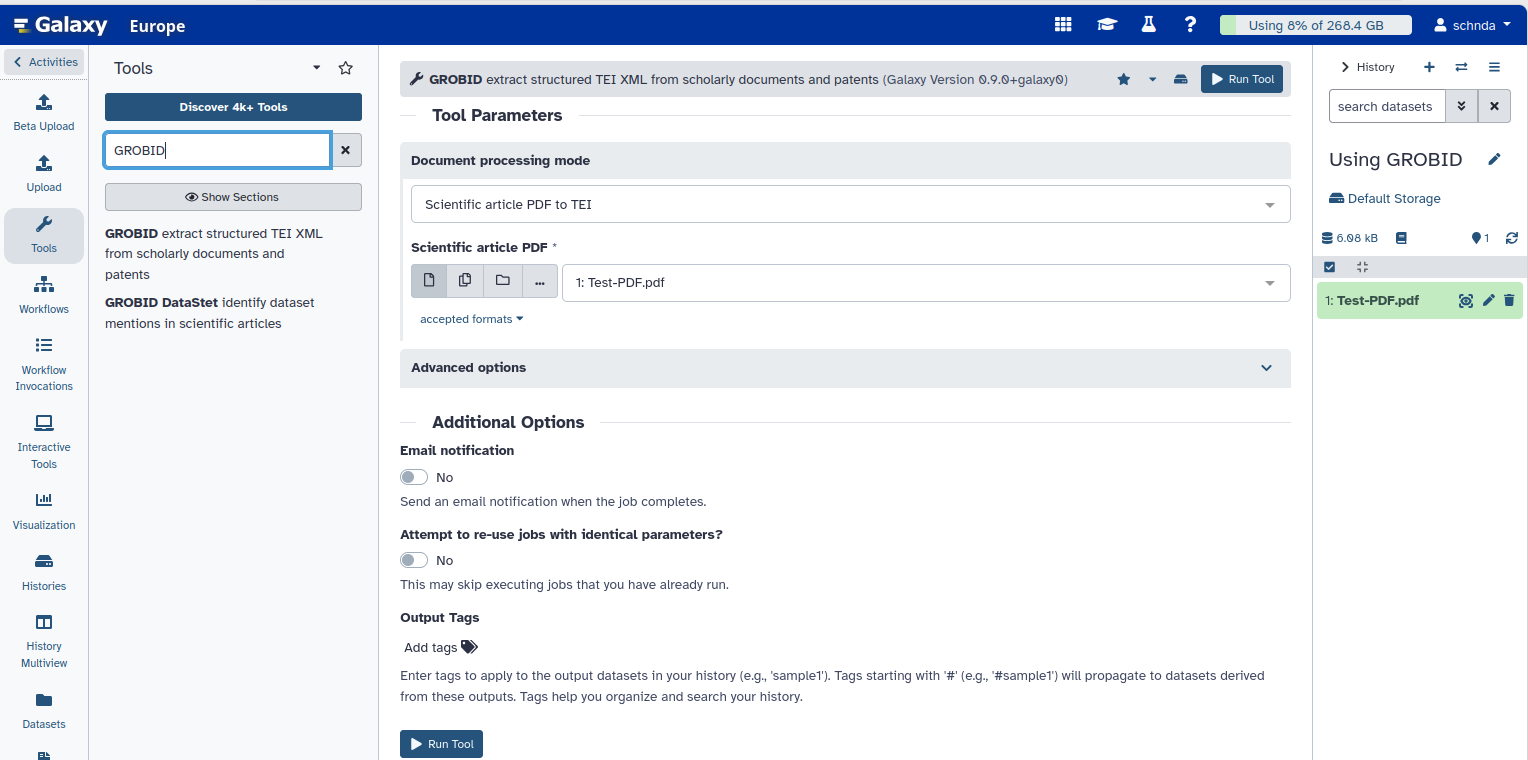
The job is now running. It will create a new dataset in your history, on top of your upload. The dataset will go through the grey (preparing/queued) and yellow (running) states to become green (success).
Once it is green, you can click on the galaxy-eye (eye) icon next to the dataset name to look at the file content. In this example, we chose to convert the article to TEI.
Comment: What is TEI?TEI, or the Text Encoding Initiative is an international project to develop guidelines for “machine-actionable cultural heritage texts.” For more details and guidelines, visit the TEI website.
The output of your file is an annotated TEI file.
Should you notice that you made a mistake or selected the wrong input file or output format, do not worry. It is easy to re-run jobs in Galaxy:
- Expand one of the output datasets of the tool (by clicking on it)
- Click re-run galaxy-refresh the tool
This is useful if you want to run the tool again but with slightly different paramters, or if you just want to check which parameter setting you used.
This allows you to see exactly which parameters you used when you ran the job before and adapt them if needed. Make your changes, then click Run Tool. This creates a new dataset with updated parameters.
In the next step, we want to extract the datasets mentioned in the scientific articles. We will use GROBID DataStet to achieve this: Navigate to the activity bar on the left-hand side once more and click on tool tools. Enter GROBID in the search bar. Click on the search result GROBID DataStet ( Galaxy version 0.8.1+galaxy0) (or this link).
Hands On: Using GROBID DataStet
Scientific article PDF or TEI XML: Select the TEI output you created earlier. If you have not renamed it, it will be called GROBID on dataset or something similar.
Output format: Select Enriched TEI XML in the dropdown menu.
Click on the workflow-run Run Tool button at the top or bottom of the tool to run it.
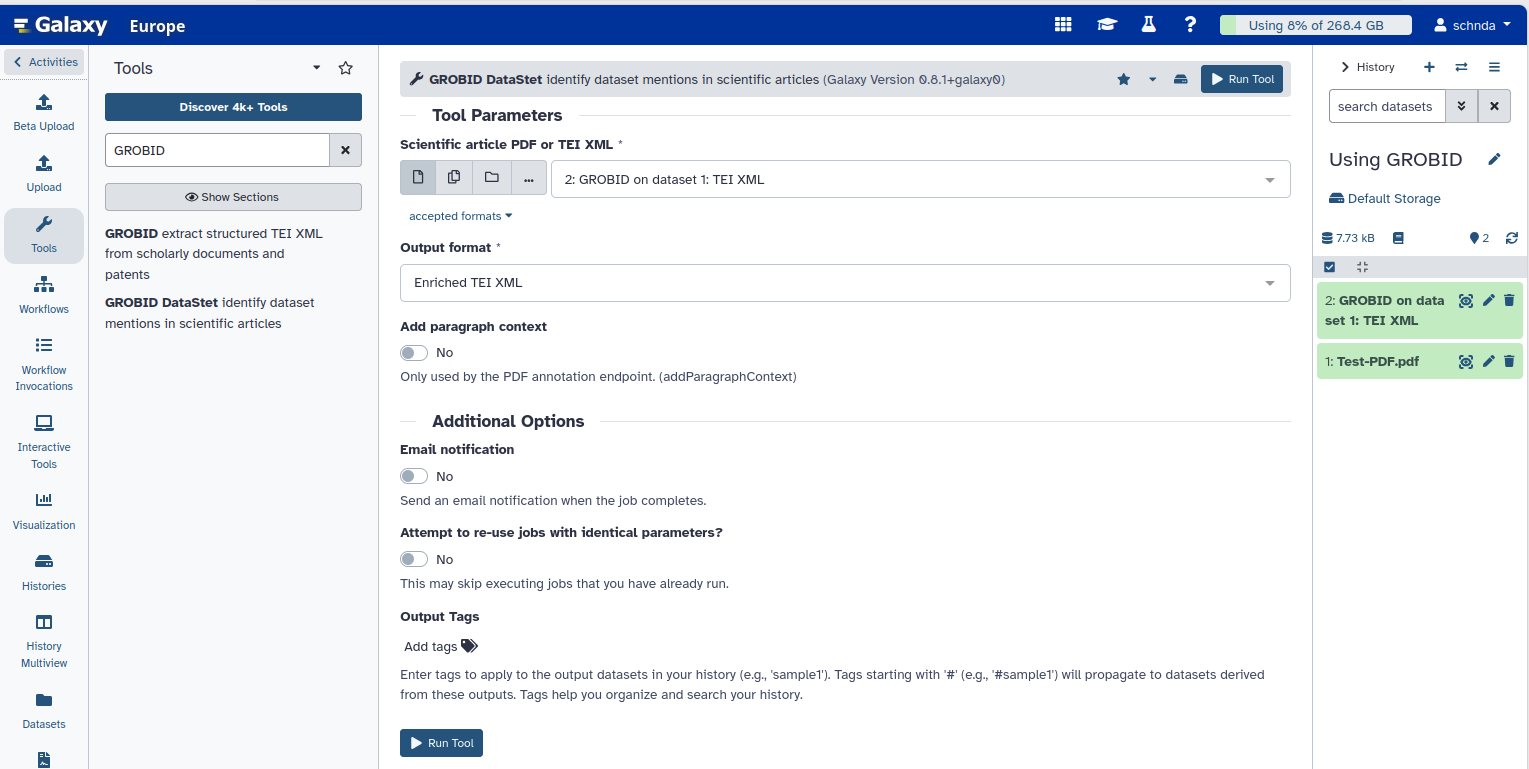
Beware: If you want a JSON output, you need to run it on the whole PDF. In this case, selecting both TEI and JSON will result in an error. For more information, see the tool help.
There is documentation available on the tool form itself which mentions the following information:
- Parameters
- Expected format for input dataset(s)
- Links to publications and ToolShed source repositories
- Tool and wrapper version(s)
- 3rd party author web sites and documentation
Scroll down on the tool form to locate:
- Information about expected inputs/outputs
- Expanded definitions
- Sample data
- Example use cases
- Graphics
The job starts running. Once it turns green, it is ready for you to inspect. Click on the galaxy-eye (eye) icon next to the dataset name to look at the new file’s content. The result is an enriched TEI XML file. Depending on your needs, you may already be finished or want to use additional tools to achieve your goals. You could now extract specific lines from this (and all the other created TEI files) by using Select lines that match an expression or use different tools to achieve your goal.
Give it a try and see how Grobid can help you mine your articles!
You've Finished the Tutorial
Key points
You can use GROBID from within Galaxy to mine text.
Frequently Asked Questions
Have questions about this tutorial? Have a look at the available FAQ pages and support channelsFeedback
Did you use this material as an instructor? Feel free to give us feedback on how it went.
Did you use this material as a learner or student? Click the form below to leave feedback.
Citing this Tutorial
- Daniela Schneider, Text-Mining articles with GROBID (Galaxy Training Materials). https://training.galaxyproject.org/training-material/topics/digital-humanities/tutorials/grobid/tutorial.html Online; accessed TODAY
- Hiltemann, Saskia, Rasche, Helena et al., 2023 Galaxy Training: A Powerful Framework for Teaching! PLOS Computational Biology 10.1371/journal.pcbi.1010752
- Batut et al., 2018 Community-Driven Data Analysis Training for Biology Cell Systems 10.1016/j.cels.2018.05.012
@misc{digital-humanities-grobid,
author = "Daniela Schneider",
	title = "Text-Mining articles with GROBID (Galaxy Training Materials)",
	year = "",
	month = "",
	day = "",
	url = "\url{https://training.galaxyproject.org/training-material/topics/digital-humanities/tutorials/grobid/tutorial.html}",
	note = "[Online; accessed TODAY]"
}
@article{Hiltemann_2023,
	doi = {10.1371/journal.pcbi.1010752},
	url = {https://doi.org/10.1371%2Fjournal.pcbi.1010752},
	year = 2023,
	month = {jan},
	publisher = {Public Library of Science ({PLoS})},
	volume = {19},
	number = {1},
	pages = {e1010752},
	author = {Saskia Hiltemann and Helena Rasche and Simon Gladman and Hans-Rudolf Hotz and Delphine Larivi{\`{e}}re and Daniel Blankenberg and Pratik D. Jagtap and Thomas Wollmann and Anthony Bretaudeau and Nadia Gou{\'{e}} and Timothy J. Griffin and Coline Royaux and Yvan Le Bras and Subina Mehta and Anna Syme and Frederik Coppens and Bert Droesbeke and Nicola Soranzo and Wendi Bacon and Fotis Psomopoulos and Crist{\'{o}}bal Gallardo-Alba and John Davis and Melanie Christine Föll and Matthias Fahrner and Maria A. Doyle and Beatriz Serrano-Solano and Anne Claire Fouilloux and Peter van Heusden and Wolfgang Maier and Dave Clements and Florian Heyl and Björn Grüning and B{\'{e}}r{\'{e}}nice Batut and},
	editor = {Francis Ouellette},
	title = {Galaxy Training: A powerful framework for teaching!},
	journal = {PLoS Comput Biol}
}
Funding
These individuals or organisations provided funding support for the development of this resource
Congratulations on successfully completing this tutorial!


You can use Ephemeris's
shed-tools installcommand to install the tools used in this tutorial.shed-tools install [-g GALAXY] [-a API_KEY] -t <(curl https://training.galaxyproject.org/training-material/api/topics/digital-humanities/tutorials/grobid/tutorial.json | jq .admin_install_yaml -r)Alternatively you can copy and paste the following YAML
---
install_tool_dependencies: true
install_repository_dependencies: true
install_resolver_dependencies: true
tools:
- name: grobid_dataset_annotate
  owner: iuc
  revisions: f5a1ccef83e1
  tool_panel_section_label: Text Manipulation
  tool_shed_url: https://toolshed.g2.bx.psu.edu/
- name: grobid_grobid
  owner: iuc
  revisions: 4abc0c381543
  tool_panel_section_label: Text Manipulation
  tool_shed_url: https://toolshed.g2.bx.psu.edu/
- name: tesseract
  owner: iuc
  revisions: f5f86d7506d5
  tool_panel_section_label: Imaging
  tool_shed_url: https://toolshed.g2.bx.psu.edu/