Montreal Forced Aligner
| Author(s) |
  Jessica Wallace
|
| Tester(s) |
 Daniela Schneider
 |
| Reviewers |
   |
OverviewQuestions:
Objectives:
How can you use Montreal Forced Aligner to align an audio and a TextGrid file in Galaxy?
Use the Montreal Forced Aligner to break down speech into its smallest sounds and align them with their corresponding transcription.
Time estimation: 1 hourLevel: Introductory IntroductorySupporting Materials:Published: Jul 22, 2026Last modification: Sep 23, 2026License: Tutorial Content is licensed under Creative Commons Attribution 4.0 International License. The GTN Framework is licensed under MITpurl PURL: https://gxy.io/GTN:T00585version Revision: 4
This tutorial explains how to use the Montreal Forced Aligner (MFA) McAuliffe et al. 2017 on the Galaxy platform.
The aligner breaks down speech into its smallest possible sounds (phones) and aligns the individual sounds to their corresponding orthographic transcription. For example, the word ‘fox’ is broken down into four sounds: F AA K S or /f ɑː k s/ (depending on whether you use ARPAbet or IPA for the transcription). The phonetic transcription of each sound is given a precise time boundary to match it to the corresponding sound in the audio file. Each sound can then be analyzed individually without the need for lengthy manual segmentation. For example, researchers can then measure and compare each pronunciation of a certain sound in very little time.
To achieve this, MFA has acoustic models and pronunciation dictionaries for numerous languages, which can be selected in Galaxy.
The tool requires an audio or video file and an orthographic transcription as a TextGrid file. Audio can be transcribed using e.g. Elan Wittenburg et al. 2006 or Praat Boersma 2001. Speech should be segmented into breath groups (the speech in between two breaths) and the transcript exported as a TextGrid. The audio file and TextGrid should then be compressed into one .zip file to be uploaded into Galaxy.
AgendaIn this tutorial, we will cover:
Preprocessing
Audio or video files must first be segmented and transcribed using e.g. Elan Wittenburg et al. 2006 or Praat Boersma 2001 and the transcript exported as a TextGrid (alternatively as a .lab/.txt file but these must be pasted in as a single line). The TextGrid should contain a single tier with short intervals (a breath group). Each interval should correspond to an utterance in the audio file. The tier name can be a speaker ID (though this is not necessary).
Required data formats
The filenames of the audio/video file and the transcript must be identical except for the extension (e.g. .wav or .TextGrid). It is helpful to have the speaker ID prefix to the filename (e.g. JW_interview.wav, JW_interview.TextGrid), then you can instruct the aligner to use the corresponding number of characters (2 in the previous example) as the speaker information. This speaker ID will be retained in the output, allowing you to later identify and analyze speech patterns by speaker.
These should then be compressed into one .zip file to be uploaded into Galaxy.
Data Validation Checklist
Before uploading, verify your files meet these requirements:
- param-check Audio file and TextGrid have identical base filenames (e.g.,
JW_interview.wavandJW_interview.TextGrid) - param-check Audio format is WAV or MP3 (WAV is best for quality)
- param-check TextGrid contains a single tier with short intervals, each representing one breath group
- param-check Transcription text matches the actual spoken content (typos will cause alignment errors)
- param-check Speaker ID prefix is consistent, if present (e.g. all files start with 2-3 character speaker code)
- param-check Files are compressed into a single .zip archive
The following example file matches the above criteria and will be used in the next steps.
Uploading the data
Hands On: Data Upload
- Create a new history for this tutorial
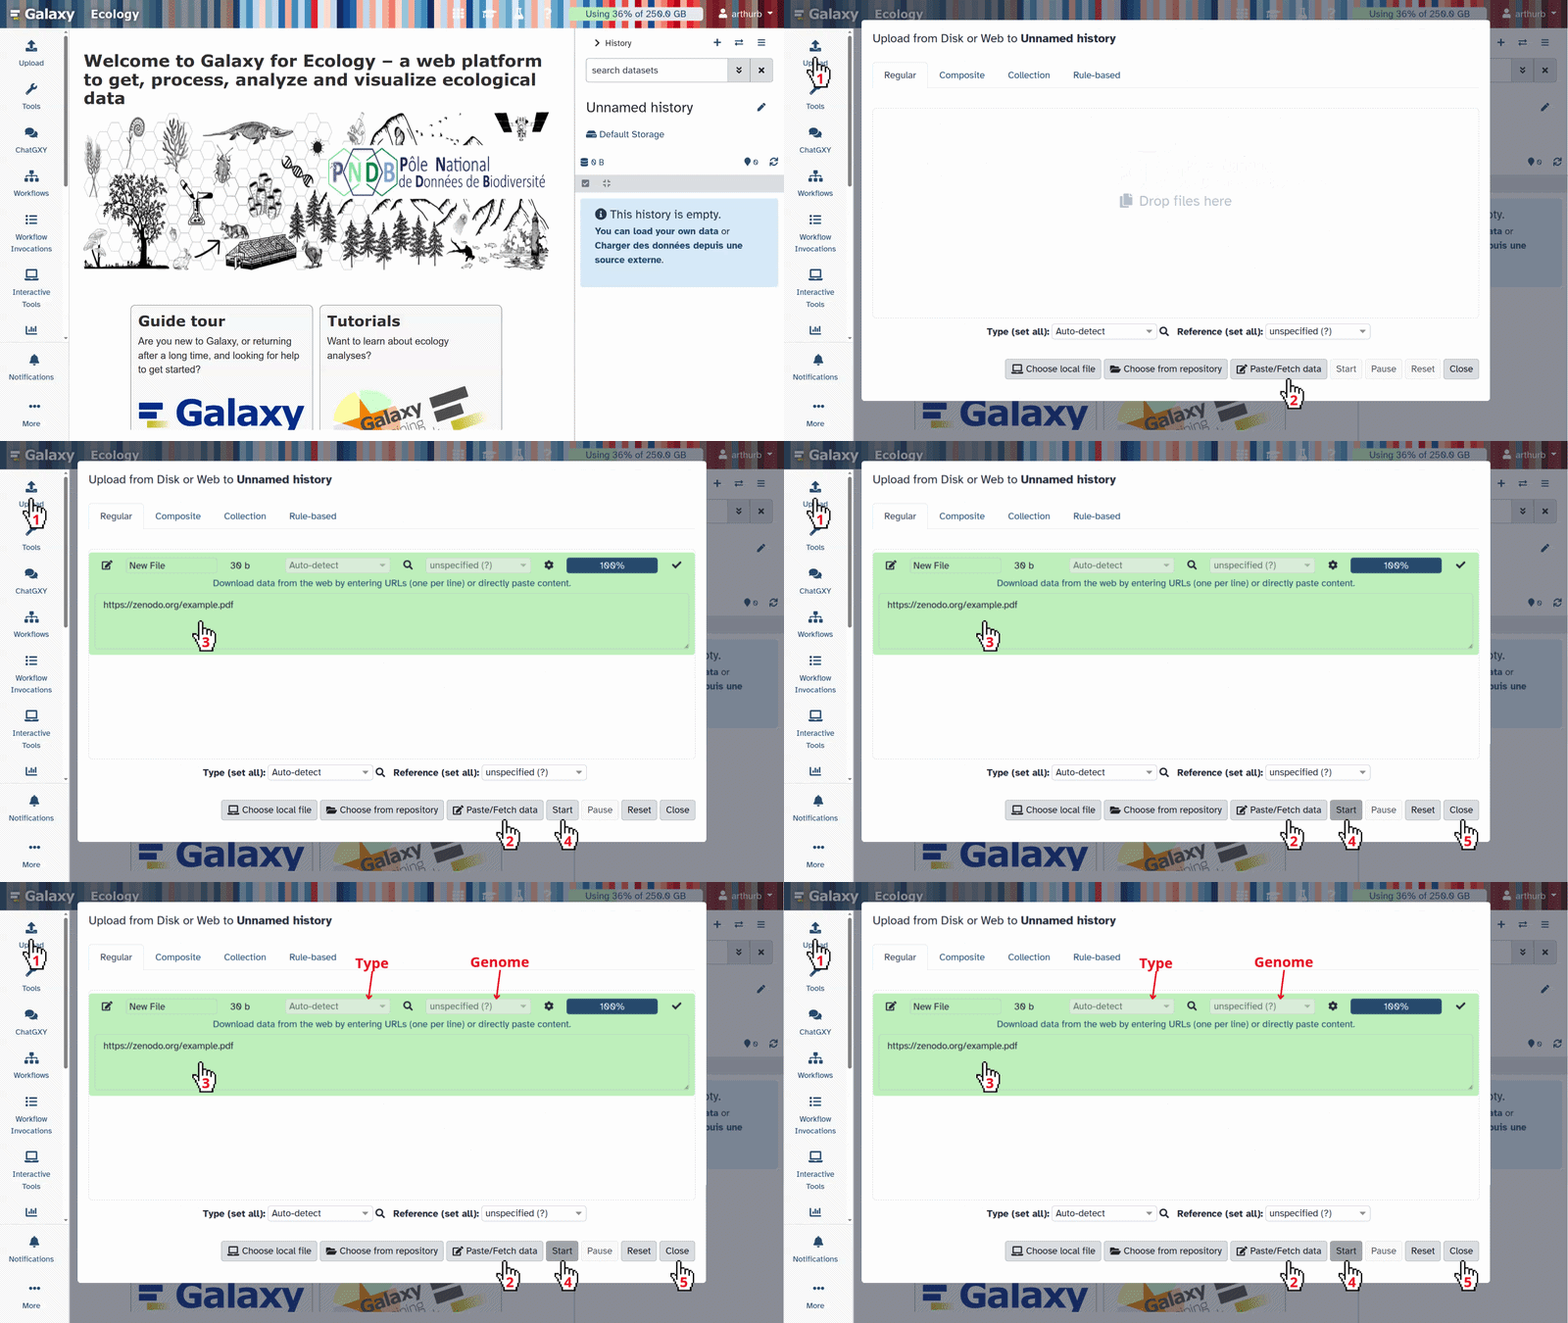
Import your files or if you want to follow the tutorial use the files from Zenodo or from the shared data library (
GTN - Material->digital-humanities->Montreal Forced Aligner):https://zenodo.org/records/21371207/files/the_fox_and_the_grapes.zip
- Copy the link location
Click galaxy-upload Upload at the top of the activity panel
- Select galaxy-wf-edit Paste/Fetch Data
Paste the link(s) into the text field
Press Start
- Close the window
As an alternative to uploading the data from a URL or your computer, the files may also have been made available from a shared data library:
- Go into Libraries (left panel)
- Navigate to the correct folder as indicated by your instructor.
- On most Galaxies tutorial data will be provided in a folder named GTN - Material –> Topic Name -> Tutorial Name.
- Select the desired files
- Click on Add to History galaxy-dropdown near the top and select as Datasets from the dropdown menu
In the pop-up window, choose
- “Select history”: the history you want to import the data to (or create a new one)
- Click on Import
- Rename the datasets to a more meaningful name (optional):
- Click on the dataset produced by MFA Find OOVs
- Click the galaxy-pencil (edit) icon
- Choose a meaningful name, for example,
the_fox_and_the_grapes.zipChange the datatype of the dataset to mfa_corpus_model.zip
- Click on the galaxy-pencil pencil icon for the dataset to edit its attributes
- In the central panel, click galaxy-chart-select-data Datatypes tab on the top
- In the galaxy-chart-select-data Assign Datatype, select
datatypesfrom “New Type” dropdown
- Tip: you can start typing the datatype into the field to filter the dropdown menu
- Click the Save button
Align the files
Before we align the files, we need to first check whether all of the words are in our dictionary. MFA offers the Find OOVs (out of vocabulary words) tool to do this.
Find OOVs
Hands On: Find out-of-vocabulary words
- MFA Find OOVs with the following parameters:
- param-file “Corpus Archive”:
the_fox_and_the_grapes.zip(Uploaded dataset)- “Dictionary Source”:
Use a built-in MFA Dictionary
- “Select Dictionary”:
English Us (ARPA)- “Speaker Characters”:
0- Rename the output file for clarity:
- Click on the dataset you uploaded
- Click the galaxy-pencil (edit) icon
- Change the name to
OOVs_english_usor similar- This will help you identify this as the out-of-vocabulary words file
Expected output: A .zip file containing a text file (
oovs_found_english_us_arpa.txt) listing all words from your transcription that are not in the English US ARPA dictionary. If no OOVs are found, the file will be empty (if that is the case, you can skip the next three steps and go straight to MFA Align).
In order to generate the pronunciations of the OOVs, we need the single file oovs_found_english_us_arpa.txt. We therefore need to unzip the output of Find OOVs so we can work with the file. The missing pronunciations can be generated automatically in the next step (MFA G2P) or manually using the editor.
Hands On: Unzipping your file
- Unzip a file ( Galaxy version 6.0+galaxy5) with the following parameters:
- param-file “Input file”:
OOVs_english_us(output of MFA Find OOVs tool)- “What to extract”:
Single file
- “File path”:
oovs_found_english_us_arpa.txt- Rename the output file for clarity:
- Click on the dataset produced by MFA Find OOVs
- Click the galaxy-pencil (edit) icon
- Change the name to
unknown_wordsor similar- This will help you identify this as the out-of-vocabulary words file
Comment: Check the OOVsDouble-check the OOVs found file and make sure that none of the OOVs are typos. To do so, click on the galaxy-eye icon next to the dataset name to look at the file. If you do find a typo, you must correct this in the transcription, then upload the .TextGrid again and rerun the previous steps.
Generate pronunciations
Now we can generate pronunciations for each of the out of vocabulary words using MFA’s built in grapheme-to-phoneme (G2P) tool. Select the same model you used for finding OOVs.
Hands On: Generate pronunciations with G2P
- MFA G2P with the following parameters:
- “Input Mode”:
Word List (Text File)
- param-file “Word List”:
unknown_words(output of Unzip tool)- “G2P Model Source”:
Use a built-in MFA Model
- “Select G2P Model”:
English Us (ARPA)Comment: Check the pronunciations manuallyIt is important to check the pronunciations manually. MFA can also offer multiple possible pronunciations for each word. Correct any incorrect pronunciations and delete any additional pronunciations that do not apply. To do so, you can use the editor which can be found in Visualization on the side bar. There you can select the generated dictionary and correct the pronunciation.
This tutorial uses ARPAbet phonetic notation for US English (e.g., AE, IH, K). Other models use IPA, which is the international standard for most other languages and varieties.
- Rename the output file for clarity:
- Click on the
output_dictionarydataset produced by MFA G2P- Click the galaxy-pencil (edit) icon
- Change the name to
generated_pronunciations_oovsorgenerated_dictionary- This clearly identifies this as the file containing generated pronunciations for OOV words
Expected output: A dictionary file in MFA format (one entry per line: word followed by phonetic transcription). File size depends on the number of OOVs.
Update dictionary
Now we will add the new words to the built-in dictionary so that they are recognized when we run the aligner.
Hands On: Add new words to your dictionary
- MFA Merge with the following parameters:
- “Dictionary Source”:
Use a built-in MFA Dictionary
- “Select Dictionary”:
English Us (ARPA)- In “Dictionary to add”:
- param-repeat “Insert Dictionary to add”
- param-file “MFA dictionary”:
generated_pronunciations_oovs(output of MFA G2P tool)Comment: If corrections were uploadedIf you uploaded a file with corrected pronunciations, you will have to select the uploaded file with the corrected dictionary entries as your dictionary to add.
- Rename the output file for clarity:
- Click on the
outputdataset produced by MFA Merge- Click the galaxy-pencil (edit) icon
- Change the name to
updated_dictionary_english_usormerged_dictionary- This clearly identifies this as the merged dictionary containing both built-in entries and newly generated pronunciations
Expected output: A merged dictionary file (single file, not a .zip) containing all entries from the built-in English US ARPA dictionary plus your newly generated pronunciations for OOV words. This is the complete dictionary your audio will be aligned against.
Align pronunciations with audio
Now we’re ready to align the pronunciations with the audio. Since we only have one speaker and no speaker ID, we leave the number of speaker characters at 0. If you have a speaker ID at the start of your file name, then select the number of characters corresponding to the speaker ID.
Hands On: Align Audio and Pronounciation
- MFA Align with the following parameters:
- param-file “Corpus Archive”:
the_fox_and_the_grapes.zip(Input dataset)- “Dictionary Source”:
Upload from History
- param-file “Dictionary File”:
updated_dictionary_english_us(output of MFA Merge tool)- “Acoustic Model Source”:
Use a built-in MFA Model
- “Select Acoustic Model”:
English Us (ARPA)Comment: Check the output in PraatAlways validate the alignment output:
- Download the .TextGrid file from the output archive (see steps below)
- Open the original audio file + aligned TextGrid together in Praat
- Check: Do the boundaries align with the actual speech transitions?
- Listen for obvious misalignments: does silence have phoneme labels? Are vowels properly segmented?
- Minor misalignment is normal, but if you have more serious or widespread errors, check your transcription or OOVs
Praat playback tip: Right-click on a TextGrid interval and select “Play” to hear just that phoneme segment.
- Rename the output file for clarity:
- Click on the output archive produced by MFA Align
- Click the galaxy-pencil (edit) icon
- Change the name to
aligned_textgridsormfa_output_aligned- This clearly identifies this as the final aligned output containing the TextGrid files with time boundaries for each phoneme
Expected output: A .zip archive containing TextGrid files (one per input file) with three tiers: words, phones (individual sounds), and word confidence scores. Total runtime depends on audio length.
Downloading and Exporting Results
Hands On: Extract and download your aligned files
- Download the aligned archive:
- Click the download icon (download) next to the
aligned_textgridsdataset- Save the .zip file to your computer
Extract the files on your computer
- Open in Praat for analysis:
- In Praat, open the original audio file (File → Open → Read from file…)
- Then open the corresponding TextGrid (Objects window → Read → Read from file…)
- Select both and click “View & Edit” to visualize the alignment
Next Steps and Use Cases
Once you have aligned TextGrids, you can:
- Measure vowel formants: Extract and analyze vowel characteristics from aligned vowel intervals. To do so, you can use new-fave.
- Compare pronunciations: Analyze variation across speakers or time
- Assess speech rate: Measure duration of phonemes or words to study articulation speed
- Study consonant voicing: Use the precise time boundaries to measure voice onset time (VOT)
Conclusion
In this tutorial, we uploaded a sample audio file and transcription. We checked for any out-of-vocabulary words (OOVs) missing from our dictionary and generated the pronunciations using G2P. After checking and, if necessary, correcting these pronunciations, we merged the generated pronunciations with the built-in dictionary and ran the aligner on our files, producing aligned TextGrid files with precise phoneme-level time boundaries.
You now have a fully aligned and labeled corpus ready for phonetic analysis.
You've Finished the Tutorial
Frequently Asked Questions
Have questions about this tutorial? Have a look at the available FAQ pages and support channelsReferences
- Boersma, P., 2001 Praat, a system for doing phonetics by computer. Glot International 5: 341–345. https://praat.org
- Wittenburg, P., H. Brugman, A. Russel, A. Klassmann, and H. Sloetjes, 2006 ELAN: a Professional Framework for Multimodality Research, in Proceedings of the Fifth International Conference on Language Resources and Evaluation (LREC’06), edited by N. Calzolari, K. Choukri, A. Gangemi, B. Maegaard, J. Mariani, et al. European Language Resources Association (ELRA), Genoa, Italy. https://aclanthology.org/L06-1082/
- McAuliffe, M., M. Socolof, S. Mihuc, M. Wagner, and M. Sonderegger, 2017 Montreal Forced Aligner: Trainable Text-Speech Alignment Using Kaldi, pp. 498–502 in Proc. Interspeech 2017, 10.21437/Interspeech.2017-1386
Feedback
Did you use this material as an instructor? Feel free to give us feedback on how it went.
Did you use this material as a learner or student? Click the form below to leave feedback.
Citing this Tutorial
- Jessica Wallace, Montreal Forced Aligner (Galaxy Training Materials). https://training.galaxyproject.org/training-material/topics/digital-humanities/tutorials/mfa_tutorial/tutorial.html Online; accessed TODAY
- Hiltemann, Saskia, Rasche, Helena et al., 2023 Galaxy Training: A Powerful Framework for Teaching! PLOS Computational Biology 10.1371/journal.pcbi.1010752
- Batut et al., 2018 Community-Driven Data Analysis Training for Biology Cell Systems 10.1016/j.cels.2018.05.012
@misc{digital-humanities-mfa_tutorial,
author = "Jessica Wallace",
	title = "Montreal Forced Aligner (Galaxy Training Materials)",
	year = "",
	month = "",
	day = "",
	url = "\url{https://training.galaxyproject.org/training-material/topics/digital-humanities/tutorials/mfa_tutorial/tutorial.html}",
	note = "[Online; accessed TODAY]"
}
@article{Hiltemann_2023,
	doi = {10.1371/journal.pcbi.1010752},
	url = {https://doi.org/10.1371%2Fjournal.pcbi.1010752},
	year = 2023,
	month = {jan},
	publisher = {Public Library of Science ({PLoS})},
	volume = {19},
	number = {1},
	pages = {e1010752},
	author = {Saskia Hiltemann and Helena Rasche and Simon Gladman and Hans-Rudolf Hotz and Delphine Larivi{\`{e}}re and Daniel Blankenberg and Pratik D. Jagtap and Thomas Wollmann and Anthony Bretaudeau and Nadia Gou{\'{e}} and Timothy J. Griffin and Coline Royaux and Yvan Le Bras and Subina Mehta and Anna Syme and Frederik Coppens and Bert Droesbeke and Nicola Soranzo and Wendi Bacon and Fotis Psomopoulos and Crist{\'{o}}bal Gallardo-Alba and John Davis and Melanie Christine Föll and Matthias Fahrner and Maria A. Doyle and Beatriz Serrano-Solano and Anne Claire Fouilloux and Peter van Heusden and Wolfgang Maier and Dave Clements and Florian Heyl and Björn Grüning and B{\'{e}}r{\'{e}}nice Batut and},
	editor = {Francis Ouellette},
	title = {Galaxy Training: A powerful framework for teaching!},
	journal = {PLoS Comput Biol}
}
Funding
These individuals or organisations provided funding support for the development of this resource
Congratulations on successfully completing this tutorial!
You can use Ephemeris's
shed-tools installcommand to install the tools used in this tutorial.shed-tools install [-g GALAXY] [-a API_KEY] -t <(curl https://training.galaxyproject.org/training-material/api/topics/digital-humanities/tutorials/mfa_tutorial/tutorial.json | jq .admin_install_yaml -r)Alternatively you can copy and paste the following YAML
---
install_tool_dependencies: true
install_repository_dependencies: true
install_resolver_dependencies: true
tools:
- name: unzip
  owner: imgteam
  revisions: 6a7e010c05db
  tool_panel_section_label: Collection Operations
  tool_shed_url: https://toolshed.g2.bx.psu.edu/